
This article provides information and instruction on the following:
- Paladin accounting software integrations
- Paladin General Ledger categories
- Options to itemize/filter revenue data
- General Ledger Summary export option
- How to add accounting software account names/numbers to the General Ledger Summary Report
- General Ledger account export file names are editable
- How to reconcile the Inventory Valuation Summary Report with your General Ledger Summary
- How to print the General Ledger Summary report of total balances
Paladin accounting software integrations
Refer to the following overviews to learn more about how you can automatically transfer the day’s accounting totals into your accounting software.
- Overview: QuickBooks integration
- Overview: Sage 50cloud Accounting Integration
- Overview: Microsoft Dynamics GP Accounting Integration
Paladin General Ledger categories
Note: You can export General Ledger data from Paladin to your accounting software. This export can be done automatically by using a Paladin accounting integration for QuickBooks, Sage 50cloud, or Microsoft Dynamics GP, or you can do it manually.
This section provides information on the following:
General Ledger Mapping Guide

Figure 1: General Ledger Mapping Guide
Paladin General Ledger category descriptions
- To access the Accounting tab to set up integration account mappings, in Paladin, from the main menu, select File > Setup, then click the Accounting tab.
- To access the GL Summary tab, in Paladin, on the top menu, select Maintain > Data Viewer, click the GL Summary tab, specify a data range, then click Get Data.
|
Paladin GL Summary tab category |
Paladin Accounting tab category | Description |
| Cash Sales [DR] |
Cash from Sales [Asset Accounts] |
Total of cash payments. |
| Credit Card Sales [DR] |
Chg Card from Sales [Asset Accounts] |
Total of credit card payments. |
| Account Sales [DR] |
Check from Sales [Account Sales] |
Total of check payments. |
|
External Charge from Sales [Asset Accounts] |
Total of external charge payments, such payments made using Capital One Trade Credit (previously BlueTarp). | |
|
Paid ON/OUT from Sales |
Paid IN/OUT from Sales [CR] [Asset Accounts] Paid IN/OUT Expense [DR] [Expense Accounts] |
Total of cash added and removed from the cash drawer. Examples:
|
| Coupons [DR] |
Coupon Redeemed as Payment [Asset Accounts] |
Total amount of dollars in coupons accepted from customers as payment (partial payment). |
| Gross Revenue [CR] |
Total of all Sales [Revenue Accounts] |
Total NET Revenue (Gross Revenue – Returns) of all revenue sources for the time period selected including Charges. |
| Accounts Receivable [DR] |
Accounts Receivable [Asset Accounts] |
Total amount of dollars charged to customer accounts. |
| Accounts Receivable [CR] |
Accounts Receivable [Asset Accounts] |
Total amount of payments received for customer account charges. |
|
Cost of Good Sold |
COGS from Inventory [DR] [Expense Accounts] Inventory Asset [CR] [Asset Accounts] |
Total amount of dollars for costs of goods sold. |
|
Tax Expense [DR] Tax A/P Liability [CR] |
Tax Expense Account [Expense Accounts] Tax A/P Liability [Liability Accounts] |
Total amount of invoiced sales tax. |
|
ROA Discounts [DR] ROA Discounts [CR] |
ROA Discounts [Expense Accounts] ROA Discounts [Asset Accounts] |
Total amount of dollars in discounts given to customer account balances (such as removing a service charge/late fee). |
|
Inventory [debit] Inventory Purchased [credit] |
Inventory [Asset Accounts] Inventory Purchase Account [Liability Accounts] |
Total amount in dollars of inventory purchased from suppliers. |
|
Shrinkage [DR] Inventory Asset – Shrinkage [CR] |
Inventory Shrinkage [Expense Accounts] Inventory [Asset Accounts] |
Total amount in dollars of inventory lost or found (positive or negative) for the time period selected. Example: The stock on hand (SOH) was 10. You haven’t sold the item, but when counted it again there was only 8. If the item cost $5.00, $10.00, -$10.00 lost in shrinkage due to an unaccounted change in SOH. |
|
Defective [DR] Inventory Asset – Defective [CR] |
Inventory Defective [Expense Accounts] Inventory [Asset Accounts] |
Total amount in dollars of defective inventory items returned to the store by customers for the time period selected. |
|
Cost of Good Sold [DR] Inventory [CR]
|
Coupons Issued [Expense Accounts] Coupons Issued [Asset Accounts] |
Rich Rewards only: Total of coupons issued by the store. |
|
|
Include ACH [Asset Accounts] ACH Account [Asset Accounts] |
Option to mark a check as received from ACH.
If Include ACH is checked, a text box appears for ACH account number to be entered. |
Note: Revenue account values in the General Ledger Summary include any tax that was charged to the customer. To calculate the total revenue without tax, compute this value:
Net revenue without sales tax = Net Revenue(#7) – Total Sales Tax(#11)
Options to itemize/filter revenue data
If you are using Paladin accounting integration, there are three options that can be used to itemize or filter revenue data in a General Ledger Summary report:
These options can be used separately or in conjunction.
Tip: Paladin integrates with QuickBooks, Sage 50cloud, and Dynamics GP to automatically transfers the day’s general ledger activity summary to your accounting software each night.
Recommended: If you have not entered account numbers from your accounting software into Paladin, we recommend you do, especially if you will be importing the data into your general ledger/chart of accounts. Follow the instructions for your accounting program.
-
- QuickBooks: Paladin export to QuickBooks
- Other accounting programs: How to add accounting software account names/numbers to the GL Summary Report
Show by Department option
The General Ledger Summary feature can itemize revenue by department for the date range you specify. To use this feature:
- In Paladin, from the top menu, select Maintain > Data Viewer.
- Select the GL Summary tab.
- Enter a Date Range.
- To itemize revenue by department, check Show by Department.
- Click Get Data to view the General Ledger summary for the date range you specified.
As shown in Figure 2, departments are shown along with the revenue generated by each.
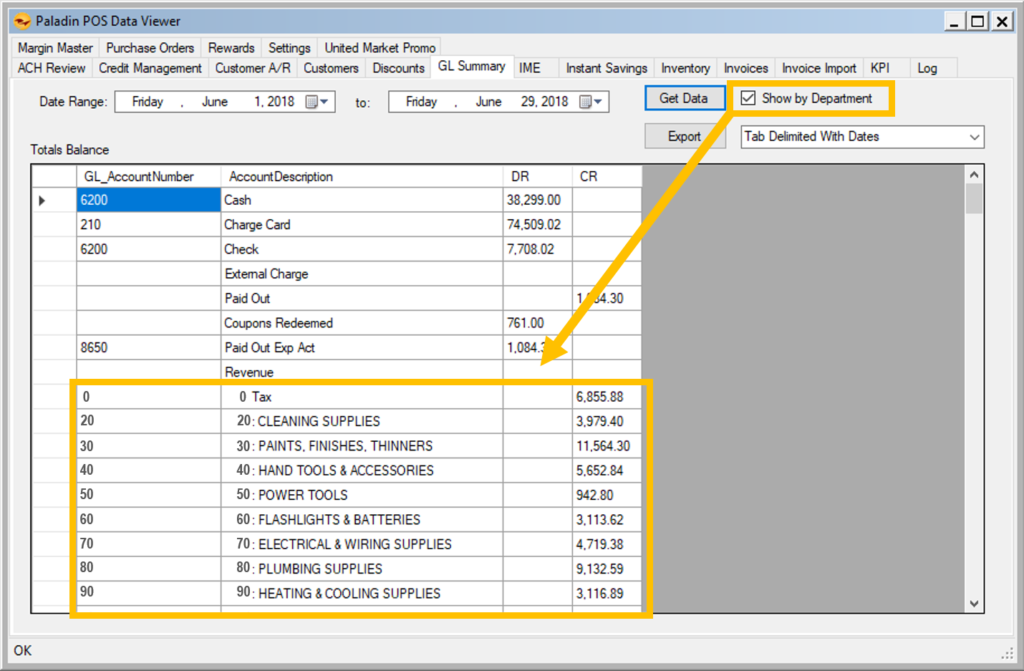
Figure 2: GL Summary/Show by Department
Include $0 Amounts in Export option
The General Ledger Summary feature can include $0 amounts in the file exported. To use this feature:
- In Paladin, from the top menu, select Maintain > Data Viewer.
- Select the GL Summary tab.
- Enter a Date Range.
- Check Include $0 Amounts in Export.
- Click Get Data, then click Export.

Figure 3: GL Summary/Include $0 Amounts in Export
- In the Save As window, enter a file name. By default, the file type is .txt. Leave this as the file type.
- Click Desktop, then click Save.
A report format is given in the .txt file showing the $0 dollar amounts.
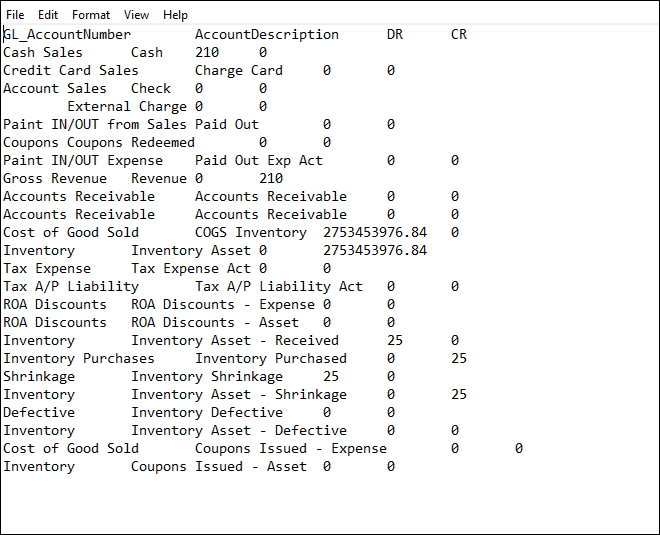
Figure 4: Report format/$0 Dollar Amounts
Include Details option
Paladin automatically transfers the day’s general ledger activity summary to your accounting software each night. But, it does not include a detailed breakdown. To be able to crossreference data, an Include Details option is available in the General Ledger Summary report.
Note: For this option, you must have Excel installed and operating on the terminal used for accounting purposes.
- In Paladin, from the top menu, select Maintain > Data Viewer.
- Select the GL Summary tab.
- Enter a Date Range.
- Check Include Details.
- Click Get Data.
Total balances appear onscreen, and an Excel spreadsheet is generated. To view the spreadsheet, double click the Excel icon on the bottom taskbar of your computer. Each area of the General Ledger Summary report that has a value creates a worksheet tab in the spreadsheet.
For example, as shown in Figure 5, the Inventory Purchased CR value in the General Ledger Summary report is shown onscreen and is detailed in the Inventory Purchased Credit worksheet tab of the spreadsheet.
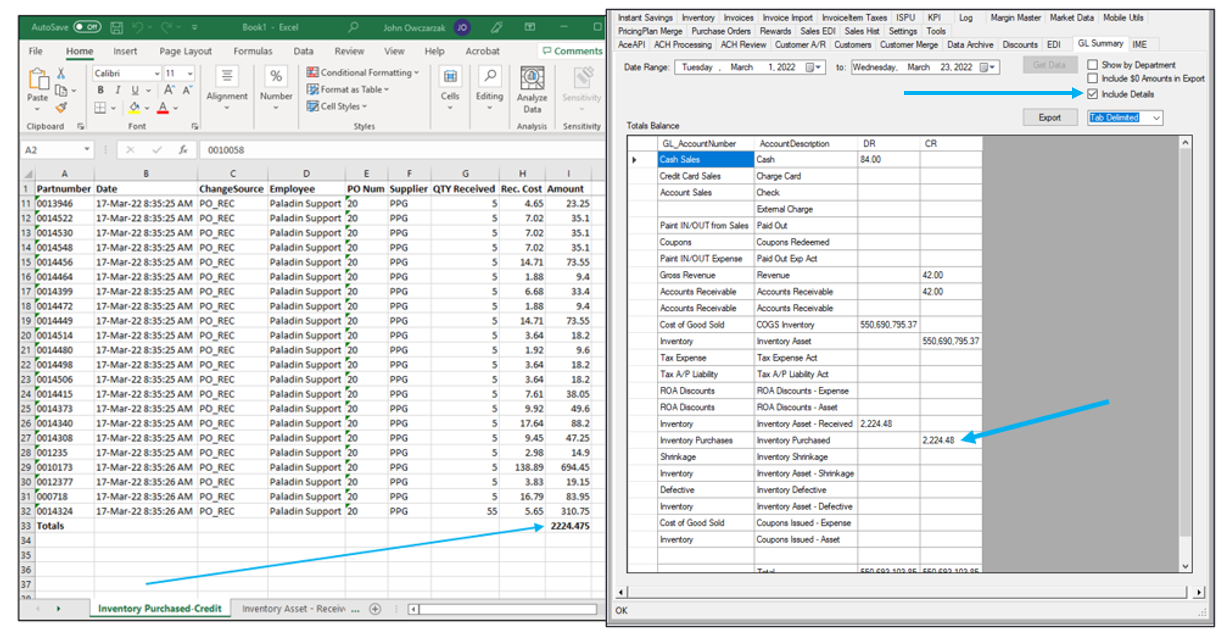
Figure 5: General Ledger Summary report detail in the Inventory Purchased Credit worksheet tab
General Ledger Summary export option
To export the data, in the Export list, select a format for exporting the data:
-
- QuickBooks: Select the QuickBooks version. If your QuickBooks version is not listed, select Tab Delimited.
- Tab Delimited: Select for other accounting programs or to view the data in Excel.
- Tab Delimited With Dates: This option adds the store name and date range of the summary at the beginning of the export file. If you view the export file in Excel, this information appears in the first row. This option is not recommended if you will be importing the file into an accounting program.
- SFTP Upload: Automatically upload GL Summary to an SFTP server nightly.
The General Ledger Summary tab delimited export option (Tab Delimited With Dates) adds the store name and date range of the summary at the beginning of the export file. If you view the export file in Excel, this information appears in the first row.
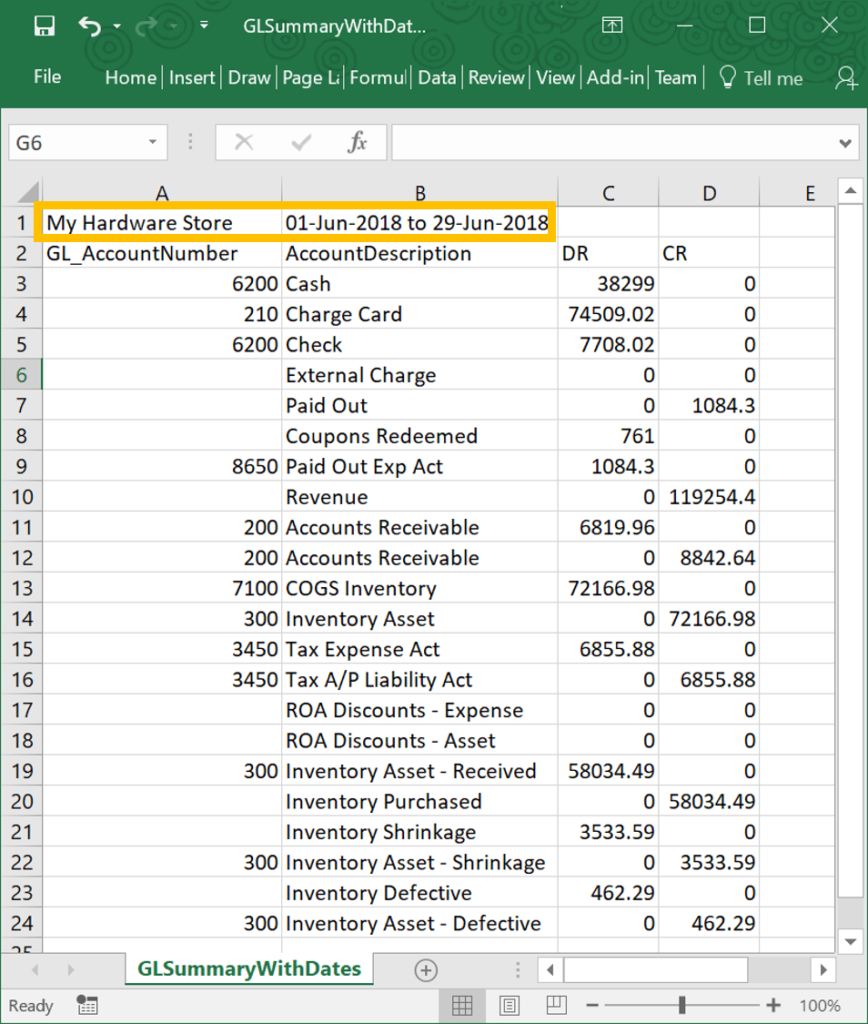
Figure 6: GL Summary report/Store name and date in first row of Excel report
The Tab Delimited With Dates export option appears in the list of export file types on Paladin’s GL Summary tab in the Data Viewer. To use this feature:
- In Paladin, from the top menu, select Maintain > Data Viewer.
- Select the GL Summary tab
- Select a date range, then click Get Data.
- In the list of export file types. select Tab Delimited With Dates, then click Export.
- Save the tab-delimited file to your computer and make a note of the file location. The file will have a .txt extension.
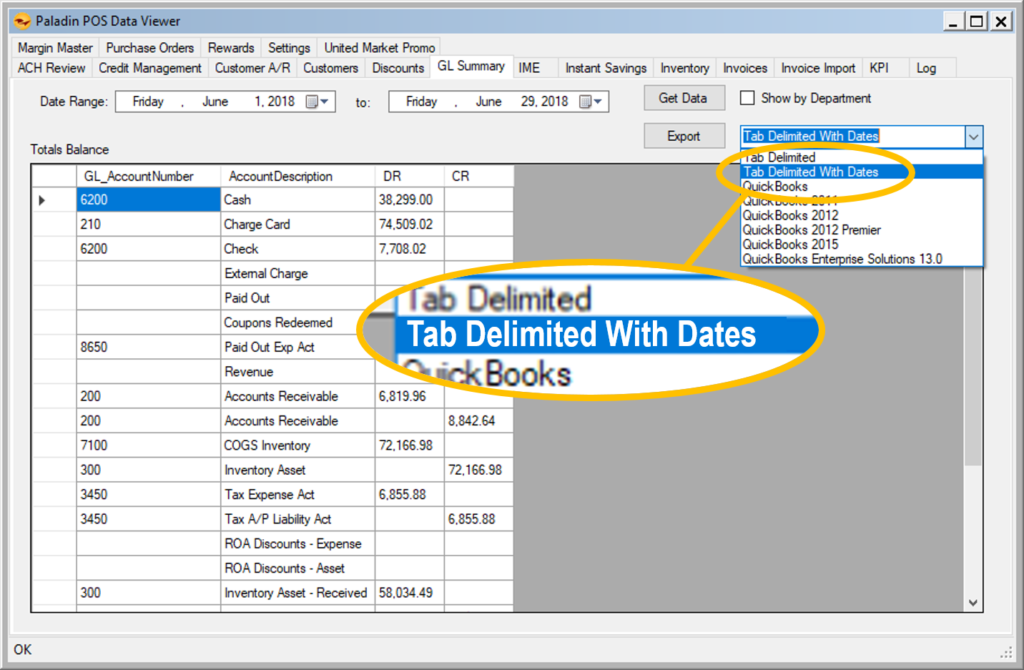
Figure 7: GL Summary Tab Delimiter With Dates option
The SFTP Upload option appears in the list of export file types on Paladin’s GL Summary tab in the Data Viewer.
To use this feature:
- In Paladin, from the top menu select File > Setup.
- Select the Accounting tab.
- In the External Integrations pane, select SFTP.
- In the SFTP GL Uploader pane, select the report format from the Export Format list.
- Click Save, then click Close.
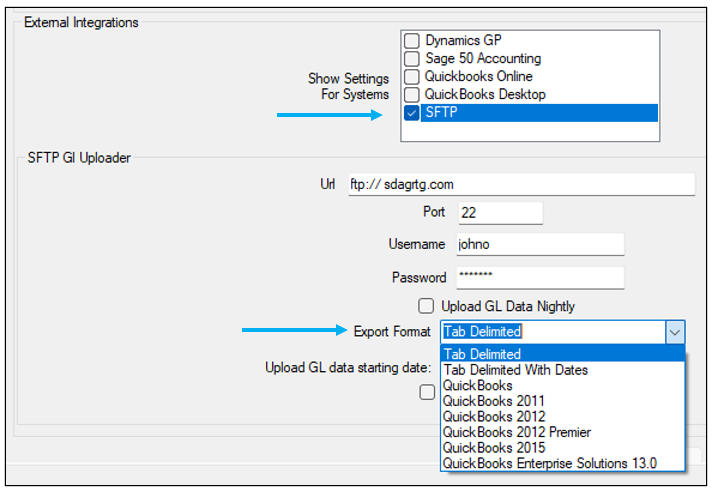
Figure 8: SFTP Uploader
- In Paladin, from the top menu, select Maintain > Data Viewer.
- Select the GL Summary tab.
- Select dates in the Date Range lists.
- From the Export list, select SFTP Upload.
- Choose options next to Get Data. These are Include $0 Amounts in Export, and Include Details. Note: A selection is not mandatory; you can select both, one, or none.
- Press Get Data.
The data will automatically upload GL Summary to an SFTP server nightly.
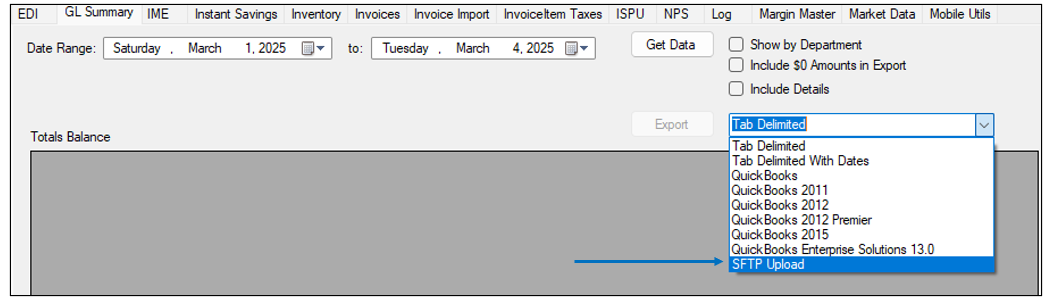
Figure 9: Data Viewer/GL Summary tab/SFTP Upload Export
Note: If a “Failed” Status response is given back from the FTP client, we will report that back to the user.
How to add accounting software account names/numbers to the General Ledger Summary Report
Perform the following to assign the account numbers/names in your accounting software to Paladin accounting categories so that they are included when you export general ledger data.
Note: If you are exporting to QuickBooks, refer to: Paladin export to QuickBooks
- In Paladin, from the main menu, select File > Setup.
- Select the Accounting tab.
- For each accounting category that you want to associate, such as Cash from Sales or Accounts Receivable, enter the corresponding account number or name from your accounting software. For a detailed description of these categories, including how they map to the Comparative Revenue Report, see: Paladin General Ledger categories
- Click Save, then click Close.
- Close and restart Paladin.
Note: If you use the GL Summary tool (from Paladin’s top menu, select Maintain > Data Viewer > GL Summary tab) to export Paladin accounting data, the account names/numbers appear when you query for data and are downloaded if you export the data.
General Ledger account export file names are editable
You can specify the file names used to export Accounts Receivable and Tax A/P Liability accounts. If you use QuickBooks, you can set the names to meet their filename requirements.
To specify the file names used to export Accounts Receivable and Tax A/P Liability accounts:
- In Paladin, from the main menu, select File > Setup.
- Select the Accounting tab.
- In the Asset Accounts pane, enter a name for the Accounts Receivable file in the GL Export Account Name box. Do not enter a file extension.
- In the Liability Accounts pane, enter a name for the Tax A/P Liability file in the GL Export Account Name box. Do not enter a file extension.
- Click Save, then click Close.
How to reconcile the Inventory Valuation Summary Report with your General Ledger Summary
Both the Inventory Valuation Summary Report (in Paladin’s Reports module) and the General Ledger (GL) Summary (manually created in the Paladin Data Viewer) can be used to calculate day-to-day changes in your store’s inventory value. If you notice a discrepancy between these calculations, this section provides you with some reasons for why this can happen.
About the Inventory Valuation Summary report
The Inventory Valuation Summary report, available in the Reports module (Inventory > General section), gives you a snapshot of your inventory value at the time you run the report. The inventory data includes a breakdown and total of your inventory stock value along with retail value and other information.
When run regularly, this report lets you observe inventory changes over time. Because you cannot run the Inventory Valuation Summary report for a previous time, we recommend that you schedule the report to run automatically daily or at a periodic time interval. To learn how to schedule a report to run automatically, see Report Presets
Important: To get a complete inventory assessment, when you run the report, select the Include Inventory On-Hold report setting. This setting is especially important if you compare daily stock value changes from the report with your general ledger.
About the General Ledger Summary
The GL Summary Report, ran from Paladin’s Data Viewer, generates the general ledger values for any time period. The data can then be exported in multiple formats. This report is manually created in the Paladin Data Viewer. Refer to: Options to itemize/filter revenue data
Reconciling stock value differences:
The Inventory Valuation Summary Valuation Report vs. your General Ledger Summary
Daily inventory value changes can be calculated from Inventory Summary Valuation reports by comparing day-to-day changes in the report’s total stock value.
Daily stock value change using the Inventory Valuation Report
= Yesterday’s Stock Value – Today’s Stock Value
You can also calculate daily inventory value changes from your General Ledger (GL) Summary values.
Daily stock value change using GL Summary data
= Inventory Asset – Received – COGS Inventory (cost of goods sold) – Inventory Shrinkage
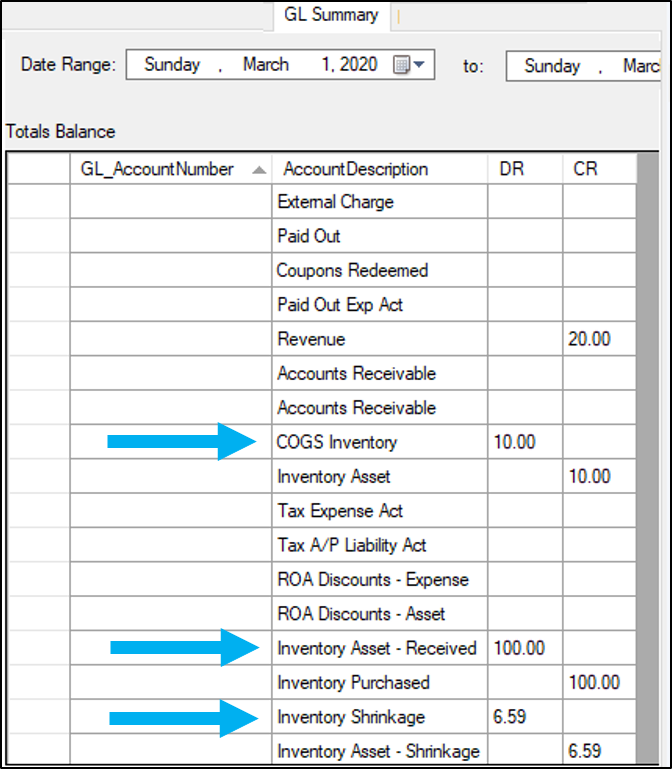
Figure 10: Daily inventory value changes from General Ledger (GL) Summary values
Ideally, both calculations would produce the same result. However, in practice, these calculations often have minor differences. To help you understand why differences occur, consider the following examples:
1) An item was sold when its stock on hand (SOH) was zero or negative. An item with a negative SOH has a no ($0) inventory value. If you sell an item when your inventory SOH says you don’t have one to sell (SOH < 0), the SOH stays negative, and your inventory stock value will remain zero.
A discrepancy in the stock value calculations appears in this scenario because:
- The Inventory Valuation Summary report stock value will not change.
- The GL COGS Inventory value will increase by the sold item’s cost.
2) An item with a negative SOH is received. When you receive new stock for an item that has a negative SOH, the number of items received will be offset by the negative SOH. For example, if the initial SOH is -1, and you receive 5 items, the SOH is set to -1+ 5 = 4.
A discrepancy in the stock value calculations appears in this scenario because:
- The Inventory Valuation Summary report will increase the stock value by 4 x item’s cost.
- The GL Inventory Asset – Received value will increase by 5 x item’s cost.
3) A negative SOH is manually updated to a positive number. In Paladin’s Inventory module, when you use the F4 Count feature on the bottom ribbon to manually change an item’s negative SOH of -1 to 1 (total change = 2), the inventory item’s stock value will only increase by 1 x item’s cost (instead of 2).
A discrepancy in the stock value calculations appears in this scenario because:
- The Inventory Valuation Summary report stock value will increase by 1 x item’s cost.
- The GL Inventory Shrinkage value will increase by 2 x item’s cost.
4) You use the PO auto-transfer integration feature for Sage or QuickBooks. If you use the PO auto-transfer feature in one of our accounting integrations (Sage or QuickBooks), completed POs are automatically transferred to your accounting software when they are completed (received) in Paladin.
A discrepancy in the stock value calculations appears in this scenario because:
- The Inventory Valuation Summary report will show a stock value change for the received items on the transferred PO.
- The transferred PO will not update the GL Inventory Asset – Received value.
5) A dump SKU item with a reference margin is sold. If you set a reference margin for a Dump SKU item, a COGS value will be calculated for each sale.
A discrepancy in the stock value calculations appears in this scenario because:
- The Inventory Valuation Summary report will not show a stock value change because the dump SKU is designated as a non-inventory item.
- The GL Summary COGS Inventory value will increase.
6) The Avg Cost of an item is manually changed after you receive new items. An item’s Avg Cost automatically show the average over time of all items that you’ve received. If you change this value, this history is lost.
A discrepancy in the stock value calculations appears in this scenario because:
- The Inventory Valuation Summary report stock value will be calculated using your modified average cost.
- A GL Inventory Asset – Received value will use the actual cost of the received items.
7) A new inventory item was manually added with a non-zero SOH. In Paladin’s Inventory module, when you use the F2 Add Item feature to create a new inventory item, you can optionally include a non-zero SOH.
A discrepancy in the stock value calculations appears in this scenario because:
- The Inventory Valuation Summary report stock value will increase because of the new SOH.
- The GL Inventory Asset – Received value will not increase because the new items were not received through a purchase order.
Tip: It is best practice to always use a purchase order to add new inventory.
8) An item with a locked cost was received during EDI processing. When you lock the cost value for an item, and the cost changes, EDI processing is prevented from modifying the item’s cost value.
A discrepancy in the stock value calculations appears in this scenario because:
- The Inventory Valuation Summary report stock value will be calculated using an out-of-date average cost.
- The GL Inventory Asset – Received value will be calculated using the new cost.
9) If Include ACH is enabled in Paladin’s Configuration Accounting tab, a row is added to the GL Summary showing the amount of ACH activity and the ACH Account number(s). To set this function, refer to: Accounting: Automated Check Handling option
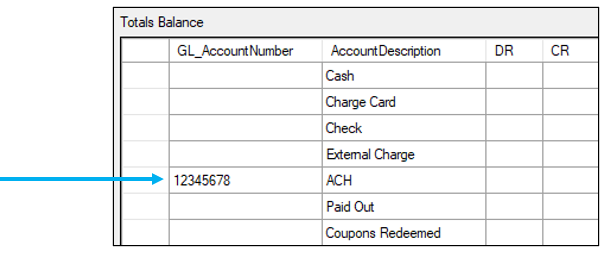
Figure 11: ACH row in GL Summary
Note: These are just a number of scenarios that can cause your Inventory Valuation Summary report and General Ledger Summary data to calculate different inventory stock values. These scenarios are meant to guide you in your reconciliation efforts and are not a comprehensive set of scenarios.
How to print the General Ledger Summary report of total balances
- In Paladin, from the top menu, select Maintain > Data Viewer.
- In the Data Viewer window, click the GL Summary tab.
- In the Date Range boxes, click the calendar icon to select the beginning and ending dates.
- There are three options to further the information gathered for the report:
-
-
- Show by Department: Use this to view revenue itemized by department. This option is best for viewing or saving the data and is not recommended if you will be importing the file into an accounting program.
- Include $0 Amounts in Export: Use this to include accounting categories with $0 amounts in the export file.
- Include Details: This option generates an Excel spreadsheet that provides details on categories from each GL Summary field that has a value associated.
-
- Click Get Data. The data appears in the Totals Balance pane.
- In the Export list, select a format for exporting the data.
- Tab Delimited: This format works best for exporting and re-importing data.
- QuickBooks: Select from the listed versions of QuickBooks.
- Click Export.
- In the Save As window, in the File name box, enter a name for the file.
- By default, Text (.txt) Files is the file type. Do not change this.
- Click the Desktop, then click Save to save the file on the desktop.
Example: GLSummary_06.01.15„to–11.05.15.txt Note: When you rename the file, include the date range for quick reference. - Open Excel, then click to open a Blank Worksheet.
- On the File menu, click Open, click Computer, click Desktop, then double-click to open the folder that includes the .txt file that you saved
- In the All Files list, select Test Files.
- In the File name box, select the file name that you created, then click Open. The Excel worksheet opens.
- To move forward through each dialog box that appears, click Next.
- When the last dialog box appears, click Finish.
- To select all columns and rows, click the half diamond in the top left corner. The spreadsheet will turn gray.
- Click between column A and column B. When the vertical line crossed by a double-arrowed line appears, click it. The column widths will adjust to fit the data.
- Highlight the rows and columns that you want to print, click the Page Layout tab, click Print Area, then click Set Print Area.
- In the Page Layout tab, click the arrow in the lower right corner.
- In the Page Setup window, click the Sheet tab.
- In the Print pane, check Gridlines to put borders around all cells, then click OK.
- Click the File menu, then select Print.
- In the Print window, in the Settings pane, click Print Active Sheets, then click Print.
- Save the file for quick reference.
If you have questions or suggestions about this information, contact support@paladinpos.com.
