
This article provides instruction and information on the following:
- How to create a Sale List
- Navigating between Sales and Pricing Plans
- How to make a Sale List inactive
- How to make a Sale List active
- Sale List filters
- How to export and import items in a sale (Sale List) using Excel
- How to create the Sale List import file and import it into a Sale List
- Pricing plans to work for non-sequential Sale List IDs (Ace Only)
- Automatic retirement of Sales Lists
Note: For information on using RF Units with Sale Lists, refer to Step 1: How to use the RF unit to import a Sale List in the How to use the RF unit to import a Sale List and activate a sale section of the RF Units KBA.
How to create a Sale List
To create a sale list:
- In Paladin, from the main menu, select File >Setup.
- Select the Sale List tab.
- In the Sales pane, click New.
- In the Name box, enter a name for the sale.
- In the ID box, enter a unique ID number and save it for future reference.
- Optional: In the Source box, enter the source of the sale.
- Click Save, then click Close.
Navigating between Sales and Pricing Plans
When in the Paladin Configuration Sale List tab, you can navigate between sales and the Pricing Plan tab.
- In the Pricing Plans pane of the Sale List tab, click Edit to be sent to the Pricing Plan tab.
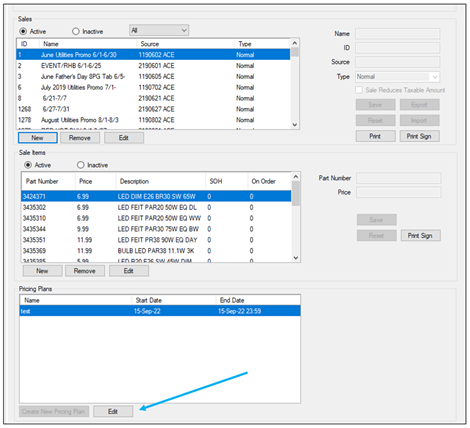
Figure 1: Sale List tab
- In the Pricing Plan tab, click Go to Sale to return to the Sale Lists tab.
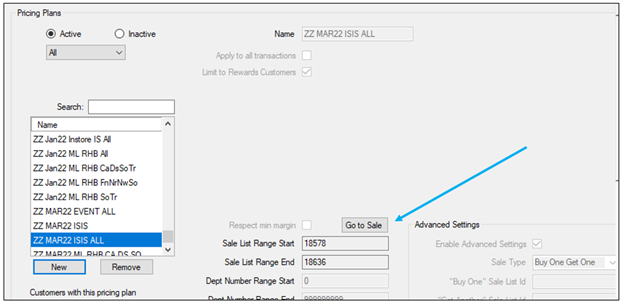
Figure 2: Pricing Plan tab Go to Sale button
How to make a Sale List inactive
When an invoice is started, it requires every line of every sale list to be loaded and analyzed. This can cause the first inventory item on an invoice/quote to load slowly, especially when there are a large number of active sale lists.
To solve the slow-loading problem, you can make sale lists inactive.
- In Paladin, from the main menu, select File > Setup.
- Select the Sale List tab.
- In the Sales pane, enable Active.
- Highlight a sale that should be inactive.
Note: Using the Shift key allows multiple sales to be selected all at once. Using the Ctrl key allows selecting specific multiple sales. When multiple sales are selected, only the New, Remove, and Restore buttons are operational.
- Click Remove.
- Click Save, then click Close.
How to make an Sale List active
- In Paladin, from the main menu, select File > Setup.
- Select the Sale List tab.
- In the Sales pane, enable Inactive.
- Highlight a sale to activate.
Note: Using the Shift key allows multiple sales to be selected all at once. Using the Ctrl key allows selecting specific multiple sales. When multiple sales are selected, only the New, Remove, and Restore buttons are operational.
- Click Restore.
- Click Save, then click Close.
Sale List filters
Sale List filters let you manage active sales more efficiently. When you select a filter, only those types of Sale Lists are displayed.
The following table shows the types of Sale Lists that appear for each filter.
|
Filter |
Sale List |
|
All |
All Sale Lists. |
|
Normal |
All Sales Lists except for Instant Savings. |
|
Instant Savings |
Sale Lists for Instant Savings only. |
To select a Sale List filter:
- In Paladin, from the main menu, select File > Setup.
- Select the Sale List tab.
- In the Sales pane, select a filter from the All list.
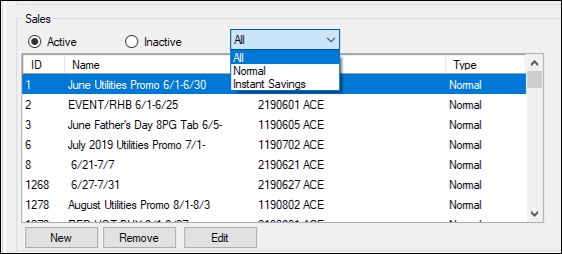
Figure 3: Sale filters
- Click Save, then click Close.
How to export and import items in a sale (Sale List) using Excel
You can export sale item part numbers and prices into a tab-delimited text file that can be opened in Excel. This file can be used to optionally add or edit items and prices and be reimported to update the sale or add to another sale. For example, you could create a new sale based off an existing one.
- In Paladin, from the main menu, select File > Setup.
- Select the Sale List tab.
- In the Sales pane, select the sale you want to export.
- Click Edit, then click Export.
- Select a file location and enter a name that you will remember.
- A message appears confirming that the tab-delimited text (.txt) file was created.
- Click Save, then click Close.
- To open the file in Excel:
- Open Excel.
- In Excel, on the File menu, click Open.
- Browse to the file location and make sure the file filter is set to All Files (*.*).
- Select the file you created (it will have a .txt file extension) and follow the prompts to import the file into Excel.
Optional: Edit the sale items and/or add new items and prices and save your changes. By default, the changes will save as a text (.txt) file, which is required to reimport the data. Do not change the file type to an Excel file type (.xlsx). The import will not work.
Important notes:
-
-
- Make sure the part #’s are accurate. The import process does not verify part #’s.
- The import process can add new items or modify the prices of existing items. It will not delete items. If you delete items from the Excel file, the items will not be removed when you reimport the file.
- Close the file before you import it or the import will not work.
-
Optional: Import the file to update a sale.
- In Paladin, from the main menu, select File > Setup.
- Select the Sale List tab.
- In the Sales pane, select the sale you want to update.
Tip: If you want to create a new sale based on your edited list, you must first create the new sale.
- Click Edit, then click Import.
- In the Import Sale List window, browse to the folder that contains the file that you created earlier.
- In the File name list, select the file that you want to import and click Open.
- When the file has been imported, the items will be updated in the Sale Items pane.
- Click Save, then click Close.
How to create the Sale List import file and import it into a Sale List
Tip: If you want to update an existing sale, you can use the export feature to edit the sale items in Excel and then reimport the file. To learn more, see: How to export and import items in a sale (Sale List) using Excel.
Note: Before you can follow this procedure, the sale list must be created. To learn more, see: How to create a Sale List.
- Open Excel.
- Open a blank workbook.
- In the upper left corner of the workbook, right-click the triangle symbol, then click Format Cells.
- Click the Number tab, select Text, then click OK. This format allows you to enter zeroes as prefixes to numbers.
- In the A1 cell, enter PARTNUMBER as one word, all caps.
- In the B1 cell, enter SALEPRICE as one word, all caps.
- For each column that you want to expand, click between two column headers. The left column will turn gray, and the cross symbol appears. Drag the cross symbol to the right.
For example, you may want to expand column A so that Part number fits. - In the A2 cell, enter a part number. For example, enter 12345.
- In the B2 cell, enter a price for the part number. For example: enter 19.99.
- For each additional part number, enter it in a cell in column A.
- For each additional price, enter it in a cell in column B.
- Click the File menu, click Save As, browse to the location where you want to save the file, enter a name for the worksheet in the File name box, select Text (Tab delimited) in the Save as type list, then click Save.
- In Paladin, from the main menu, select File >Setup.
- Select the Sale List tab.
- In the Sales pane, select the sale that you want to import items into.
- Click Edit, then click Import.
- In the Import Sale List window, browse to the folder that contains the file that you created earlier.
- In the File name list, select the file that you want to import, then click Open.
- When the file has been imported, it will appear in the Sale Items pane in Paladin.
- Click Save, then click Close.
-
Pricing plans to work for non-sequential Sale List IDs (Ace Only)
A configuration setting, Enable Non-Sequential Sales Lists for Ace Sales, is available for Ace stores only, which allows pricing plans to work for non-sequential Sale List IDs. When enabled, every Ace sale will know the pricing plan they are attached to, rather than pricing plans searching for sales in a sale number range.
Note: Again, this setting only impacts Ace sales created via hotsheets. Locally created sales and sales created using the BMAS creation utility in POS are not currently supported and will continue operating as they have before.
To enable this setting:
- In Paladin, from the main menu, select File > Setup.
- Select the Sale List tab.
- In the Sales Configuration pane, check Enable Non-Sequential Sales Lists for Ace Sales.
- Click Save, then click Close.
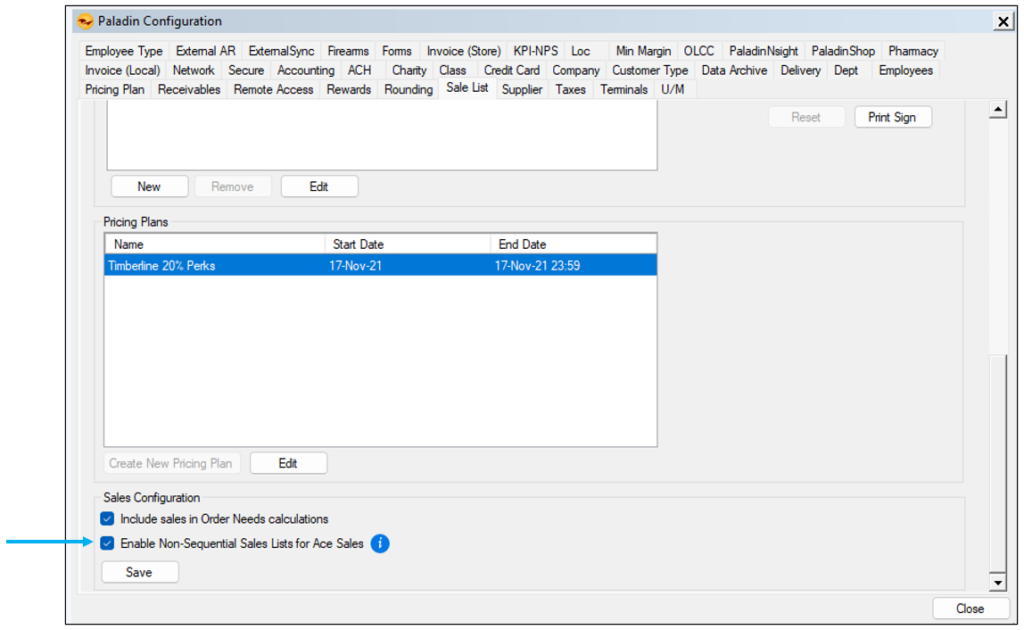
Figure 4: Enable Non-Sequential Sales Lists for Ace Sales
Automatic retirement of Sales Lists
Paladin automatically retires out-of-date Pricing Plans and Sale Lists. All sale data controlled by a specific start date and end date and is observed to be 90 days past the end of the sale “Date Range End” specified in the Pricing Plan will be marked as Inactive and no longer display in the list of Active sales.
The old sale data is not deleted or lost, it is simply moved.
To enable this:
- In Paladin, from the main menu, select File > Setup.
- Select the Pricing Plan tab.
- In the Pricing Plans pane, enable the Inactive radio button to view the old sale data.
-
Note: Should you want to add a sale back to the Active list, highlight the sale data desired and click Restore.
Remember these sales are still inactive because of an expired end date. Use of your newly restored sale will require modification to the Date Range End date or unchecking Date Range.
- Click Save, then click Close.
If you have questions or suggestions about this information, contact support@paladinpos.com.
