
The following provides instruction and information on RF units:
Setup:
- How to set employee RF unit access
- How to assign RF printers
- How to hide retail in a PO on RF terminal
- How to enable Inbound Receiving for the RF Unit
- How to set up bin tags and shelf tags on a dedicated printer with an RF unit
Functionality:
- How to use the RF unit to overwrite or append stock on hand (SOH)
- How to build a working purchase order with an RF unit
- How to select a printer from an RF unit
- How to print bin tags and shelf tags from a label printer with an RF unit
- How to batch bin tags with an RF unit
- How to use Receive PO mode on the RF Unit
- RF Unit Inbound Receiving of an EDI supplier shipment
- How to use the RF unit to import a Sale List and activate a sale
- How to use an RF terminal inventory exporter
Setup
How to set employee RF unit access
Paladin can be set for stores that require employees to log in to the RF Remote Terminals before access to the device is granted. In addition to controlling who has access to these mobile devices, Paladin also records the employee ID with every change and check performed on the RF unit. This additional information improves oversight and management of inventory stock and staff access.
To enable this feature:
- In Paladin, from the main menu, select File > Setup.
- Select the Company tab.
- In the RF Terminals pane, check Enable RF Login.
- Click Save, then click Close.
When employees use the RF unit, they must log in with their employee ID.
How to assign RF printers
Paladin lets you choose a different printer each time you login to an RF terminal. With this, you can mix-and-match RF terminals and RF printers in your store. Once printers are assigned to an RF terminal, you can select a printer when you log in to an RF terminal.
To use this feature, you must first add the printers in Paladin. Afterwards, you can select a printer when you login to an RF terminal. If you only have one printer, it will be selected by default.
To add the RF printers in Paladin:
- In Paladin, from the main menu, select File > Setup.
- Select the Network tab.
- In the Network pane, select up to four (4) printers from the following lists:
- RF Attached Printer 1
- RF Attached Printer 2
- RF Attached Printer 3
- RF Attached Printer 4
Notes:
-
- The term “RF Attached Printer” refers to RF portable printers that may or may not be attached using physical cable.
- It is strongly recommended to physically label each printer with its printer number.
- Click Save, then click Close.
For instruction on selecting a printer from an RF terminal, see How to select a printer from an RF terminal.
How to hide retail in a PO on RF terminal
Paladin supports a request to turn off business intelligence data during manual purchase order creation in RF Remote Terminals. If your store does not need to confirm the retail price in inventory matches the retail price on a bin tag scanned, you may turn off display of this information during PO creation.
To perform this:
- In Paladin, from the main menu, select File > Setup.
- Select the Company tab.
- In the RF Terminals pane, check Hide Retail in PO.
- Click Save, then click Close.
How to enable Inbound Receiving for a RF Unit
To set up Inbound Receiving for a RF Unit:
- In Paladin, from the main menu, select File > Setup.
- Select the Company tab.
- In the RF Terminals pane, check Enable Inbound Receiving.
- Click Save, then click Close.
How to set up bin tags and shelf tags on a dedicated printer with an RF unit
- Open the LTSR Catalog.
- Determine which tags you want.
- In Paladin, from the main menu, select File > Setup.
- Select the Company tab.
- In the Tag Styles section, in the Default Bin tag Style list, select the Bin tag Format # that you want.
- Click Save.
- Select the Network tab.
- Enter the Administrator Password.
- In the Network section, select an RF Attached Printer (1 – 4).
- Click Save, then click Close.
Functionality
Important: The RF Unit Controls window must be kept open for the RF unit to communicate with Paladin.
How to use the RF unit to overwrite or append stock on hand (SOH)
Important: To ensure the “last counted” date is updated properly in Paladin for reporting purposes, when counting inventory in the Overwrite or Append mode, and the SOH on the shelf matches what the Paladin has listed for SOH, you MUST enter the SOH number in the RF unit again. Do not bypass the field by pressing Enter.
- In Paladin, on the top ribbon, select the Inventory module.
- On the bottom ribbon of the module, click F10 RF Unit.
Important: The RF Unit Controls window opens. It must stay open for the RF unit to communicate with Paladin.
- On the RF unit, press ON, then press #1 to sign on.
Note: The sign in process for the WorthData & Motorolla RF units may vary.
- For Bin tag output device, select one of the following options:
a) To print today’s real-time bin tag changes to a desktop or portable printer, press 1.
b) To batch the bin tags that you want to print later to a full sheet on a laser printer, press 2.c)
When batching bin tags using the RF unit, press 0.
- In Paladin, from the main menu, select File > Setup.
- Select the Network tab.
- Select Label Printer 1, 2, 3, or 4 as the printer.
- Click Save, then click Close.
- On the RF unit, for the Printing method, select one of the following options:
a) To print bin tags for everything scanned, press 1.
b) To print bin tags for only the changes that you made, press 2. - If you have already set up the Location in Paladin, you can perform one of the following options for the Location prompt on the RF unit:
a) Add a location for all the items to be scanned, then press Enter.
b) Keep the default information without adding any new information, then press Enter.
Note: Location information can be entered by Location ID or by Location Name on the RF unit by utilizing the shift key function. The Shift key is the circular key with the arrow on the top right-hand side of the RF unit keypad.
- Scan the barcode(s) or manually enter the part number(s).
- In the Quantity (Qty.) field, make any changes, then press Enter. The RF unit will announce which mode you are in:
a) If you hear “Quantity”, you are in Overwrite mode. Any number that you enter will change the stock on hand to that number.
b) If you hear “Add to Stock”, you are in Append mode. Any number that you enter will be added to the total amount of stock on hand.
Note: Leave the volume on so you can hear the announcement.
- In the Sell Price (Sell) field, make any changes, then press Enter. To print a tag without changing the sale price, type the # symbol, then press Enter.
Note: This is the retail price of the item.
- If no changes were made, press Enter, then complete the required fields.
- When you are done scanning, press F1 on the RF unit, and you will be returned to the main menu.
How to build a working purchase order with an RF unit
- In Paladin, on the top ribbon, select the Inventory module.
- On the bottom ribbon of the module, click RF Unit.
Important: The RF Unit Controls window opens. It must be kept open for the RF unit to communicate with Paladin.
- On the RF unit, press ON, then press #1 to sign on.
Note: The sign in process for the WorthData & Motorolla RF units may vary.
- Scan the barcode(s), or manually enter the part number(s), then press Enter.
-
- Type the Order Quantity, then press Enter.
- Optional: When the RF unit prompts you for the Sale Price (Retail Price), you have two options:
a) If no changes were made to the retail price, press Enter to bypass changing the Retail Price.
b) To change the retail price, type the new retail price, then press Enter. - When you are done entering part numbers, and the purchase order is complete, leave the RF unit on.
- In Paladin, on the top ribbon, select the PO module.
- On the bottom ribbon of the module, click F6 Recall PO.
- In the Recall PO window, highlight the RF unit purchase order that you just created, then click F12 Recall.
Optional: Manually add more items to complete the purchase order.
Optional: Make any changes to the data or delete an item. - On the bottom ribbon of the module, click F8 Confirm PO.
- On the bottom ribbon of the Confirm PO tab, click F1 Buy.
- When the purchase order has been processed through Paladin, press F1 on the RF unit to return to the main menu.
How to select a printer from an RF unit
Note: For information on assigning RF printers, see How to assign RF printers.
Note: The RF Unit Controls window must be kept open for the RF unit to communicate with Paladin.
To select a printer:
- Turn on the RF unit.
- To sign on, press 1.
Note: The sign in process for the WorthData & Motorolla RF units may vary.
- Look for the following message during the login process:
Bin Tag Output Devices
Attached Printer [Y/N]
Note: The term “Attached Printer” refers to RF portable printers that may or may not be attached using physical cable.
- Press Y, then press Enter.
- When a range of printer numbers appears, select the number of the printer that you want to use. The option to choose a printer number does not appear if there is only one printer defined in Paladin.
Example: If there are 3 printer options, the text [1-3] is displayed. If you want use the printer specified as RF Attached Printer 2 , select 2 for this option. - You can now print to the printer selected.
How to print bin tags and shelf tags from a label printer with an RF unit
Note: The RF Unit Controls window must be kept open for the RF unit to communicate with Paladin.
- Turn on the RF unit.
- To sign on, press 1.
Note: The sign in process for the WorthData & Motorolla RF units may vary.
- Select Overwrite SOH or Append to SOH.
- If a message appears about Bin Tag Output Devices Attached to Printer, press 0.
- For Label Printer: 1-4, select the number that you indicated for the wireless label printer in Paladin Configuration’s Network tab.
- For the Printing method, select the mode that you require:
- To print all: Continue though the prompts and scan an item.
- To print changes only: Items with a price or location change will prompt a bin tag.
- To print a bin tag with the Changed Bin Tags printing method: When prompted to enter the retail price, enter the # symbol, then press Enter.
How to batch bin tags with an RF unit
Note: The RF Unit Controls window must be kept open for the RF unit to communicate with Paladin.
- Turn on the RF unit.
- To sign on, press 1.
Note: The sign in process for the WorthData & Motorolla RF units may vary.
- Select Overwrite SOH or Append to SOH.
- If the Bin Tag Output Devices Attached to Printer message appears, press 0.
- Press 0 for label printer, or press Enter for batch.
- Select a Printing method:
- To print all, continue though the prompts, and scan an item.
- If you select print only items with a price change or location change, a bin tag will be prompted.
- If the RF unit does not provide either of these options, you can enter a # during the sale price prompt.
How to use Receive PO mode on the RF Unit
Note: The RF Unit Controls window must be kept open for the RF unit to communicate with Paladin.
Note: This feature is for non-EDI suppliers only.
The Receive PO mode in your RF unit lets you scan newly-arrived items and enter received quantities. Paladin automatically assigns the received quantities to your open purchase orders. When you have scanned all the items, you can view and reconcile the ordered and received item amounts for each purchase order. Before you complete the receiving process, supplier costs and received amounts can be changed.
Note: The following steps must be done in the following order:
- Step 1: Find the Paladin supplier number
- Step 2: Scan an item
- Step 3: Review and edit purchase order quantities and receive the items
Step 1: Find the Paladin supplier number
The supplier number associates the received items with the purchase orders. To start the RF PO Receiving process, you need the supplier number. If you do not know the supplier number:
- In Paladin, on the top ribbon, select the Inventory module.
- Display one of the received items.
- Select the Order Control tab.
- In the Suppliers pane, in the Supplier 1 list, the supplier number will appear to the left of the supplier name.
Step 2: Scan an item
Use the RF unit to scan items and enter quantities.
- Turn on the RF unit.
- To sign on, press When prompted, press 1.
Note: The sign in process for the WorthData & Motorolla RF units may vary.
- If prompted, enter a 4-digit Paladin login password.
- When the list of mode options appears, select option 4 Receive Stock.
Note: If the RF Inbound Receiving mode (RF receiving for EDI suppliers) option appears, select More, then select 5 Receive PO.
- When the Non-EDI supplier # prompt appears, enter the supplier number, then press Enter.
- Scan the item.
If the item exists in an open PO for this supplier, the following information appears
-
- Part number
- Alternate part number
- Description
- ORD= <Item quantity in open POs for this supplier>
- QTY= __
- A prompt for entering the item quantity in this shipment.
- RECENTLY SCANNED
- If this item has already been scanned, or if the item is found in more than one part of the shipment, a non-zero value appears. You can enter a different quantity or scan the next item to continue.
- Enter the item quantity that you received at the QTY= prompt.
Note: When you enter an item quantity, Paladin will temporarily assign this quantity to open purchase orders. If the item is on more than one purchase order, the oldest purchase order will be filled first. Assignments can be edited later.
- For all items in the shipment, repeat step 1.
- When all items have been scanned, turn off the RF unit.
- In Paladin, close the RF Unit Controls window and exit the Inventory module.
Step 3: Review and edit purchase order quantities and receive the items
- In Paladin, on the top ribbon, select the PO module.
- On the bottom ribbon of the module, toggle F5 Mode/PO to change to F5 Mode/Receive.
- On the bottom ribbon of the module, select F7 Inbound Receiving.
Note: F7 Inbound Receiving option will glow when RF receiving work is available to be reviewed.
- In the Find PO window, in PO Details pane, in the Supplier list, select the supplier.
- In the Matching Purchase Orders pane, purchase orders for the selected supplier appear. These purchase orders have items that were scanned during the RF PO Receiving process.
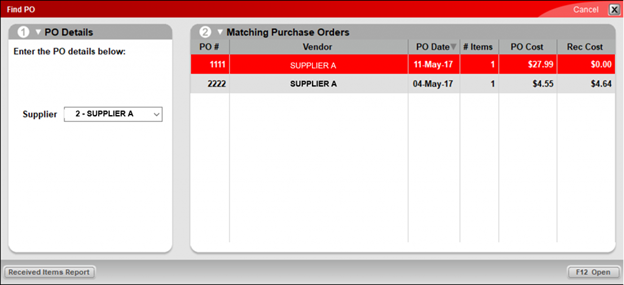
Figure 1: Matching Purchase Orders pane
- In the Matching Purchase Orders pane, highlight a purchase order, then click F12 Open. A RF PO Receiving window opens with information for each purchase order item. The Cost and Scanned Qty columns are editable, and any changes appear in the receiving history of the purchase order. Pressing Ctrl + F opens the Search Purchase Order window. In this window, pressing F9 Find Next lets you search another purchase order.
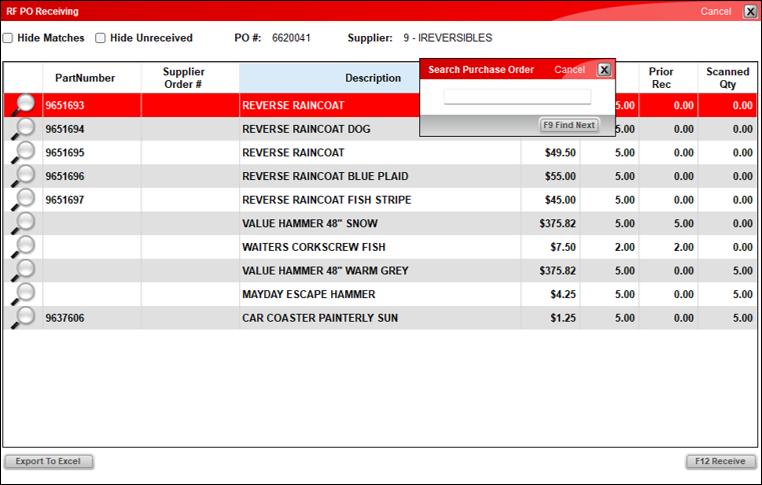
Figure 2: RF PO Receiving window
- If you have questions about an item’s received quantity, in the RF PO Receiving window, click the item’s magnifying glass. A Receiving History window with a detailed history of received quantity changes opens. This history includes the RF PO Receive quantities that were assigned by Paladin and manual changes made in RF PO Receiving window.
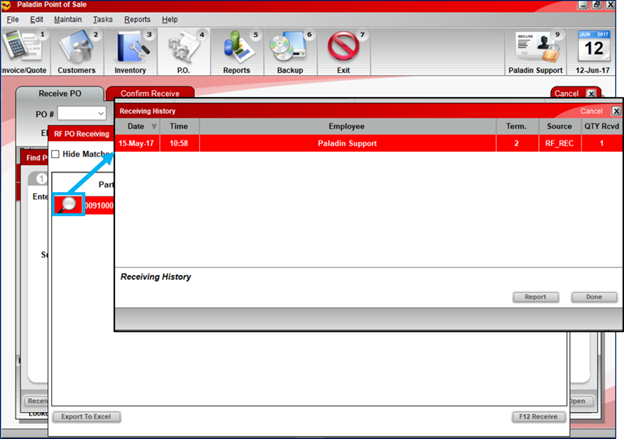
Figure 3: Receiving History window
|
This Receiving History value |
Means this |
|
Date |
The date of the update. |
|
Time |
The time of the update. |
|
Employee |
The employee ID of the person who made the update. |
|
Term |
One of the following:
|
|
Source |
One of the following:
Note: If a scanned quantity is changed during a purchase order review, the Source changes from RF_REC to Manual. |
|
QTY Rcvd |
The updated quantity. |
- Optional: In the Receiving History window, to create a report, click Report.
- To close the window, click Done.
- To complete the purchase order and update stock on hand (SOH) quantities, in the RF PO Receiving window, click F12 Receive.
- In the PO Freight Cost window, enter the freight cost (optional), then click OK to complete the purchase order process.
- Repeat the steps 4-11 for all purchase orders associated with the RF PO Receiving process.
Note: In the PO module, if you try to receive a purchase order that has RF unit-scanned items applied to it without using the Review RF Receiving feature, the message shown in Figure 4 opens, and you will be redirected to the RF PO Receiving window.
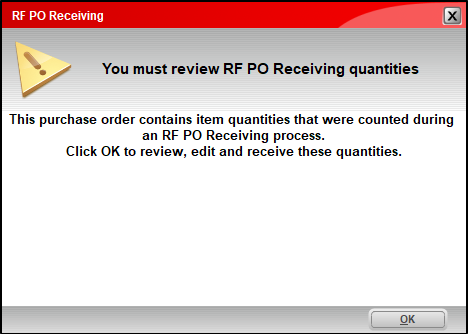
Figure 4: RF PO Receiving window/Review PO Receiving quantities message
RF Unit Inbound Receiving of an EDI supplier shipment
Note: The RF Unit Controls window must be kept open for the RF unit to communicate with Paladin.
Paladin’s RF Inbound Receiving feature lets you scan newly-received items from EDI suppliers and enter the received quantities on your RF unit. In Paladin, you can quickly reconcile the physically-received quantities with the corresponding EDI invoice quantities when the scanning process is complete. Before you reconcile, you can also make changes to the received quantities.
The Inbound Receiving feature makes EDI receiving efficient and accurate. It also identifies discrepancies between the EDI supplier invoice amounts and the number of items that you physically received so that you can investigate the difference. Discrepancies on high-priced items can have a significant financial impact.
With the RF Inbound Receiving feature, you scan newly-received items from EDI suppliers and enter the received quantities on your RF unit. Then, in Paladin, you can quickly reconcile the physically-received quantities with the corresponding EDI invoice quantities. This feature can be used for single-stores and multi-stores.
Other advantages to the Inbound Receiving feature:
- It makes EDI receiving efficient and accurate.
- It identifies discrepancies between the EDI supplier invoice amounts and the number of items physically received so you can investigate the difference. Discrepancies on high-priced items can have a significant financial impact.
- Before you reconcile amounts, you can make changes to the received quantities.
Important: Before you use the RF Inbound Receiving feature to scan received items, you must process the associated EDI invoices in Paladin. Inbound receiving must occur within 48 hours of the date and time that you processed the invoice.
- In Paladin, on the top ribbon, select the Inventory module.
- If you have not downloaded and processed the EDI invoices associated with the shipment (EDI > Download Files), on the bottom ribbon of the module, click F9 EDI.
- In the EDI Processing window, click Download Files, then process the EDI files. When EDI processing completes, close the EDI Processing window.
- On the bottom ribbon of the module, click F10 RF Unit.
- Close the Inventory module.
Turn on the RF unit.
- From the RF unit, select More, then select 2. Inbound Receiving.
- Scan each physically-received item and enter the received quantity on the RF unit.
- When you have scanned all the items in the shipment, turn off the RF unit.
In Paladin, on the top ribbon, select the Inventory module.
- On the bottom ribbon of the module, click F9 EDI.
- In the EDI Processing window, click Reporting.
- In the EDI Reporting window, select an EDI invoice that is associated with the received items, then click Inbound Receiving.
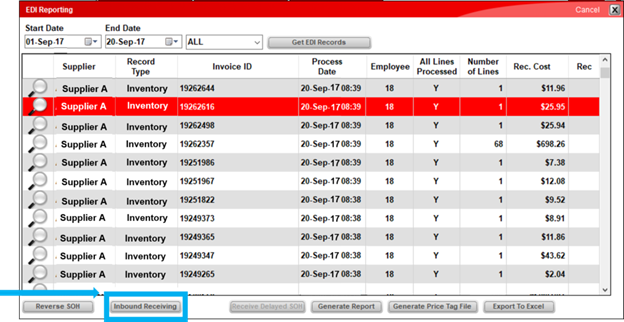
Figure 5: EDI Reporting window/Inbound Receiving
- In the EDI Inbound Receiving window, compare the quantities you entered on the RF unit (Rec Qty) with the EDI invoice quantities (Ship Qty).
By default, only items with different Ship Qty and Rec Qty values appear. To show all items on the invoice, select Show All.
You can edit the Rec Qty value without any time limits.
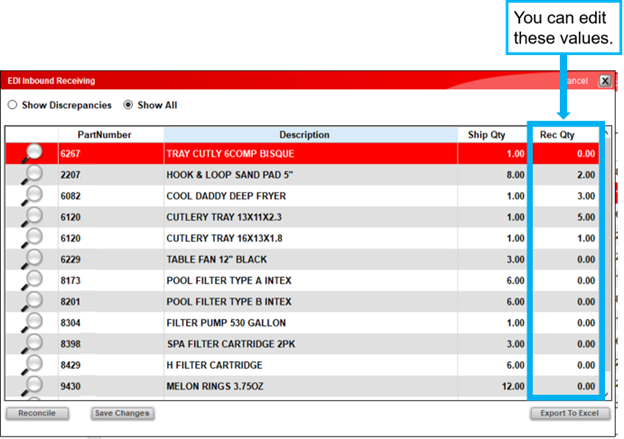
Figure 6: EDI Inbound Receiving window
- When you have compared all the quantities and made any changes, perform one of the following:
-
- If you want to finalize received quantities and adjust stock on hand, click Reconcile, then click Yes in the confirmation message. When you reconcile the invoice, no further changes to received quantities are allowed.
- If you want save your Rec Qty changes, and then reconcile the invoice and update stock on hand later, click Save Changes.
Note: If you open an invoice that has already been reconciled, an informational message opens at the bottom of the window, and you cannot make further changes.
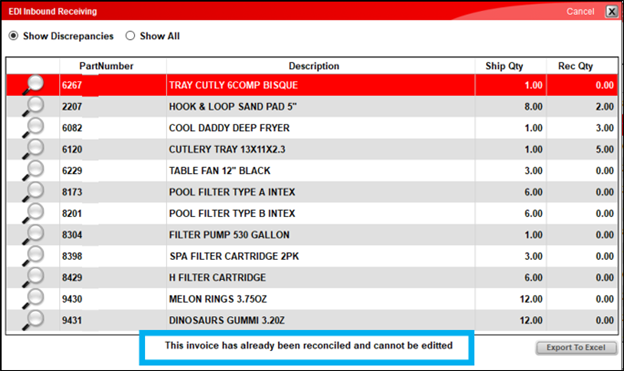
Figure 7: Invoice cannot be edited message
- Repeat steps 3 – 5 for all EDI invoices associated with your physically-received items.
- When you are done, close the EDI Reporting and EDI Processing windows.
How to use the RF unit to import a Sale List and activate a sale
Note: The RF Unit Controls window must be kept open for the RF unit to communicate with Paladin.
Note: The following steps must be done in the following order:
- Step 1: How to use the RF unit to import a Sale List
- Step 2: How to assign the sale to a pricing plan and activate the sale
Step 1: How to use the RF unit to import a Sale List
- On the RF unit, select option number 3 Working PO, then scan the sale items.
- When scanning the items you wish to add to the sale list, enter a order number of 1.
(If you don’t enter a number, the item will not appear on the purchase order.) - In Paladin, on the top ribbon, select the PO module.
- Open the RF Terminal purchase order.
- To change the name of the PO, select the purchase order, then save it as Sale List or another new name.
- Delete the previous RF Terminal purchase order.
- In Paladin, from the top menu, select Maintain > Data Viewer.
- Select the Purchase Orders tab.
- In the Type list, select Stored PO’s, then click the Sale List that you just created.
- Click Export Inventory. The exported list opens in Microsoft Excel.
- In the Excel worksheet, save the following columns:
- Column A: PARTNUMBER
- Column V: UNITCOST
- Column W: MKTCOST
- Column X: PLVL_PRICE1
- Select one of the following columns to create a new sale price:
|
To calculate this type of cost |
Select this Excel column |
|
Average Cost |
UNITCOST |
|
Market Cost |
MKTCOST |
|
Retail Cost |
PLVL_PRICE1 |
- Create a new column and name it SALEPRICE.
Notes:
-
- The SALE PRICE column can only contain a numeric value and cannot include formulas. Highlight the column data, press Ctrl+C, right-click to select Paste Value Only, insert a new column, then press Ctrl+V to paste the data into the new column.
- Optional: To use the pricing plan to calculate a price percentage using the retail price or cost in the Inventory module, set all of the prices to 0 (zero).
- If you enter a zero in a cell in the new SALEPRICE column, Paladin will not recognize a sale report as a promotion; therefore, it will not appear in a Promotion report.
- Delete all but the following columns:
-
- PARTNUMBER
- SALEPRICE
The worksheet should look similar to the following:
|
PARTNUMBER |
SALEPRICE |
|
013144 |
39.99 |
|
012025 |
12.49 |
|
032174 |
7.915 |
- Save the Excel worksheet as a text (.txt) file.
- In Paladin, from the main menu, select File > Setup.
- Select the Sale List tab.
- In the Sales pane, click New.
- In the Name box, enter a sale name.
- In the ID box, enter a sale ID number.
- Click Import.
- In the File name box, navigate to the Sale List file that you created, then click OK. The sale list should appear in the Sale Items box.
- Click Save, then click Close.
Step 2: How to assign the sale to a pricing plan and activate the sale
- In Paladin, from the main menu, select File > Setup.
- Select the Pricing Plan tab.
- In the Pricing Plan pane, click New.
- In the Name pane, enter a pricing plan name.
- Select one of the following check boxes:
- Apply to all transactions
- Limit to Rewards
- Respect min margin
Note: To limit the sale to certain customers, do not select any of the checkboxes.
- In the Sale List Range Start box, enter the Sale List ID number that you just created.
- In the Sale List Range End box, enter the Sale List ID number that you just created.
- In the Date Range Start box, enter a starting date for the sale.
- In the Date Range End box, enter an ending date for the sale.
- Click Save, then click Close.
Notes:
- If the sale is at a fixed sale price, your sale is completed.
- If you retained your regular retail price or set the price to zero, add a percentage markup or percentage discount on either the cost price or retail price, then set a percentage amount.
How to use an RF unit inventory exporter
Note: The RF Unit Controls window must be kept open for the RF unit to communicate with Paladin.
Users can generate an inventory export file specific to items scanned with Paladin’s RF units. No reprogramming is necessary on any of the current RF units to support the feature.
The data collection phase is an action you may already be utilizing in your store. Step one is to review if a pending RF-generated PO exists. You may verify this in the PO module by selecting F6 Recall PO on the bottom ribbon of the module and visually verify if a pending PO exists for your RF terminal number (every RF unit creates their own pending file). If you continue to use this file, your new work will be appended/updated to this existing file. Should you want to begin anew, either complete the pending PO or click the Delete button when this file is highlighted. Be certain your RF terminal is not logged into the system while you perform this action. Exit PO Recall file control.
Now, log into the RF unit and select the option to create a PO. Remember your RF unit will open an existing pending (stored) PO and will update/add to it if it exists. If a pending PO file does not exist for this specific RF unit, a new empty PO file will be created. Scan the inventory items you want an export file created for. You must enter an “order” quantity > 0 to cause the software to store your entry. Unless you purchase this PO, the quantity entered isn’t used.
Once your list building is complete, exit the RF unit.
- In Paladin, from the top menu, select Maintain >Data Viewer.
- Select the Purchase Orders tab.
- Select Stored PO’s from the Type field list. The upper display box now displays ALL pending POs.
- Select the PO of your choice, view the contents of that PO in the large display window, and click Export Inventory.
- An Excel icon appears on the bottom taskbar of your computer.
- Click the Excel icon to open the worksheet.
The file exported will not be the contents of the pending PO, but rather the full (large) inventory export format based on the specific list of part numbers contained in your pending PO.
If you have questions or suggestions about this information, contact support@paladinpos.com.
