RF Unit 15 line functionality (introducing dynamic prompts) is an enhancement to the current 6 line functionality. All current functions of the RF Unit in Paladin remain the same; clients currently using the RF 6 line functionality have the option to continue using that functionality or utilize some or all of the RF 15 line dynamic prompts.
These dynamic prompts are:
- Item Overstock
- Shrinkage
- Low on Stock
- Suggest Clearance
The Item Overstock prompt is determined by the client entering a percentage (%) value in the Overstock Warning Threshold (%) field (shown in Figure 1).
The Shrinkage prompt is given when there is excessive loss. Paladin sets the following default values that the client can override and set values in the following fields (shown in Figure 1).
- Shrinkage warning (Dollars Lost $). The default set by Paladin is 25.0, which can be changed by the client.
- Shrinkage Timespan Warn Threshold (Days). The default set by Paladin is 180, which can be changed by the client.
The Low on Stock threshold prompt is given when stock needs are under an expected quantity.
Items not performing may also be considered for a clearance item (refer to the Clearance function section in this article).
There is also additional information displayed (no voice prompt given):
- Wasted. This is determined when investment dollars are tied up in inventory that is not selling. These dollars represent wasted opportunity (refer to the Wasted section in this article).
- Gross Margin Return On Investment (GMROI). This is a measurement of a store’s investment performance (refer to the GMROI section of this article).
Paladin follows ADA Section 508 Compliance for the visually impaired; therefore, users can change the text and background color by making a selection from the Color Display Mode list (refer to the Change text and background color section in this article).

Figure 1: RF 15 line display options
This article provides information and instruction on the following
- Set up RF Unit in Paladin
- Set RF 15 line dynamic prompts
- Clearance function
- Change from RF 6 Line to RF 15 line
- Change text and background color
- Choosing RF Unit 15 line modes
- Set Location
- Overwrite or Append Stock on Hand modes
- Low on stock
- Suggested Order
- Shrinkage
- Build Working PO
- Receive PO (Non-EDI)
- Serialization
- Additional information given with RF Unit 15 line
Note: For information and instruction on setting up RF Unit base stations, setting up employee access, assigning printers, etc., refer to the RF Units KBA.
Set up RF Unit in Paladin
Important: Contact Paladin Support to load voice prompts on existing RF units. New RF units purchased from Paladin have the voice prompts loaded.
- In Paladin, from the main menu, select File > Setup.
- Select the Company tab.
- In the RF Terminals pane, in the RF Server Location box, enter the PC name for the Paladin terminal.
Note: This is a text field and does not affect functionality.
- In the Port list, select the COM port that you assigned to the RF base station in Device Manager.

Figure 2: RF Server Location and Port
- Click Save, then click Close.
- Close and restart Paladin.
- In Paladin, on the top ribbon, select the Inventory module.
- On the bottom ribbon of the module, click F10 RF Unit.

Figure 3: Inventory module/F10 RF Unit
The RF Unit Controls window opens with the message to sign on to an RF Unit.

Figure 4: RF Unit Controls window
Important: When initializing the RF Unit, if Paladin cannot ID the COM port, the COM Port for the base station is not configured correctly.
The following message opens:

Figure 5: Unable to establish COM port error message
Also, the RF Unit will display the following message at the bottom of the screen:

Figure 6: COM Port error message
To correct this, ensure that the base station is plugged into the computer prior to opening Paladin.
After the RF Unit is logged in, the RF Unit Controls window is populated with information on the RF unit.
Important: the RF Unit Controls window must be kept open when RF units are in use.

Figure 7: RF Unit Controls window/RF Units connected
- Perform the following tests:
- Verify that Paladin sees the RF scanner.
- Test the RF scanner by scanning an item’s tag.
Set RF 15 line dynamic prompts
As previously mentioned, the following dynamic prompts can be turned on or off when using RF 15 line functionality:
- Item Overstock
- Shrinkage
- Low on Stock
Voice prompts can be configured by adjusting the following thresholds:
- Shrinkage Warning (Dollars lost $). By default, this is set to 25.0.
- Shrinkage Timespan Warn Threshold (Days). By default, this is set to 180 days.
- Overstock Warning Threshold (%). By default, this is 35 percent.
In addition, the standard color scheme (yellow text on a maroon background) can be changed to a scheme of white text on a black background. Both of these schemes are inverted when highlighted (refer to the Change text and background color section in this article).
To set the dynamic prompts and display:
- In Paladin, from the main menu, select File > Setup.
- Select the Company tab.
- In the RF Terminals pane, select the options under RF 15 line display options.
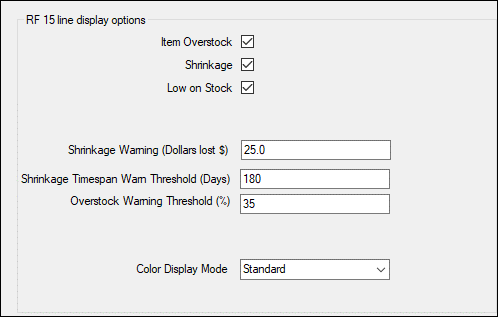
Figure 8: RF 15 line display options
Clearance function
Using the PaladinNsight™ dashboard, clients can set up clearance items. PaladinNsight™ is located in Paladin’s Inventory module on the Inventory tab. If you are a manager or other high-level employee, it will automatically appear on your PaladinNsight™ dashboard.
Note: You can enable/disable the RF Unit Clearance prompt by checking/unchecking Suggested Clearance in File > Setup > Company tab.
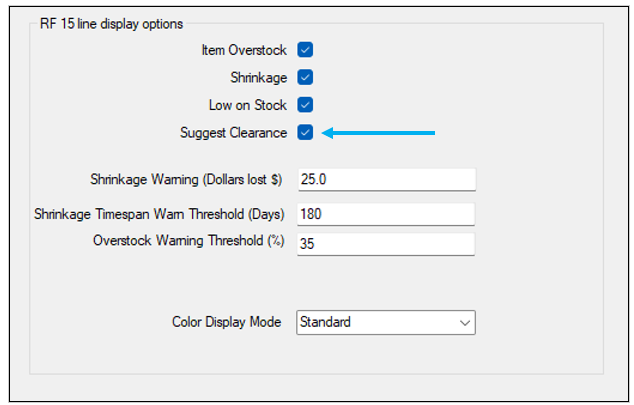
Figure 9: Suggested Clearance option
For instruction on setting up clearance items, refer to PaladinNsight™ Clearance function.
When the Item Overstock dynamic prompt is checked in the RF 15 line display options section of Paladin Configuration, the RF 15 line unit recognizes clearance items when in the Overwrite SOH or Append to SOH mode as shown in Figure 9.

Figure 10: Clearance Item status
In Build Working PO mode, when scanning an item, the RF Unit will bring up a screen showing the item is on clearance. A voice prompt also announces “Clearance.”

Figure 11: Item on Clearance message
Press ENTER to resume scanning.
If you want to put an item on clearance from either the Overwrite SOH or Append SOH mode:
- After scanning an item and entering a quantity and sell price, if it meets the requirement(s) shown on the bottom half of the screen (Figure 11), the RF unit voice prompt will state “Clearance.”
- Enter Yes or No on the unit keyboard. If Yes, the RF unit goes to printing (if you have printing bin tags set up).
- If No, enter 0, and the RF unit is ready to proceed with scanning.

Figure 12: Bottom ribbon values
Change from RF 6 Line to RF 15 Line
After signing the RF unit into Paladin, the following screen appears on the device:

Figure 13: RF Unit SIGN ON screen
- Press 2 to to set RF 15 Line.
The RF TEMINAL SETUP screen opens.
- Select option 5 LCD SETTINGS.

Figure 14: RF TEMINAL SETUP screen
- In the LCD OPTIONS screen, select option 1 to toggle 4/6 LINE LEGACY MODE to OFF. This puts the unit into 15 line mode.

Figure 15: Turn 6 line mode off and 15 line mode on
- Ensure that option 6 PROMPT COLOR CHANGE is set to “\” as shown in Figure 15.

Figure 16: Background and text color status
Change text and background color
Paladin follows ADA Section 508 Compliance for the visually impaired; therefore, users can change the text and background color.
- In Paladin, from the main menu, select File > Setup.
- Select the Company tab.
- In the RF Terminals pane, under RF 15 line display options, select either Standard or AlternateOne from the Color Display Mode list.
- Standard is a maroon background with yellow text. This is inverted when highlighted.
- AlternateOne is a white background with black text. This is inverted when highlighted.
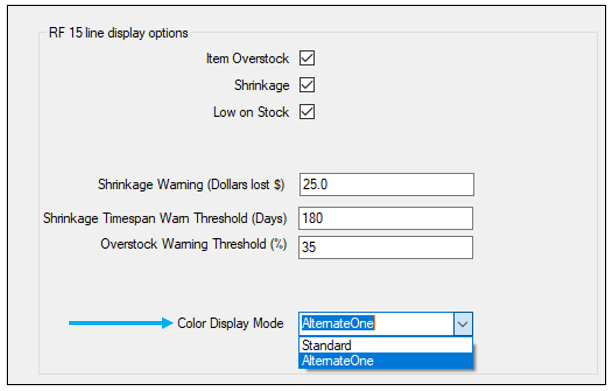
Figure 17: RF 15 line unit Color Display Mode list
- Click Save, then click Close.
Choosing RF Unit 15 line modes
On the RF Unit sign on screen, press 1 to sign on the device.

Figure 18: RF Unit SIGN ON screen
The Choose Mode screen opens. Figure 18 shows the 6 modes available.
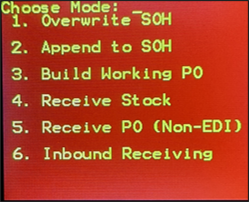
Figure 19: Choose Mode screen
Set Location
After selecting a mode, the following screen (Figure 19) opens where you set the location before starting to scan items.

Figure 20: Location prompt
Perform one of the following options for the Location prompt on the RF unit:
a) Enter a new location to be added to each scanned item, then press Enter.
b) To keep the item’s current location, enter nothing and press Enter.
Location information can be entered by Location ID or by Location Name on the RF unit by utilizing the shift key function (the Shift key is the circular key with the arrow on the top right-hand side of the RF unit keypad).

Figure 21: Ready to scan
Note: For information on setting locations in Paladin, refer to the Set up location system in your store KBA.
Overwrite or Append Stock on Hand modes
Operations in the Overwrite SOH mode and the Append SOH mode are the same as the 6 line interface.
Overwrite SOH mode changes or accepts the item’s current stock on hand. Append SOH mode adds amounts to the item’s stock on hand.
In both modes, in the Quantity (Qty.) field, make any changes, then press ENTER. The RF unit will announce which mode you are in:
a) If you hear “Quantity,” you are in Overwrite mode. Any number that you enter will change the stock on hand to that number (refer to the Suggested Order section below)
b) If you hear “Add to Stock,” you are in Append mode. Any number that you enter will be added to the total amount of stock on hand.
Note: The SELL field reflects the retail price of the item.
Low on stock

Figure 22: Paladin Configuration/Low on Stock
If Low on Stock is checked in Paladin Configuration, when the quantity (QTY) and sell price (SELL) are entered in the RF Unit, Paladin recognizes the item is low on stock, and a voice prompt states “low on stock.”
Suggested Order
Related to low on stock, the RF 15 Line unit will display SUGGESTED ORDER when an item is low on stock.
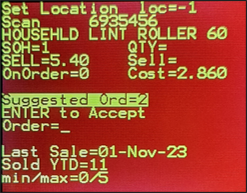
Figure 23: SUGGESTED ORDER prompt
You have the option to press ENTER to Accept the Suggested Order, or you can specify a different amount to order in the Order field.
Shrinkage
Shrinkage reflects unexpected variation in the SOH value. Theft, loss, damaged or misplaced items result in a decrease of SOH at the next count.
If Shrinkage is checked in Paladin Configuration, when an item is scanned that meets the threshold requirements, a voice prompt states “shrinkage.” You must press Enter to acknowledge that the voice prompt was heard.

Figure 24: Paladin Configuration/Shrinkage
Note: If the item is set on clearance in Paladin, this is noted in the screen and a voice prompt states “Clearance.” For more information, refer to the Clearance function section of this article.
Build Working PO
In the Build Working PO mode, when an item is scanned, a voice prompt states “Order.” If an item is overstocked, a voice prompt states “Overstock.”
In Build Working PO mode, Suggested Order is always shown and highlighted in the middle field of the screen. Also, Warehouse stock on hand is shown when available.

Figure 25: Build Working PO mode
Receive PO (Non-EDI) mode
When an item is scanned in Receive PO mode, the following screen appears asking for a Non-EDI Supplier ID. Enter the numerical ID of the supplier you want to use. If the item has a serial number that needs to be entered, refer to the Serialization section of this article.

Figure 26: Non-EDI Supplier ID request
Serialization
Product serialization is the process of assigning unique IDs or “serial numbers” to individual items in a product line. Serial numbers are typically used for high-value products, such as power equipment, chainsaws, power tools, and appliances.
The Paladin serialization feature lets you maintain and track serial numbers for any product in your store and has a component in every module.
- PO Receive: Serial numbers are added when items are received.
- Invoice/Quote: When a serialized item is sold or returned, the cashier must select the serial number from a list of the available serial numbers in your inventory. You cannot complete the sale without entering the serial number.
- Inventory: Each item maintains a current list of in-stock serial numbers and a detailed status history for every serial number entered in Paladin.
- Reports: With the Serial Number List report, you can view a complete list of your serialized products and all their serial numbers in Paladin, including current serial number status.
Paladin has incorporated multiple safeguards to help you maintain exactly one serial number for each serialized item in your inventory. An item’s serial numbers must also be unique; duplicates are not allowed.
For instruction and information on serialization in Paladin, refer to the Serialization: Managing products with serial numbers KBA.
To enter a serial number in the 15-line RF unit:
- In Receive PO (Non-EDI) mode, scan the barcode that has the serial number. If there is another serial number, the RF Unit will advance in order to scan the next serial number.
Note: Serial numbers can also be entered using the pin pad.
- When done, press Enter.
- If you don’t want to enter serial numbers on the RF gun, do not scan or type anything and press Enter. This allows bypassing entering serial numbers on the RF gun.
Note: Serial numbers not entered on the RF unit can be entered in Paladin on a terminal at a later time.

Figure 27: Enter serial number(s)
Additional information given with RF Unit 15 line
The following additional information is given in the RF Unit 15 line screen regardless of the number of dynamic prompts enabled.
Note: Both GMROI and Wasted appear in the middle of the screen and are highlighted.
GMROI
GMROI is the acronym for Gross Margin Return On Investment. GMROI is a measurement of a stores investment performance. The formula for determining GMROI is:

Example: If an item has a gross profit of $225,000 (gross margin dollars), and an average inventory value of $85,000 (inventory investment) the total GMROI is: 264%
A good rule of thumb for evaluating the return on an item is:
- The first 100% pays you back for the goods.
- The second 100% pays for operations (give or take).
- The rest is the profit.
Paladin recommends that you try for 300% GMROI or more.
The following are suggestions on how to increase your GMROI:
- Decrease inventory investment.
- Increase customer count and average sales.
- Increase margin
(Use caution as this may defeat #2 above.)
Keeping an eye on your store’s GMROI is important because:
- Most store owners just look at the profit margin without considering their inventory investment.
- GMROI is the most important statistic ─ especially for successful retailers.
- GMROI shows the financial return for every inventory investment dollar spent.
- GMROI is all about inventory (investment) productivity.
This is triggered when Item Overstock is checked in Paladin Configuration and is reflected in the 15 line as a percentage as follows:
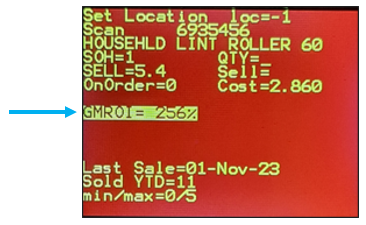
Figure 28: GMROI percentage
Wasted
Waste is calculated by number of overstocked units according to the suggested order x cost. This is reflected as a dollar amount as follows:
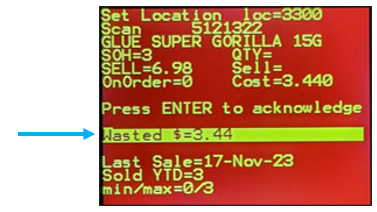
Figure 29: Amount wasted
Bottom ribbon
Enhancements have been made on the information fields that appear on the bottom of the RF unit.
In Overwrite/Append modes, the bottom ribbon provides the following:
- Last Sale (Date)
- Sold YTD
- min/max
- user min/max (Max Qty)

Figure 30: Overwrite/Append modes bottom ribbon
In Build Working PO mode, the bottom ribbon provides the following:
- Last Sale (Date)
- Sold YTD
- min/max

Figure 31: Building Working PO bottom ribbon
If you have questions or suggestions about this information, contact support@paladinpos.com.

