
This article provides instruction and information on the following:
- What is product serialization?
- Common uses for serial numbers
- About the Paladin Serialization feature
- How to set up the serialization feature
- Identifying serialized items: Inventory module
- Receiving serialized items: PO Module
- Selling serialized items: Invoice/Quote module
- Managing serial numbers: Inventory module
- Serial Number Reporting
- Multi-stores and serial numbers
What is product serialization?
Product serialization is the process of assigning unique IDs or “serial numbers” to individual items in a product line. Serial numbers are typically used for high-value products, such as power equipment, chainsaws, power tools, and appliances.
Common uses for serial numbers
Serial numbers are useful for many reasons, including:
- Managing warranty coverage
- Maintaining ownership records
- Supplier traceability
- Enhanced accountability
- Product recalls
About the Paladin Serialization feature
The Paladin serialization feature lets you maintain and track serial numbers for any product in your store and has a component in every module.
- PO Receive: Serial numbers are added when items are received.
- Invoice/Quote: When a serialized item is sold or returned, the cashier must select the serial number from a list of the available serial numbers in your inventory. You cannot complete the sale without entering the serial number.
- Inventory: Each item maintains a current list of in-stock serial numbers and a detailed status history for every serial number entered in Paladin.
- Reports: With the Serial Number List report, you can view a complete list of your serialized products and all their serial numbers in Paladin, including current serial number status.
Paladin has incorporated multiple safeguards to help you maintain exactly one serial number for each serialized item in your inventory. An item’s serial numbers must also be unique; duplicates are not allowed.
How to set up the serialization feature
To set up the serialization feature:
- In Paladin, from the main menu, select File > Setup.
- Select the Company tab.
- In the Inventory pane, check Enable Serial Number Management.
- Click Save, then click Close.
- Close and restart Paladin.
- Do the following for each serialized inventory item:
- In Paladin, on the top ribbon, select the Inventory module and open the item.
- On the General tab, on the top of the Item Information pane, check Serial#.
- Click F12 Save.
- Enter serial numbers for items currently in-stock (recommended), or instruct cashiers to enter the serial number manually at checkout. To enter the serial numbers in the Inventory module, re-open the item and click the yield icon with a exclamation point next to the SOH quantity. Enter or scan the serial numbers for items in-stock, then click F12 Finish.
Tips:
-
-
- The yield icon will disappear when the number of serial items equals your stock on hand quantity.
- You can always access an item’s serial numbers by clicking F6 Serial # and Alt Part # on the bottom ribbon of the Inventory module. In the Alternate Part # & Serial # window, enable Serial #, then select the Serial #.
- When a serialized item is received by an EDI process, you must enter the serial number afterwards in the Inventory module or at checkout.
- If a serialized items is received manually in the PO module, you will be required to enter the serial number before the PO receiving process can complete.
-
Identifying serialized items: Inventory module
To identify a product as a serialized item:
- In Paladin, on the top ribbon, select the Inventory module.
- Enter a part number in the Part # box.
- Press Enter.
- Open the General tab.
- On the top of the Item Information pane, check Serial#.
- Click F12 Save.
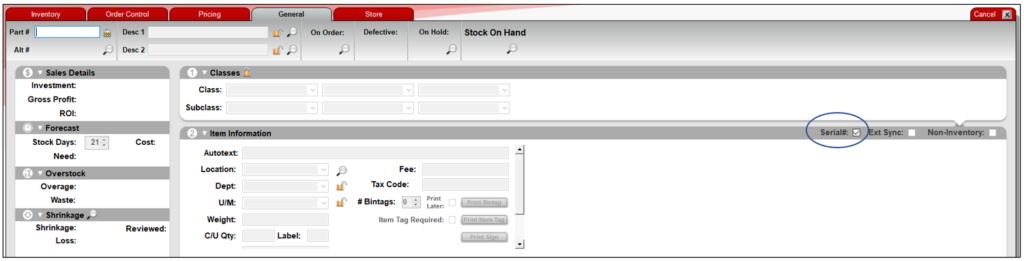
Figure 1: Serial# checkbox
This turns on the serialization feature for this item, and all sales and receiving events for the item will require a serial number.
Receiving serialized items: PO Module
In Paladin’s PO module, there are two types of receiving:
Note: For working with serialized items with the RF 15 line unit, refer to the Serialization section of the RF Unit: 15 line functionality KBA.
Manually receiving
When serialized items on a purchase order (PO) are manually received, you must provide a serial number for every received item. Serialized PO line items are identified with a Serial # label. A red Serial # warning indicates that a PO item needs a serial number.
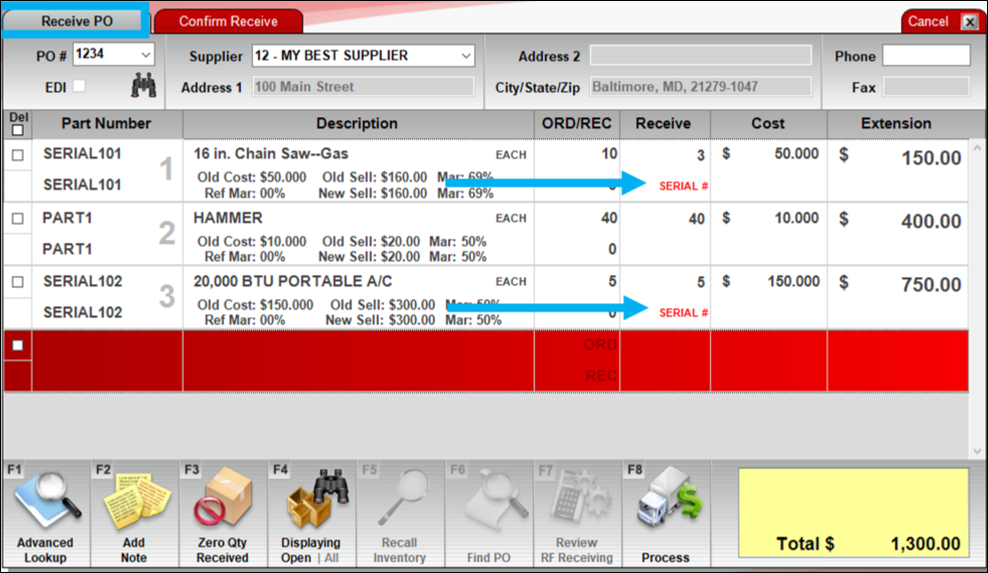
Figure 2: Red Serial # warning/Serial number needed
To add, edit, and view serial numbers, or search the PO for serialized items, use the quick access (right-click) menu.
When you right-click a serialized item, you have these options:
- Add Serial #: Opens the Add/Remove Serial Numbers window.
- Find Next Serial # Warning: Moves to the next PO item that needs serial numbers.

Figure 3: Serial # options
To add serial numbers, right-click the line item, select Add Serial #, then scan or enter the serial numbers in the Add/Remove Serial Numbers window.
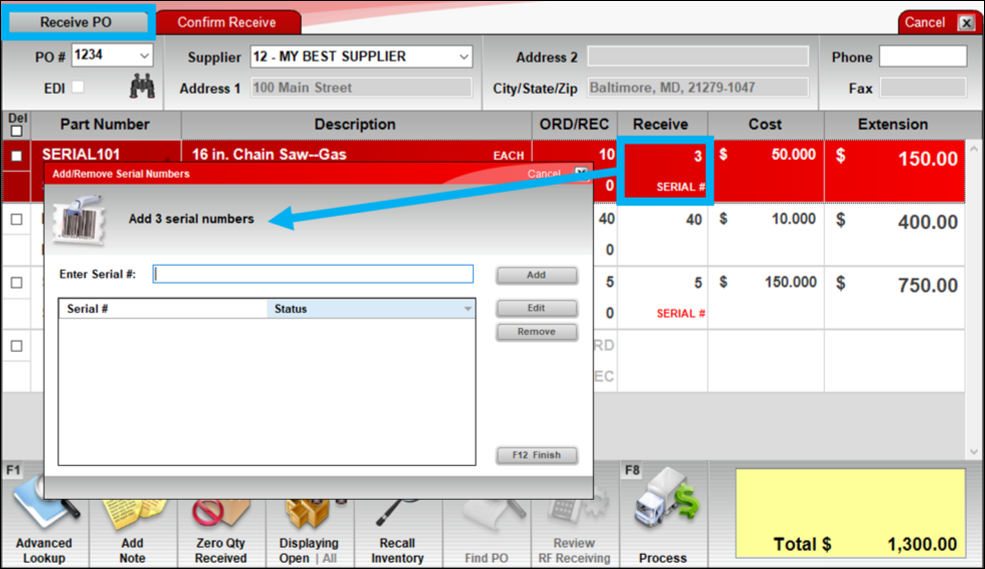
Figure 4: Add/Remove Serial Numbers window
As you add serial numbers to the item, the required number in the message decreases. For example, if three serial numbers are required, and you add one, the message changes from Add 3 serial numbers to Add 2 serial numbers.
When you are done, click F12 Finish.
Serial numbers are only required for the quantity that you are receiving. In Figure 5, the order quantity is 10, but the receive quantity is 3. Therefore, only 3 serial numbers are requested.
When the required serial numbers are entered for an item, the Serial # label turns from red to black.
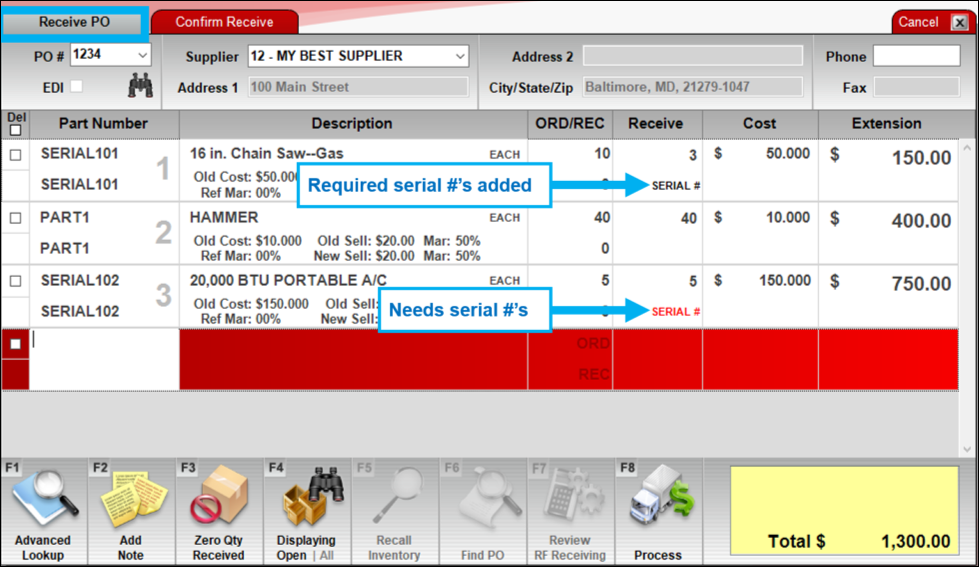
Figure 5: Serial # label turns from red to black when added or needed
When a PO item was partially received at a previous time, in the Add/Remove Serial Numbers window, the serial numbers you previously entered appear in light gray with a Status of Received and cannot be edited.
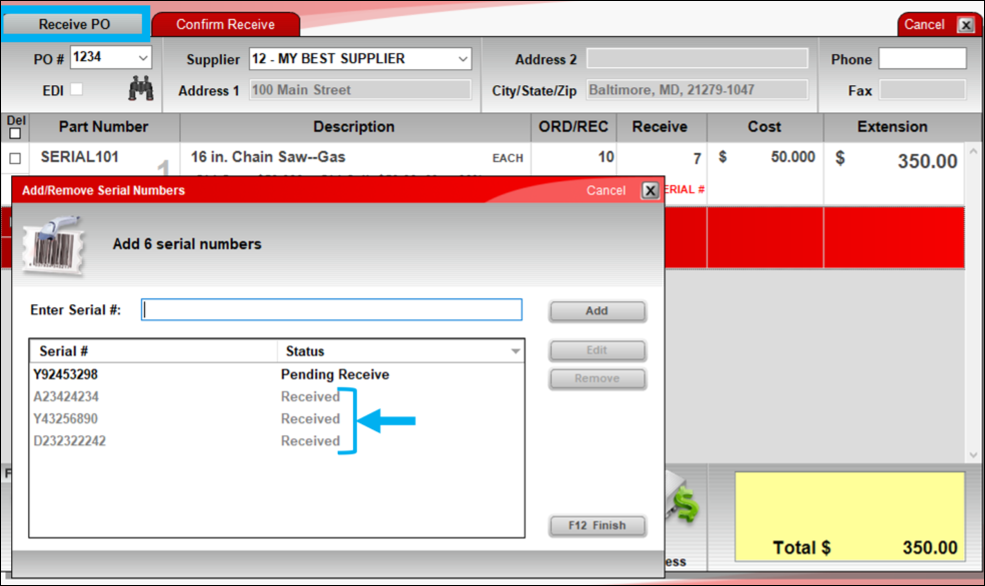
Figure 6: Add/Remove Serial Numbers window/Status of Received
EDI Receiving
When you receive items using EDI, the items are automatically added to your inventory without serial numbers. You must manually add the missing serial numbers to the items in the Inventory module.
To do this, after the EDI receive process is complete, open the serialized item in the Inventory module and click the yield sign next to the SOH value. This opens the Alternate Part # & Serial # window where you can add the required serial numbers. A message in red tells you how many serial numbers are needed and will decrement the number as you add them.
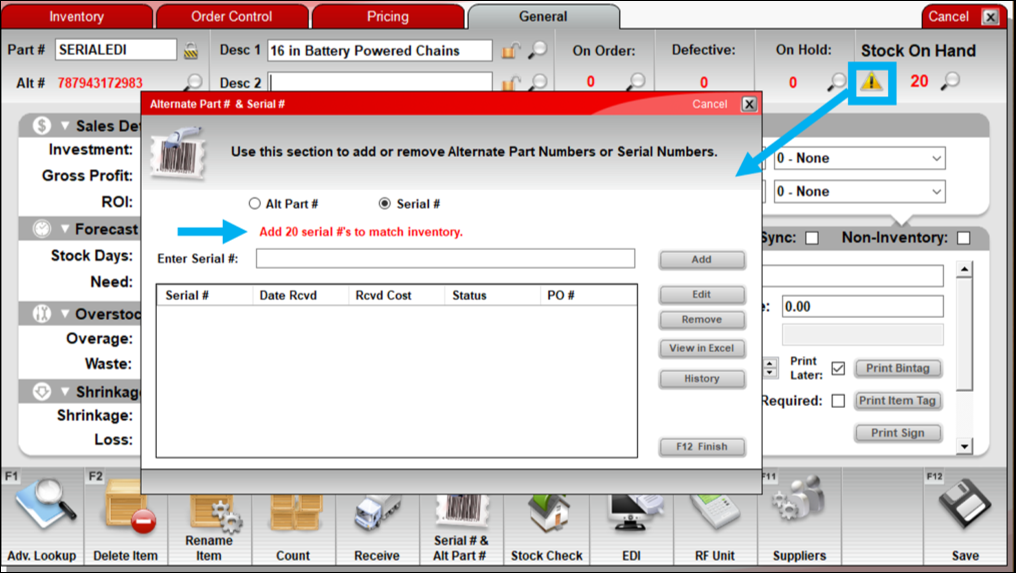
Figure 7: Alternate Part # & Serial # window/Amount of serial numbers needed
After you enter all the serial numbers, the yield sign indicator disappears.
Tip: This indicator always appears when there are more or fewer serial numbers than items in-stock (based on the SOH value); it is not directly related to the EDI process.
To create a Missing Serial Number Report/spreadsheet showing all items that do not have serial numbers:
- In Paladin, from the top ribbon, select the Reports module.
- In the Report Area pane, select Inventory > General.
- In the Report List pane, select Missing Serial Numbers.
- In the Choose Report pane, click F12 Next.
- In the Missing Serial Numbers window, in the Sorting Options pane, click F12 Run Report.
An Excel spreadsheet opens with the following columns:
- PartNumber
- AltPartNumber
- Description
- InventoryId
- StockOnHand
- StockMissingSerialNumbers
- SerializedStock

Figure 8: Missing Serial Numbers report/spreadsheet
Selling serialized items: Invoice/Quote module
In the Invoice/Quote module, when a cashier adds a serialized item to an invoice, they are prompted to select a serial number from the available serial numbers for that item.
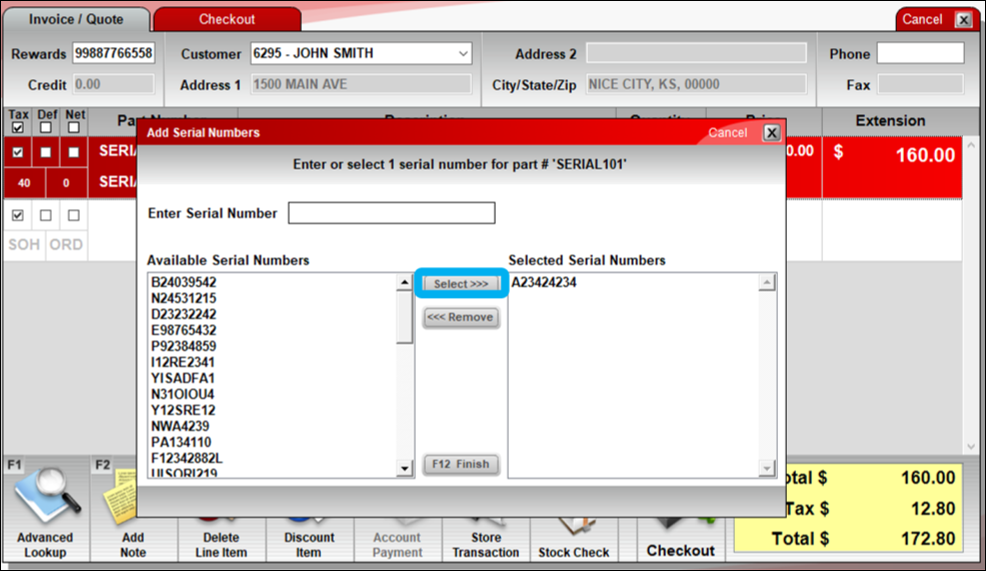
Figure 9: Add Serial Numbers window/Available serial numbers
If the serial number does not appear in the list, you can enter it manually with manager approval.
Tip: Use this override feature with caution. While you may need to add serial numbers manually at checkout when your store is transitioning to the serialization system, over time, serial numbers should only be entered during PO receiving.
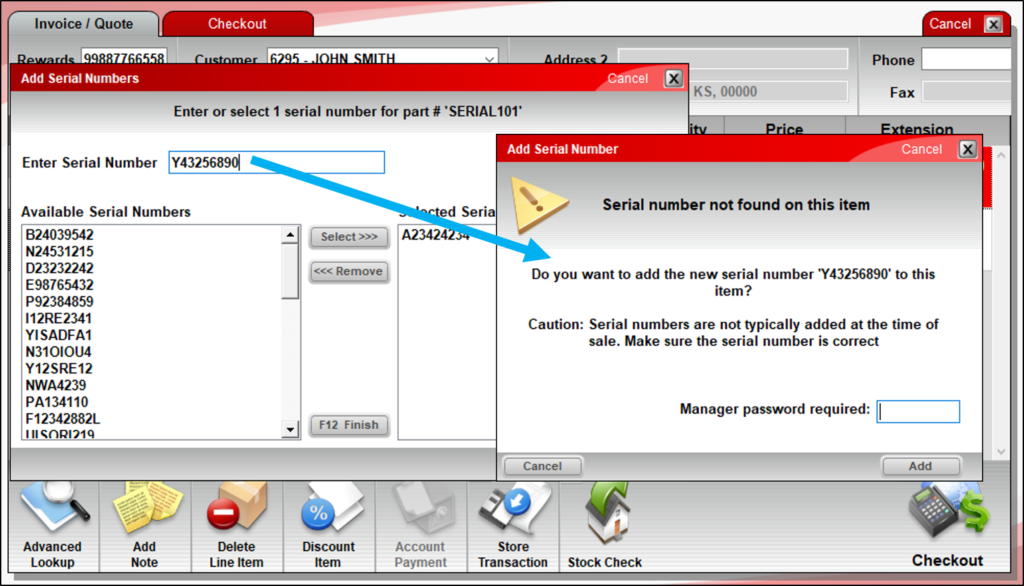
Figure 10: Add Serial Number message
On the invoice, serialized items are identified by a SERIAL # label, and selected serial numbers are added as line items on the invoice. A red SERIAL # label (also known as a Serial # warning) identifies items that don’t have the required serial numbers.
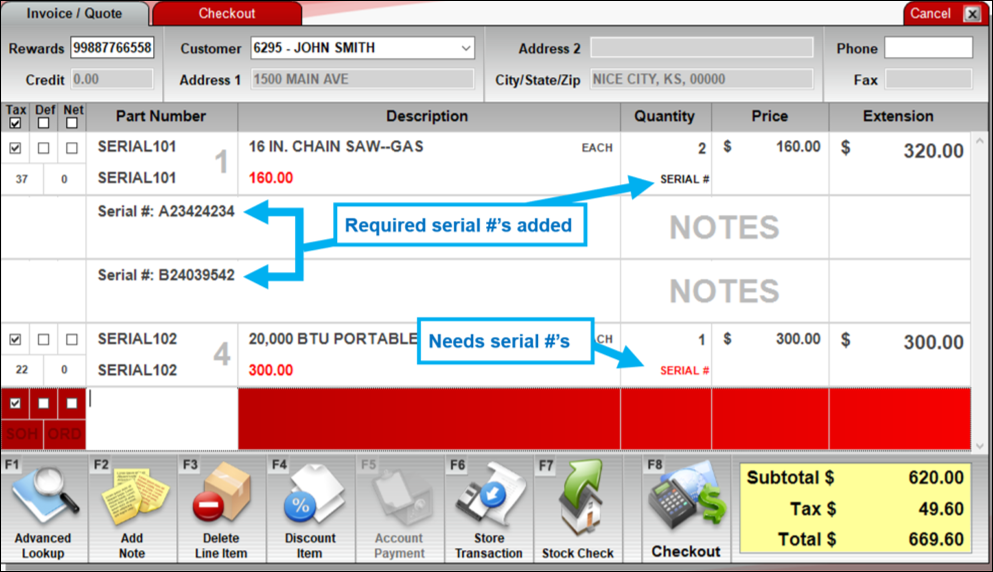
Figure 11: Serial numbers added or needed
Similar to the PO module, you can use the quick access (right-click) menu to edit and view serial numbers (Add Serial #) as well as find the next item with a serial number warning (Find Next Serial # Warning).
Figure 12: Find Next Serial # Warning
As a safeguard, if you try to process an invoice without the correct number of serial numbers, a message opens, and you will be taken to the first item with a Serial # warning.
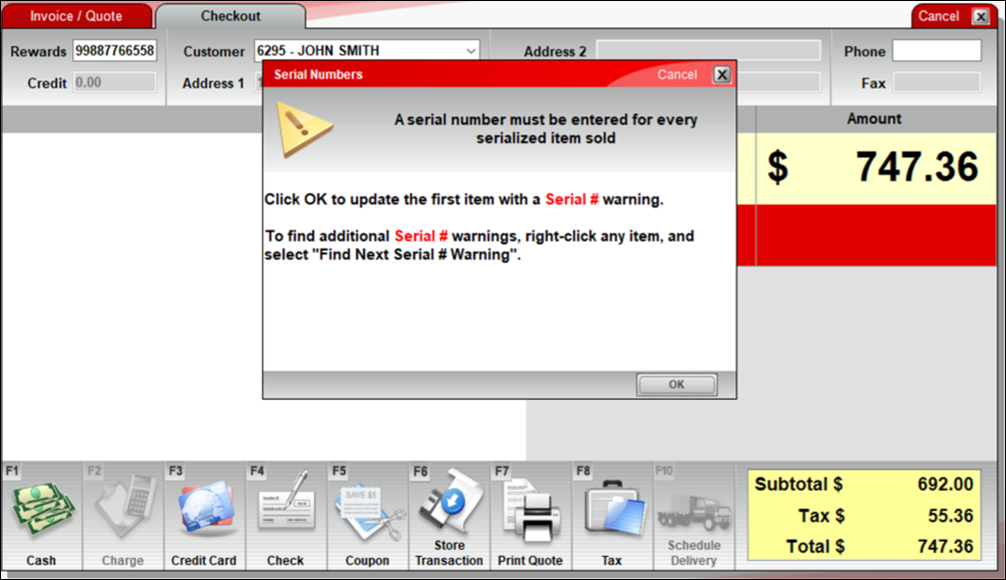
Figure 13: Serial Numbers window/Serial # warning message
Serial numbers appear on the customer’s receipt for easy reference.
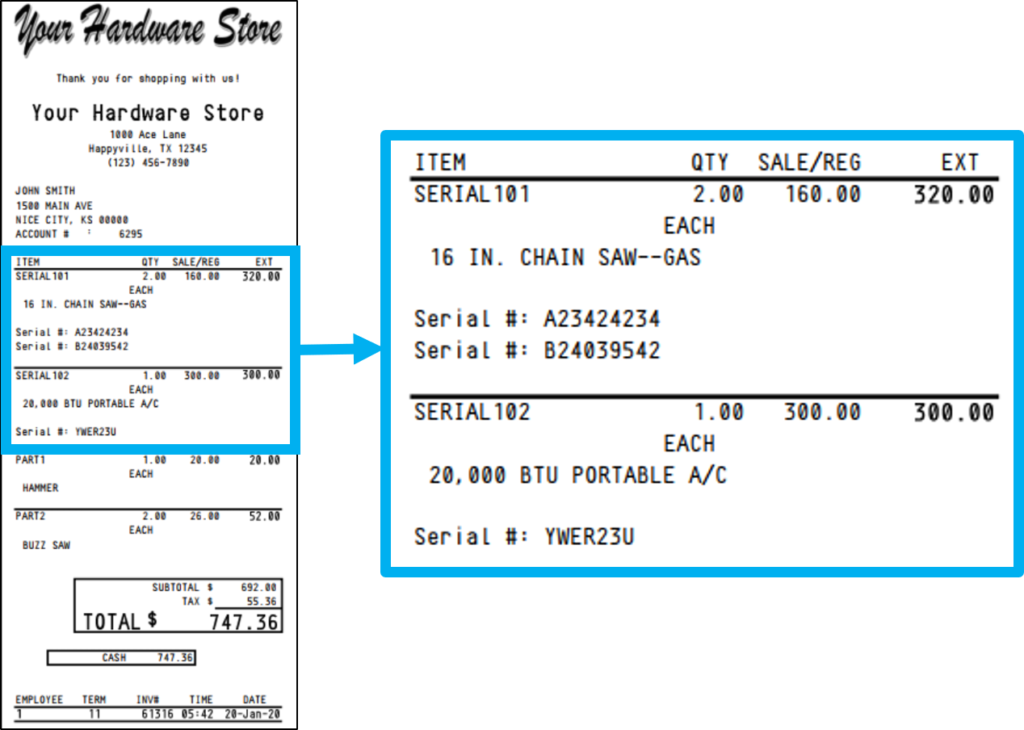
Figure 14: Serial number on customer receipt
When a customer returns a serialized item, the cashier must select the serial number from the list of Sold Serial Numbers for that item. The return cannot be processed until a serial number is selected.
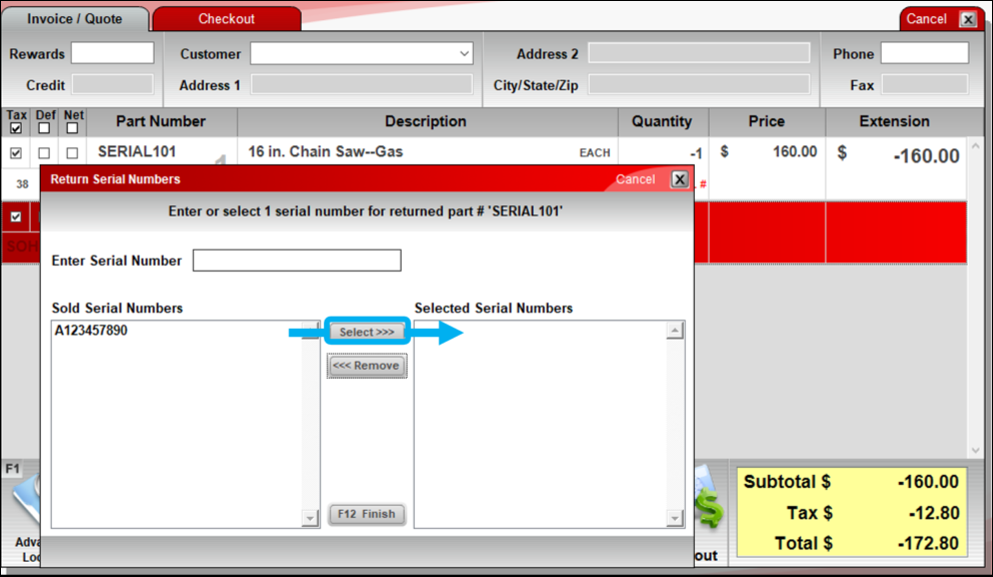
Figure 15: Return Serial Numbers window
Managing serial numbers: Inventory module
In Paladin’s Inventory module, you can view and edit an item’s available (in-stock) serial number list. You can also access a detailed serial number history and view the serial number information in Excel. To access these features, on the bottom ribbon of the Inventory module, click F6 Serial # & Alt Part #. Then, in the Alternate Part # and Serial # window, enable Serial #.
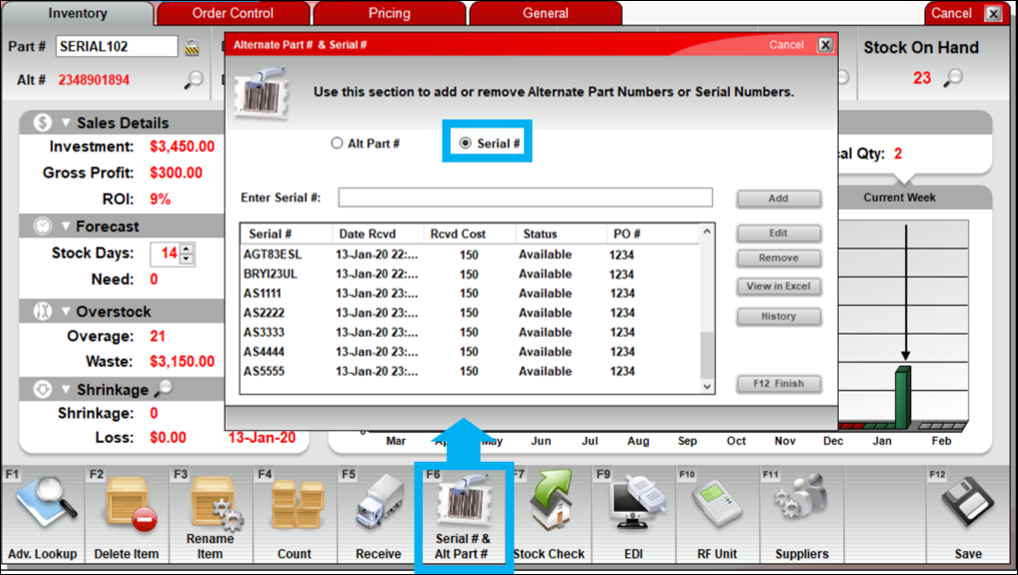
Figure 16: Alternate Part # and Serial # window/Enable Serial #
To view the available serial number information in a spreadsheet, click View in Excel.
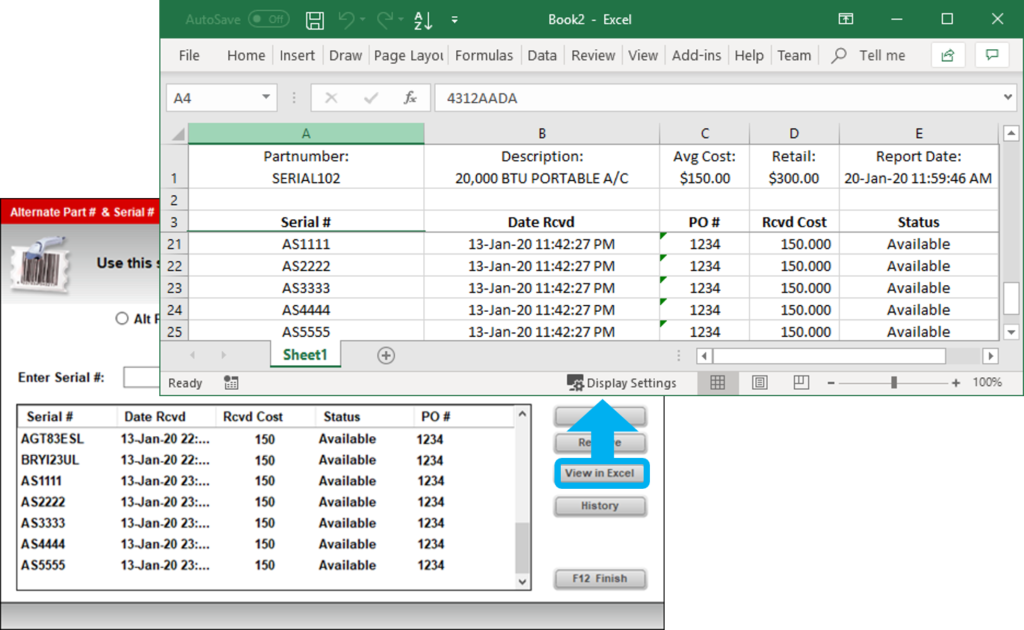
Figure 17: View in Excel option
Each time a serial number is added to an item, added to an invoice, sold, returned, or otherwise changed in some way, Paladin logs the event in the inventory item’s serial number history. To view this history, click History to open the Serial Number History viewer. To review this information in an Excel spreadsheet, at the bottom of the Serial Number History window, click View in Excel.
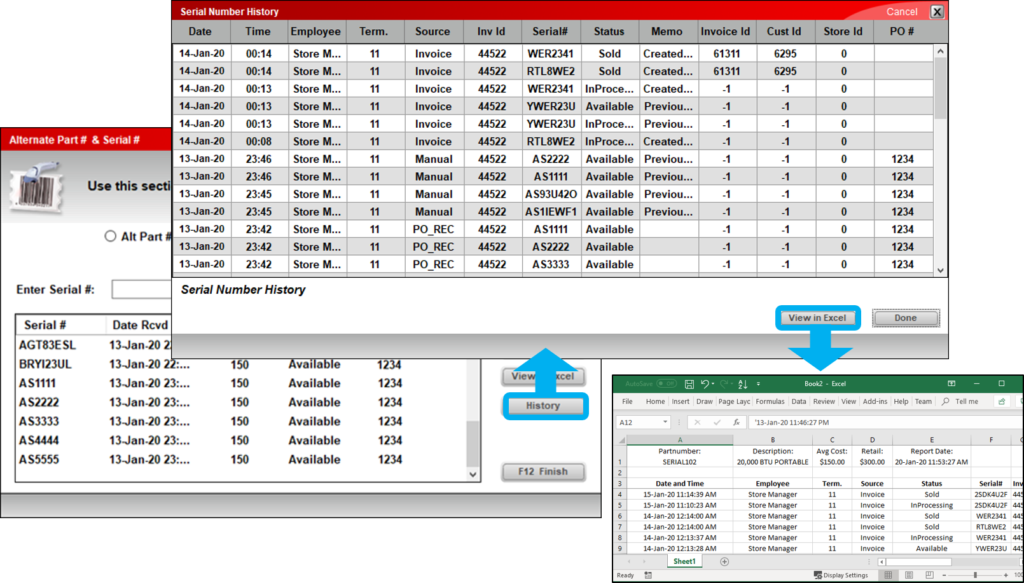
Figure 18: Serial Number History window/View in Excel
As mentioned in the EDI Receiving section, if there are too many or too few serial numbers for an item, a yield button with an exclamation point appears in the Inventory module next to the SOH value. Click this indicator to view and address the discrepancy.
Tip: Stores that are transitioning to the serial number system will likely have many of these warnings because items that were received before serialization was turned on will not have serial numbers in Paladin. These serial numbers can be added manually.
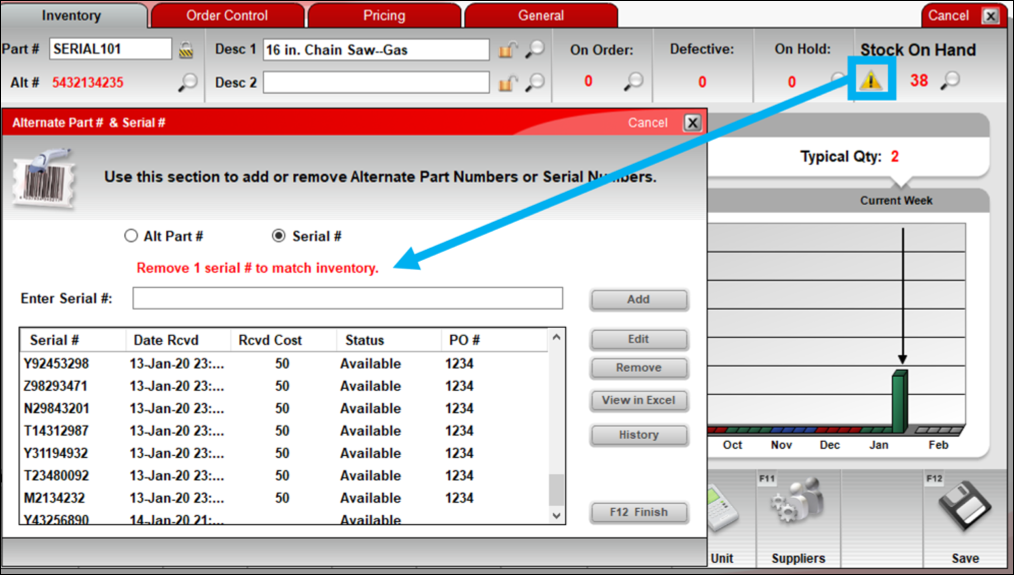
Figure 19: Alternate Part # & Serial # window/SOH message
Serial Number Reporting
The Serial Number List report provides an itemized list of serialized items and their serial numbers including:
- Serialized Part # & Alt Part #
- Serialized item description
- Serial #’s (one serial # per line)
- Serial # added/received date
- Current serial # status (Available, Sold, etc.)
- Supplier cost when serial # was received (if available)
- Received PO # (if available)
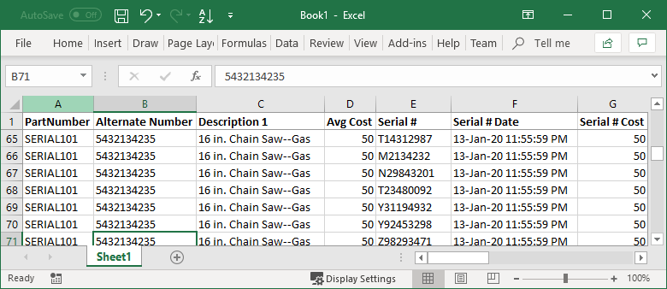
Figure 20: Serial Number List Report
To access this report:
- In Paladin, on the top ribbon, select the Reports module.
- In the Report Area pane, select Inventory > General.
- In the Report List pane, select Serial Number List.
- In the Choose Report pane, click F12 Next.
- In the Serial Number List window, in the Report Settings pane, set the parameters for the report.
- In the Sorting Options pane, click F12 Run Report. An Excel icon appears on the bottom taskbar of your computer.
- Click the Excel icon to open the report.
If items have not been assigned serial numbers, the Missing Serial Number report provides an itemized list of items that do not have a serial number assigned. To access this report/spreadsheet:
- In Paladin, from the top ribbon, select the Reports module.
- In the Report Area pane, select Inventory > General.
- In the Report List pane, select Missing Serial Numbers.
- In the Choose Report pane, click F12 Next.
- In the Missing Serial Numbers window, in the Sorting Options pane, click F12 Run Report.
An Excel spreadsheet opens with the following columns:
- PartNumber
- AltPartNumber
- Description
- InventoryId
- StockOnHand
- StockMissingSerialNumbers
- SerializedStock
Figure 21: Missing Serial Numbers report/spreadsheet
Multi-stores and serial numbers
In multi-stores, when the serial number feature is turned on for an item, it is turned on in all stores. Similarly, if you turn off the serial number feature for an item, a message opens letting you know that you will be turning it off in all stores.
The following applies to multi-store serial numbering:
- Multi-store serialized item transfers
- Transfer using a manual purchase order
- Transfer using the Inventory F7 Transfer feature
Multi-store serialized item transfers
When serialized items are transferred between stores, serial numbers must be specified and reassigned. How they are specified depends on the transfer method.
- Purchase order (PO) transfer
- Inventory F7 transfer
- Transfer using the Inventory F7 Transfer feature
In the following multi-store transfer examples, store “Greenville” is receiving a serialized item from store “Anderson”.
Transfer using a manual purchase order
In this scenario, the Greenville store creates a manual purchase order (PO) to transfer serialized items from the Anderson store. When Greenville receives the items from Anderson, Greenville is required to select the received items’ serial numbers from the Anderson’s Available Serial Numbers list. Once the serial numbers are selected, and the receiving process is completed, the serial numbers are removed from Anderson’s serial numbers and added to Greenville’s serial numbers.
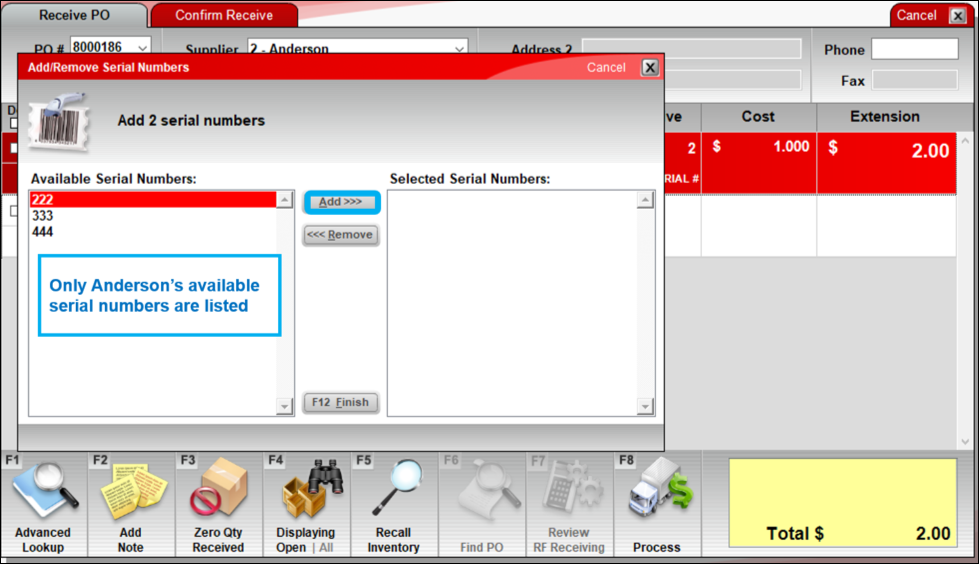
Figure 22: Add/Remove Serial Numbers window/Available Serial Numbers
Transfer using the Inventory F7 Transfer feature
In this scenario, the Greenville store uses the F7 Transfer feature in the Inventory module to automatically create and send a PO to Anderson designating specific serial numbers to transfer.
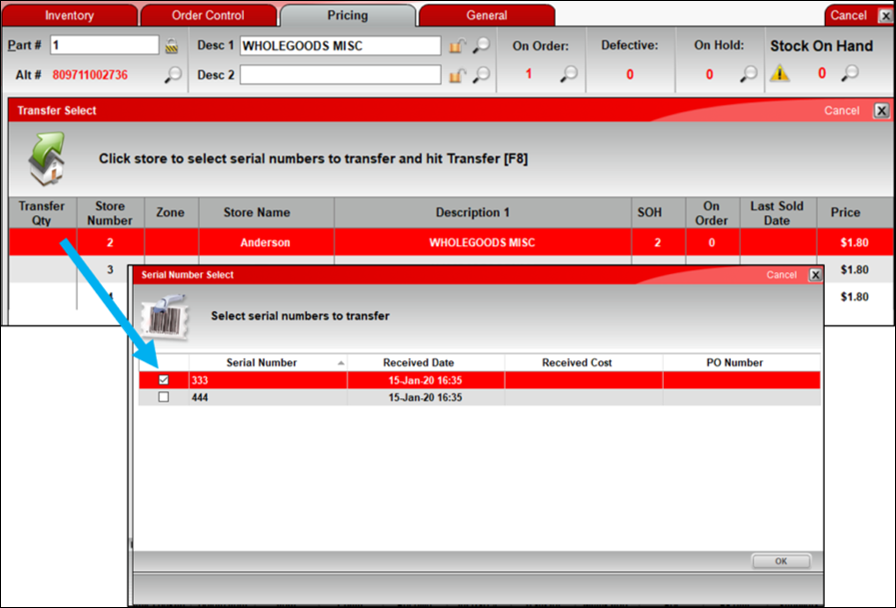
Figure 23: Transfer Select window/Serial Number Select window
When the Greenville receives the items from Anderson, Greenville is prompted to confirm that the received items have the requested serial numbers. If that is not true, the person receiving is shown all possible Anderson serial numbers for that item and can select the serial numbers that actually arrived before completing the receiving process.
Note: A negative PO for Anderson is created in this scenario only when the Paladin configuration option Create Negative POs during Stock Transfers is selected. This is a recommended setting.
To set this:
- In Paladin, from the main menu, select File > Setup.
- Select the Company tab.
- In the Inventory pane, check Create Negative POs during Stock Transfers.
- Click Save, then click Close.
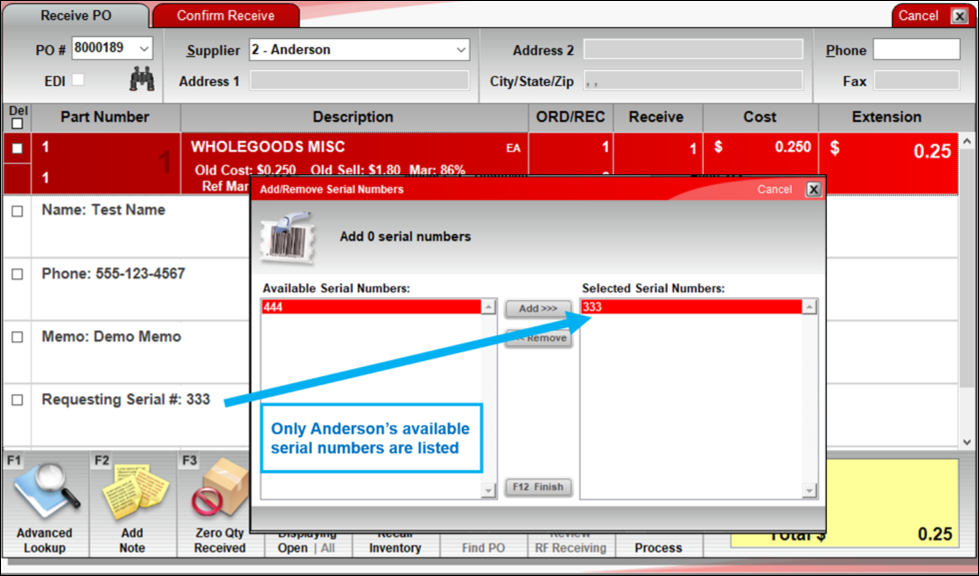
Figure 24: Add/Remove Serial Numbers window/Available serial numbers
If you have questions or suggestions about this information, contact support@paladinpos.com.
