Paladin provides cloud-based storage for documentation, invoice signatures, images and videos, and also includes document scanning tools and built-in document retention features.
- PO Documents
- Customer Documents
- Delivery Images
- Invoice Signatures
- Supplier’s Inventory Images
- Adding the supplier’s images
- Store’s Inventory Images
- Adding the store’s images
- Viewing Inventory Images in Paladin
PO Documents
With PO Documents checked, Paladin provides the capability to create electronic files that can be attached to a purchase order (PO) and stored in Paladin Cloud™. This is done through scanning.
For information and instruction, refer to the Paladin Cloud: Attaching electronic files to a purchase order KBA.
Customer Documents
With Customer Documents checked, the following document types can be uploaded to Paladin Cloud:
- Taxes
- Contracts
- Credit Applications
- Financial Statements
- Photos
- Correspondents
- Monthly Statements
Note: When Month-end statements are run, PDFs of statements are automatically uploaded to Paladin Cloud. The PDFs are also stored on the client’s database.
All file types are accepted, that is, .docx, .pdf, .pptx, .xls, and so on.
Documents are managed in Paladin’s Customers module in the Document tab.
Note: Electronic files can also be created through scanning. For information and instruction on scanning and creating customer documents, refer to the Paladin Cloud: Attaching electronic files to a purchase order KBA.
To upload and manage customer documents:
- In Paladin, from the main menu, select the Customers module.
- Select the Documents tab.
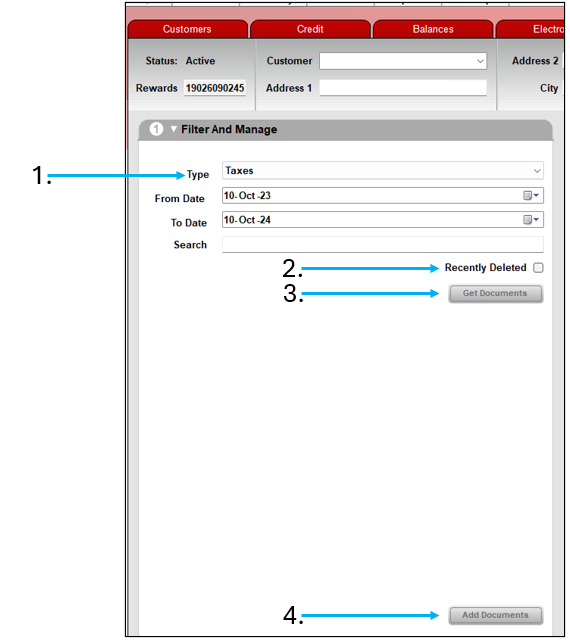
- In the Filter And Manage pane, there are the following four actions available for uploading and managing documents:
Type – Provides categories to organize document type. From the list, you have the option of:
-
- None
- Taxes
- Contracts
- Credit Applications
- Financial Statements
- Photos
- Correspondents
- Monthly Statements
Note: When Month-end statements are run, PDFs of statements are automatically uploaded to Paladin Cloud Storage. The PDFs are also stored on the client’s database.
Recently Deleted – After selecting a type, checking this and pressing Get Documents will bring up deleted documents in the Customer Documents pane, up to 30 days from deletion.
Get Documents – After selecting a type, pressing this will populate the Customer Documents pane with that document type.

Figure 1: Filter and Manage documents
Add Documents – Selecting this opens the Attach File window where you can either browse for or scan documents to add (Figure 4).

Figure 2: Browse or scan
Delivery Images
If a customer is not available to confirm the delivery, the Paladin Mobile application allows delivery personnel to take pictures to verify the delivery was performed. Refer to the Paladin Mobile KBA for creating delivery images on your mobile device(s).
Invoice Signatures
In Paladin, inventory items requiring a customer signature can be flagged. This feature also includes five lines of text that can be displayed on the signature pad (if your store is using the large display signature pads) as well as recorded on the invoice for the sale. In the Signature Required Class Number field, the Class number entered will be used as the trigger “flag” to capture the customer’s signature.
For more information on signatures refer to the Signatures KBA.
Note: Since inventory allows three unique Class values to be stored with every item, EDI processing normally updates Class 1; therefore, using of Class 2 or 3 is recommended.
Supplier’s Inventory Images
Paladin Version 2.2404.7096.1 and above is required.
By default, inventory images provided by suppliers are automatically stored in Paladin Cloud storage.
Adding the supplier’s images
Note: Supplier’s Inventory Images must be checked.
To add the supplier’s images:
- In Paladin, from the top ribbon, select the Inventory module.
- Select the Store tab.
- Under the Image Management pane, under Supplier’s Images, the supplier images populate the pane.
Note: If the supplier does not, or has not, provided any images, the view is as follows:

Figure 3: No supplier images available

Figure 4: Image Management/Supplier’s Images
When images from the supplier have populated the Supplier Images pane, you can select Download All to get all images to the file destination on your terminal. You can also right-click a single image to download. Once you have images downloaded, you can then upload them to the Store Images pane, where you can arrange them in the order preferred.
Store’s Inventory Images
If clients want to store inventory images that have been collected/created for use in items such as logos, coupons, flyers, web sites, and so on, by enabling Store’s Inventory Images, these images will be housed in Paladin Cloud.
Adding the store’s images
Note: Store’s Inventory Images must be checked.
To add a store’s images:
- In Paladin, from the top ribbon, select the Inventory module.
- Select the Store tab.
- Under the Image Management pane, perform one of the following:
-
- Click the No image available icon to open the Select Images for Part Explorer window where you can navigate to the folder that holds the store’s images.
- Copy the image to add. Right-click on the No image available icon and select Paste.
Note: The No image available icon is only available when there are no images uploaded. Once images are uploaded, the Edit Mode must be used.

Figure 5: Add image/No image available icon
-
- Add image by clicking Edit Mode.

Figure 6: Add image/Edit Mode
In Edit Mode, the following options shown in Figure 12 become available.

Figure 7: Edit Mode options
Click Add Image to add an image.
Whether you add an image by clicking on the No image available icon or clicking Edit Mode, the Select Images for Part Explorer window opens where you can open your image folder and select an image to upload to the Image Management pane.

Figure 8: Select Images for Part Explorer window
In the Edit Mode, images can be moved Left/Right to be put in the order the client wants to view them. Images can also be copy/pasted into the Image Management pane (versus using the Add Image function). Images can also be deleted.
Viewing Inventory Images in Paladin
There are two ways to view inventory images, either from Invoice/Quote or Advanced Lookup.
To view images in Invoice/Quote:
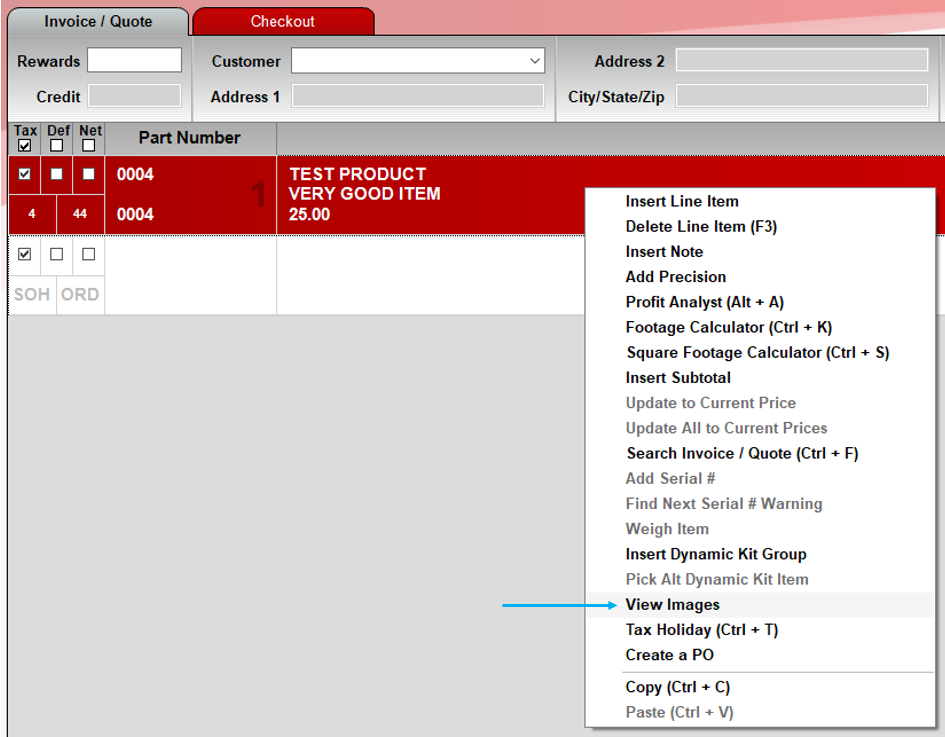
When in an invoice in Paladin, right click on an item and select View Images.
Note: View Images will be grayed out if images are not set in Remote Data Access.

Figure 9: Invoice/Quote/View Images
To view images in Advanced Lookup:
- On the top ribbon of Paladin, select the module (Invoice/Quote, Inventory, or PO).
- In the module, on the bottom ribbon, select F1 Adv. Lookup.
- In the Advanced Lookup window, enable a search parameter from the following options: Class, Department, Location, Supplier, or Keyword.
- After you have enabled your search parameter, click Find >>. The Advanced Lookup window populates with parts and their corresponding data.
- Find and click the magnifying glass next to a part. An image of that part appears.

Figure 10: Image of a part
If you have questions or suggestions about this information, contact support@paladinpos.com.

