
This article provides instruction and information on the following:
- How to enable Signature required
- Specify a signer and PO number for all credit card purchases
- How to set up Paladin to optionally skip any required signature
- Skip signature dollar limit
- How to turn on the authorized signer options for all credit card purchases
- How to set up the Enable No-Signature Threshold for Credit Card transactions
- Cashier can skip signatures on E2E and EMV payment terminals
- How to set up a dump SKU to skip signatures for EMV card-not-present (CNP) transactions
How to enable Signature required
Inventory items requiring a customer signature can be flagged. This feature also includes five lines of text that can be displayed on the signature pad (if your store is using the large display signature pads) as well as recorded on the invoice for the sale.
To enable this feature:
- In Paladin, from the main menu, select File > Setup.
- Select the Company tab.
- In the Signature Required pane, check Enable Signature Required.
- In the Signature Required Class Number field, enter the Class number that you will use as the trigger “flag” to capture the customer’s signature.
Note: Since inventory allows three unique Class values to be stored with every item, EDI processing normally updates Class 1; therefore, we recommend use of Class 2 or 3 for this feature.
- In the Signature Pad Line field (option of five lines), enter the text to be displayed on the signature pad.
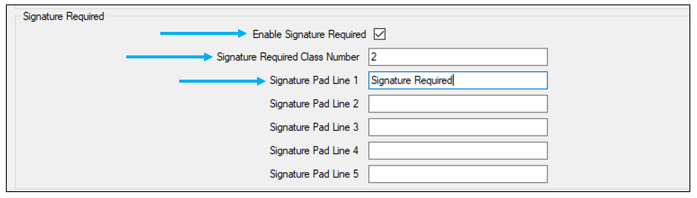
Figure 1: Signature Required pane
- Click Save, then click Close.
Specify a signer and PO number for all credit card purchases
Credit cards are used more today than ever. In response, accounting departments are increasingly interested in collecting information with credit card transactions, such as the signer’s name, a purchase order number, and/or a project name. Paladin lets you optionally specify a signer and/or memo or purchase order number for credit card purchases when a customer is not selected on the invoice.
If this feature is turned on, you can enter information during the checkout process in the payment wizard.
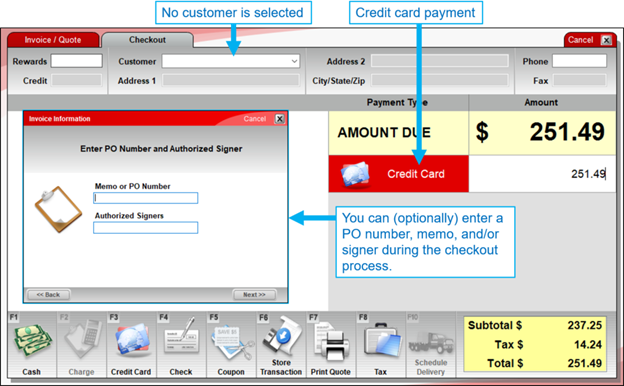
Figure 2: Invoice Information window
To turn on the authorized signer and PO number options for all credit card purchases:
- In Paladin, from the main menu, select File > Setup.
- Select the Credit Card tab.
- In the Signatures pane, check Enable Auth Signer for all Credit Card Transactions.
Note: If this option is selected, you can enter an authorized signer for any customer who pays with a credit card. If you want to limit this feature to customers in your Paladin database that have credit card information on file, then check this option instead: Enable Auth Signer for Credit Cards on file.
- Click Save, then click Close.
How to set up Paladin to optionally skip any required signature
Paladin offers two options for skipping the signature requirement:
- Option 1: Allows the cashier to skip the signature requirement when a transaction is under an amount you specify (no-signature threshold). For this option, see How to set up the Enable No-signature Threshold for Credit Card transactions
- Option 2: This option allows the signature to be skipped in all Paladin scenarios, including credit card purchases, charge purchase, agreement to pharmacy terms and conditions, etc. This option will override a no-signature threshold if one is set.
Note: Option 2 does not work for Charge Transactions or Pharmacies if the client is on TriPOS.
To set up this option:
- In Paladin, from the main menu, select File > Setup.
- Select the Credit Card tab.
- In the Signatures pane, check Allow Signature to be Skipped.
- Click Save, then click Close.
Skip signature dollar limit
In Paladin, you can set a ‘skip signature’ dollar limit for credit card purchases. Invoice amounts up to the limit you define can be processed without a customer’s signature.
The maximum amount for the ‘skip signature’ limit is $99,999.
To set the dollar limit without a customer’s signature:
- In Paladin, from the main menu, select File > Setup.
- Select the Credit Card tab.
- In the Signatures pane, in the No Signatures for Purchases Under $ box, enter, without the dollar sign, the maximum transaction amount allowed without a customer’s signature. This amount cannot exceed 99,999. If this value is blank, signatures are always required.
- Click Save, then click Close.
How to turn on the authorized signer options for all credit card purchases
To turn on the authorized signer options for all credit card purchases:
- In Paladin, from the main menu, select File > Setup.
- Select the Credit Card tab.
- In the Signatures pane, check Enable Auth Signer for all Credit Card Transactions.
Note: If this option is selected, you can enter an authorized signer for any customer who pays with a credit card. If you want to limit this feature to customers in your Paladin database that have credit card information on file, select this option instead: Enable Auth Signer for Credit Cards on file.
- Click Save, then click Close.
How to set up the Enable No-Signature Threshold for Credit Card transactions
To allow cashiers to skip the signature requirement if transactions are under an amount you specify (no-signature threshold):
- In Paladin, from the main menu, select File > Setup.
- Select the Credit Card tab.
- In the Signatures pane, check Enable No-Signature Threshold.
- In the No Signatures for Purchases Under $ box, enter the preferred threshold amount.
Important: Do NOT select the Allow Signature to be Skipped option. This option overrides the no-signature threshold and always allows signatures to be skipped, including all credit card transactions, store charges, agreements to accept pharmacy conditions and terms, and any other Paladin scenario where a signature is required.
- Click Save, then click Close.
Cashier can skip signatures on E2E and EMV payment terminals
There are reasons why a cashier may skip a customer’s signature, including phone and online orders.
When a credit card purchase is processed on an end-to-end (E2E) or EMV payment terminal, in the Credit Card Processing window, the cashier can optionally click Next, then click Yes to skip the signature screen and not collect the customer’s signature.
To turn on this feature:
- In Paladin, from the main menu, select File > Setup.
- Select the Credit Card tab.
- In the Signatures pane, check Allow Signature to be Skipped.
- Click Save, then click Close.
How to set up a dump SKU to skip signatures for EMV card-not-present (CNP) transactions
Note: Purchases where a customer is not present are also called card-not-present (CNP) purchases.
When this feature is turned on, the person processing a CNP order can skip the customer signature step by adding a custom dump SKU to the invoice.
To set up this feature, you must define a CNP department, class, and dump SKU, then turn on a Paladin Configuration option.
- In Paladin, from the main menu, select File > Setup.
- Select the Dept tab.
- In the Departments pane, click New.
Note: You can use an existing department because the dump SKU that you add to it will not incur any revenue. However, the department ID that you use cannot be within the range used by your EDI supplier. If you want to use an existing department, make a note of it and go to step 10.
- In the Name box, enter a name for the CNP department. Example: Card not present
- In the Department label number box, enter a unique department ID.
Important: The department ID must not be within the department ID range used by your EDI supplier. Make a note of this department name and ID. You will need it in a later step.
- Click Save.
- Click the Class tab.
- In the Classes pane, click New.
- in the Name box, enter a name for the CNP class.
- In the Class ID box, enter a unique class ID.
Important: The class ID must not be within the class ID range used by your EDI supplier.
- In the Default Dept. list, select the department you created in step 5.
- Click Save. Make a note of this class name and ID. You will need it in a later step.
- Turn on the CNP skip signature feature and assign the CNP class.
- Click Save.
- Select the Invoice (Store) tab.
- In the Invoice pane, check Enable the ability to skip signatures when the customer is not present.
- In the Skip signature class ID box, enter the class ID you created in step 10.
- Click Save, then click Close.
Create a dump SKU inventory item to identify CNP purchases:
- In Paladin, on the top ribbon, select the Inventory tab.
- On the bottom ribbon of the module, click F2 Add Item.
- In the Add New Item window, in the Part # box, enter a unique part number. Example: CNP
- In the Description box, enter a description. Example: Card not present sale
- In the Cost box, enter: 0.00
- In the Sell Price box, enter: 0.00
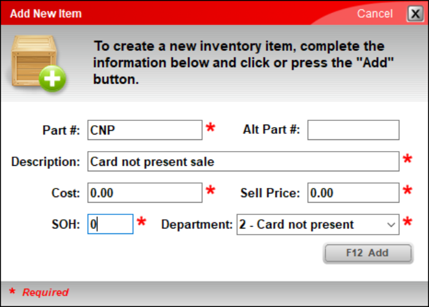
Figure 3: Add New Item window
- Click the General tab.
Important: On the top of the Item Information pane, check Non-Inventory.
- In the Classes pane, in the second or third Class list, select the class you created in the first step 10.
Important: Do not use the first Class list because it is used by your EDI supplier.
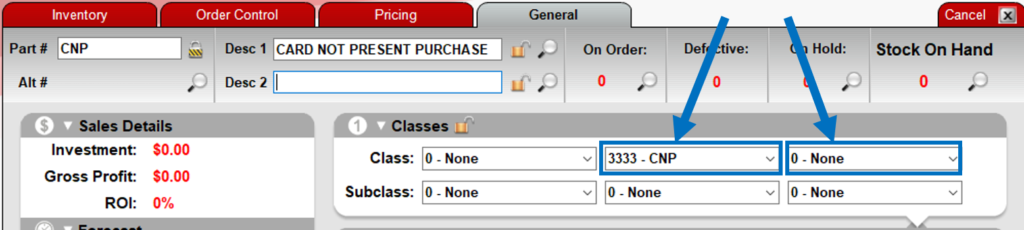
Figure 4: General tab/Class lists
- Click F12 Save.
- If a message appears that asks Do you want sales of this item to report a profit of $0.00?, click Yes.
- Make a note of the dump SKU part number and share it with anyone who will process CNP transactions. When you add this dump SKU to an invoice, the signature step will be skipped.
To skip the customer signature step for card-not-present (CNP) transactions:
- In Paladin, on the top ribbon, select the Invoice/Quote module.
- Add the customer’s items to the invoice.
- Add the card not present dump SKU to the invoice.
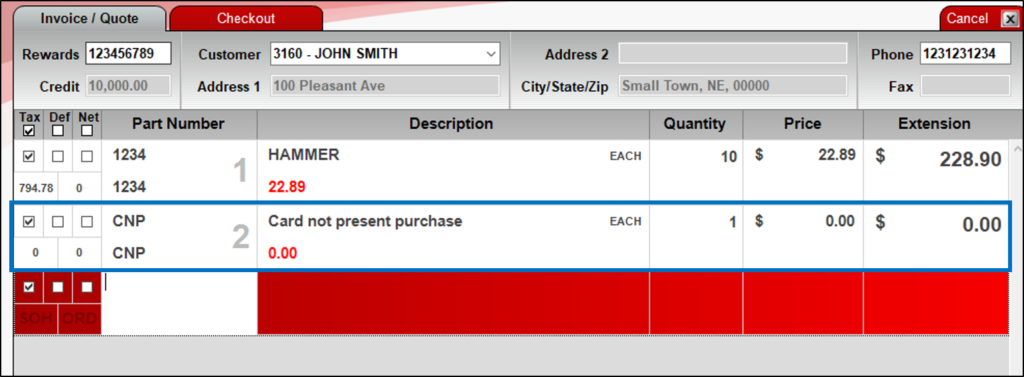
Figure 5: Invoice/Quote module/CNP
- Complete the purchase, and the signature step will be automatically skipped.
If you have questions or suggestions about this information, contact support@paladinpos.com.
