
Important Note: Mobile2Deliver must be set for Paladin delivery to be set up for client’s customers (Invoice/Quote).
Note: This feature is available in build 7397.1 or higher.
Stores providing delivery service to business customers need to track delivery addresses at a project level; and in the increasingly complex world of sales tax, they frequently need to calculate tax based on the delivery location. Taxes can now be calculated based on the delivery address using Avalara Avatax integration, ensuring total compliance with tax rules. Furthermore, the checkout process in Paladin is even more streamlined.
- Assign a project at checkout from within the delivery window
- Choose a project delivery address at checkout
- Assign a delivery address to a project at checkout
- Calculate sales taxes based on delivery address with the Avalara integration
- Enhanced checkout efficiency
This article provides instruction and information on the following:
- How to add a delivery address
- How to add Contact Information
- How to validate a customer’s delivery address (Avalara AvaTax™ accounts only)
- How to schedule a delivery
- How to view delivery details
- How to view daily deliveries on a desktop
- How to capture the customer’s signature and complete the delivery
- How to Collect on Delivery (COD)
- How to cancel a delivery
- Tax return on canceled delivery
- How to set Local Pickup for a delivery
- How to mark delivery as complete within Paladin (not in Mobile2Deliver)
- How to create the Delivery Transactions Report
How to add a delivery address
- In Paladin, on the top ribbon, select the Customers module.
- Enter or select a customer name from the Customer list.
- Press Enter.
- Click your cursor in the Delivery Addr: field in the Contact Information pane.

Figure 1: Contact Information pane/Delivery Addr field
The Edit Delivery Address window opens.

Figure 2: Edit Delivery Address window
Note: If the delivery address is different from the customer’s mailing address, uncheck Use the mailing address.
- Enter the address in the Deliver 1 field (this would be the primary address).
- Enter the address in the Deliver 2 field (this would be the secondary address, for example Unit B).
- Enter the city in the Deliver City field.
- Select the state from the Deliver State list.
- Enter the zip code in the Deliver Zip field.
- Click Save.
How to add Contact Information
- In Paladin, on the top ribbon, select the Customers module.
- Enter or select a customer name from the Customer list.
- Press Enter.
- In the Contact Information pane, enter the following:
-
- Attn: Enter the point of contact for the delivery name.
- Phone: Enter a phone number that the point of contact can be reached at. Note: There is also an option for a cell phone number.
- E-mail: Enter an email for the point of contact.
Note: If multiple email addresses exist for the customer, click the green arrow at the end of the E-mail box. A list of email appears to choose an email address from.
- Click F12 Save.
How to validate a customer’s delivery address (Avalara AvaTax™ accounts only)
- In Paladin, on the top ribbon, click the Customers module.
- Enter or select a customer name from the Customer list.
- Press Enter.
- If the customer account has a Delivery Address, Avalara AvaTax™ will automatically verify the address and may recommend an update. If an update is suggested, in the Address Validation window, do one of the following:
- To change the delivery address to the Updated Address, click Suggested.
- To keep the Original Address, click Original.
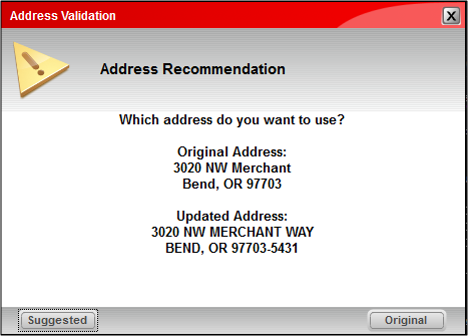
Figure 3: Address Validation window
If the customer account does not have a Delivery Address, enter a delivery address, then click F12 Save. Avalara AvaTax™ will automatically verify the delivery address and may offer suggested changes.
- Optional: Update the primary address to match the delivery address, then click F12 Save. Avalara AvaTax™ will not change the primary address.
To learn more on Avalara AvaTax™ refer to: Avalara AvaTax™
How to schedule a delivery
Note: In order to use the Schedule Delivery option, you must first set the Delivery options and the Mobile2Delivery Options.
After you have set up the Mobile2Delivery and Paladin delivery options, to schedule a delivery:
- In Paladin, on the top ribbon, click the Invoice/Quote module.
- Enter or select a customer name from the Customer list.
- Press Enter.
- Enter a part number in the Part Number box.
- Press Enter.
- When done entering part numbers, click F8 Checkout.
Note: If there are taxes required, they show on the purchase amount details. Depending on the delivery address, the taxes may or may not apply (Figure 7).

Figure 4: Tax shown on invoice
- In the Checkout tab, click F10 Schedule Delivery.
The Schedule Delivery window opens. The Delivery Address fields are initially filled in from the store address or customer address depending on configuration.
Note: All fields marked with a red asterisk require information or selection from the list.

Figure 5: Schedule Delivery window/Delivery Details
In the Delivery Details pane:
-
- Select the delivery vehicle from the Truck list (set in Paladin Configuration Delivery tab).
- Select a delivery time from the Delivery Date time list.
Note: You can change the default information in the E-Mail box for each Scheduled Delivery that you create. However, it will not become default information on subsequent deliveries.
Special Instructions will be shown to the driver and the customer.
In the Delivery Address pane, you can perform the following:
-
- Make no changes. Fields are populated with the store’s address.
- Edit a different delivery address.
- Select a project from the Project list.
When a project is selected, the fields are disabled (grayed out) and the Add button now reads Edit.
When Edit is pressed, the Add or Restore Projects window opens.

Figure 6: Add or Restore Projects window
You can create a new project or restore an existing project.
To add a project:
-
- Enter a project name in the Project Name field (required).
- Enter address(es) in the Address field(s).
- Enter the City, State, and zip code in the corresponding fields.
- Enter a manager’s password in the Requires a manager password field (required).
- Press Add.
- In the Schedule Delivery window, press F8 Add.
To restore a project:
-
- Select a project from the projects shown below the manager password field.
- Enter a manager’s password in the Requires a manager password field (required).
- Press Add.
- In the Schedule Delivery window, press F8 Add.
In the invoice, F10 Schedule Delivery is outlined in red.

Figure 7: F10 Schedule Delivery red outline
The Tax amount will update based on the entered delivery address. For example, the initial tax was $3.77 (Figure 3); it is now $0.00 (no tax based on the delivery address).

Figure 8: Adjusted tax
Note: If the highlighted F10 Schedule Delivery is pressed, the delivery will be cancelled, the F10 Schedule Delivery will be unhighlighted, and the Tax will go back to the default amount on the sale.
- From the bottom of the invoice, select a payment type and press Enter.
- In the Transaction Complete window, select an option for printing. Select 1 None if you do not want a receipt or invoice printed.
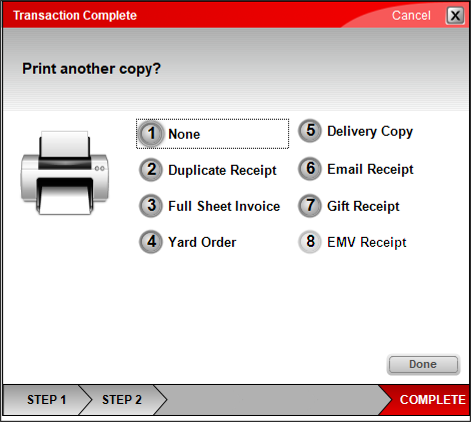
Figure 9: Transaction Complete window
- Click Done. Information on the delivery appears on the receipt.
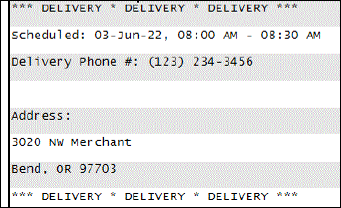
Figure 10: Delivery information on receipt
How to view delivery details
- In Paladin, on the top ribbon, select the Invoice/Quote module.
- On the bottom ribbon of the module, click F6 Recall Transaction.
- On the top of the Recall Transaction window, enable Delivery.
- Double-click a delivery line item.
- In the Delivery Details pane, the Delivery Status line item appears as Delivered, Open, or Canceled.
- Scroll to Delivery Notes and Delivery Photos to see any notes or photos.
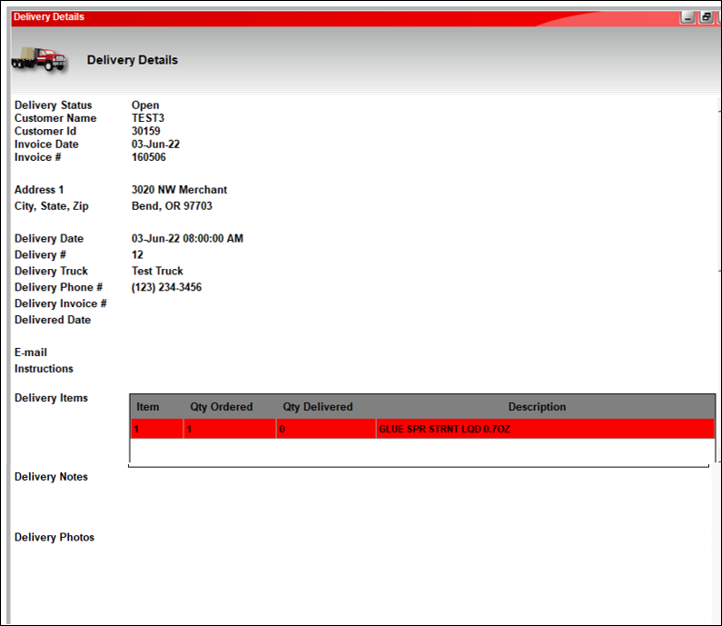
Figure 11: Delivery Details window
How to view daily deliveries on a desktop
- In Paladin, on the top ribbon, select the Invoice/Quote module.
- On the bottom ribbon of the module, click F6 Recall Transaction.
- In the Recall Transaction pane, select Delivery.
- To recall the delivery details, double-click the selected row (highlighted in red).
- To recall the original sale invoice, double-click the first magnifying glass on the selected row.
- To recall the delivery invoice, double-click the second magnifying glass on the selected row. A PDF of the invoice appears with delivery details.
Note: The second magnifying glass only appears when the delivery is completed.
- To edit the delivery schedule, double-click the wrench icon.
- To cancel the delivery or change to a local pickup, double-click the trash can icon.
- In the Status column, there are four indicators that appear as icons:
|
Indicator |
Delivery status |
|
Yellow exclamation point |
Open |
|
Green check mark |
Completed |
|
Blue check mark |
Picked up in store |
|
Red check mark |
Canceled |
On the top of the Recall Transaction window, you can select the status of the delivery from the Status list. The options are:
- All, Open, Delivered, Closed, Pickup, Cancelled
The Start Date and End Date ranges are also shown. These can be edited/changed.
- Make any changes to the status and dates, then press F5 Refresh. The information in the Recall Transaction window will reflect the changes.
How to capture the customer’s signature and complete the delivery
Note: The driver must have the login credentials for Mobile2deliver to complete this step. If you do not know your Mobile2deliver login credentials, contact Paladin support.
- From a mobile phone or tablet that has an Internet connection, go to https://mobile2.paladinpos.com/app/deliver/v1/, enter your store’s login credentials, then tap Login.
- If this is a first-time login, have the driver bookmark this site and save the login credentials.
- From the store page, select the store’s name.
- From the delivery truck list, select the truck or employee name.
- Select the scheduled delivery from the drop-down menu. If the delivery was scheduled on a different day, select filter, choose the date range, then tap the arrow next to update deliveries.
- Optional: To open the address in Google Maps, tap the ellipses […] next to the delivery. This will open the Google Maps page for the delivery address that was added at the time of scheduling the delivery.
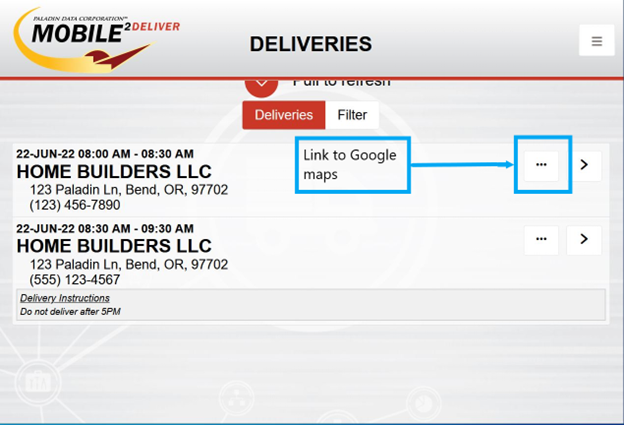
Figure 12: Link to Google maps
- To select a delivery, tap the right arrow.
- Once the delivery is selected, you can view all related information about the delivery. This includes all SKUs and items quantities for the invoice, delivery address details, customer information, and any notes attached to the delivery.
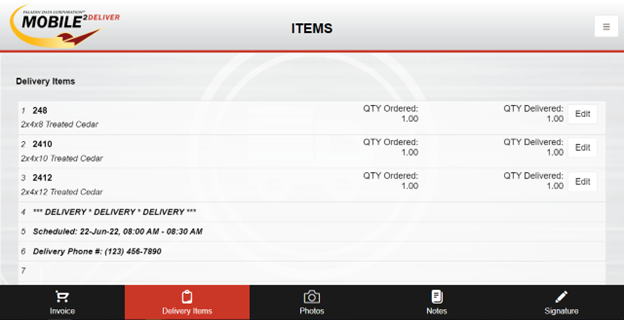
Figure 13: Delivery items information
- Once the product has been delivered, to attach a photo or add notes to the delivery, select either Photos or Notes at the bottom of the screen.
- To collect a signature and complete the delivery, tap the Signature button to proceed to the signature capture screen.
Note: An Internet connection is required at this point; otherwise, the delivery cannot be completed..
- Once the signature has been captured, tap the Accept button.
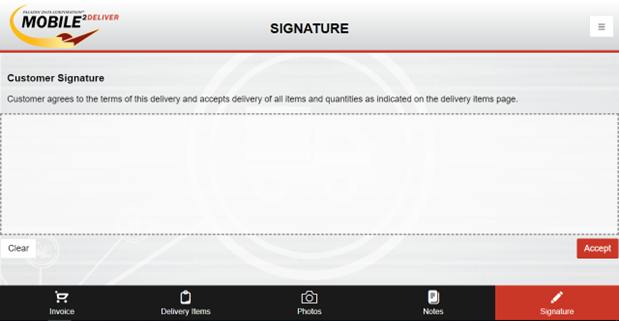
Figure 14: Customer Signature window
How to Collect on Delivery (COD)
The collect on delivery (COD) feature allows your customers to pay for purchases when they are delivered. The payment option is available when you use the Schedule Delivery feature in the following scenarios:
How to turn on the COD feature
The COD feature is an option and available only when you use the Schedule Delivery feature in Paladin.
- In Paladin, from the main menu, select File > Setup.
- Select the Delivery tab.
- Check Enable COD Deliveries.
- Click Save, then click Close.
- Close and restart Paladin.
How to collect on delivery when a customer has no store credit
When the COD feature is turned on, and you select Schedule Delivery for a customer who does not have a store line of credit (credit limit of zero), the Charge payment type becomes available and offers the option to collect payment on delivery.
Example: Customer Bill Smith has no store credit.
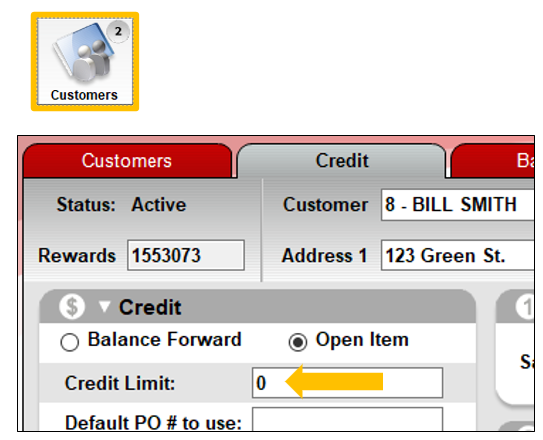
Figure 15: Credit Limit
Bill Smith makes a purchase and asks for it to be delivered and to pay for the shipment when it arrives. This is a collect on delivery (COD) payment. The cashier creates the invoice and then clicks Schedule Delivery on the Checkout tab, enabling the Charge payment type.
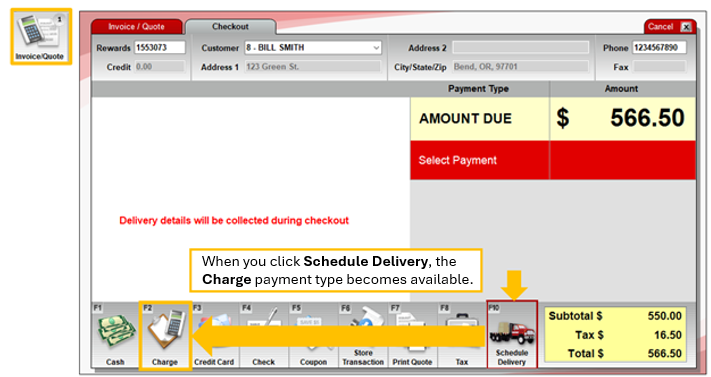
Figure 16: Charge payment type
The cashier clicks Charge and selects Collect this amount on delivery: COD.
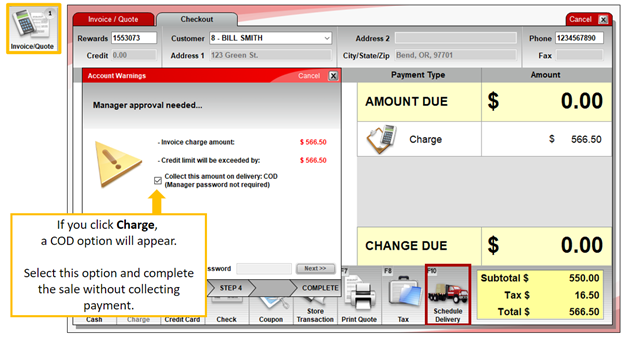
Figure 17: Collect this amount on delivery: COD
The cashier completes the sale, and the receipt shows the amount to collect on delivery.

Figure 18: Amount to collect on delivery
The delivery person delivers the items and collects payment from Bill Smith. When the delivery person returns to the store with Bill’s payment, the payment is applied as an Account Payment to Bill Smith’s account in the Invoice/Quote or Customers module.
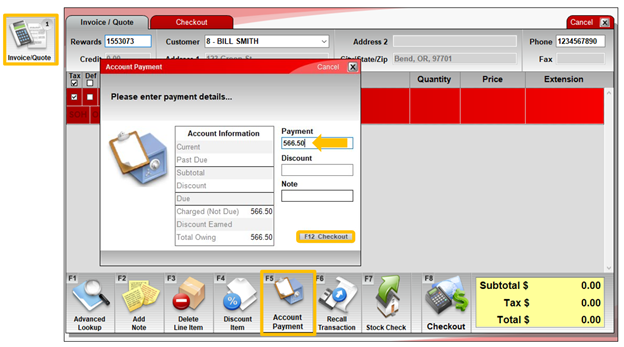
Figure 19: Account Payment window
Tip: When you use the COD feature, invoice payments are recorded as Charge payments in the customer’s Sale History. If the customer pays by check at the time of delivery, you can optionally record the check number and account info when you apply the account payment.
How to collect on delivery when a customer exceeds their store credit
The COD option also appears for customers who have a store line of credit when the Charge amount on a purchase exceeds their available credit.
Example: Customer Mary Smith has a store line of credit of $1,000.
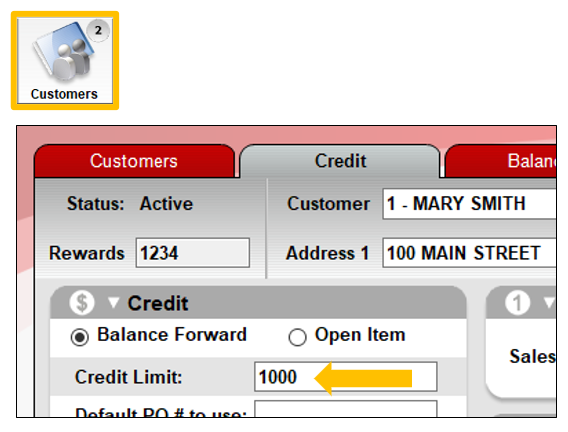
Figure 20: Credit Limit
Mary wants to make a purchase for delivery using her store credit. However, the purchase amount will cause her to exceed her current available credit. In this scenario, a manager can approve a temporary extension in her credit limit OR she can opt to pay COD.
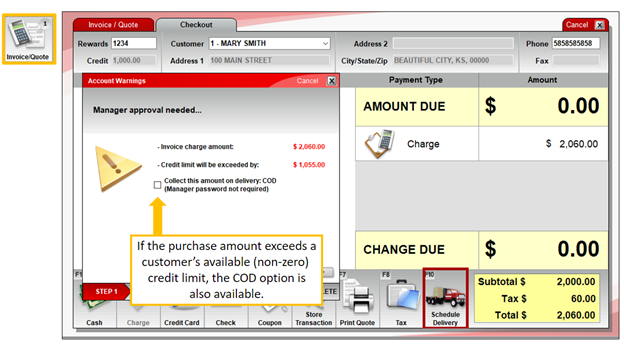
Figure 21: Credit limit exceeded/Manager Approval
If you select the COD option, the entire invoice amount will be due at delivery.
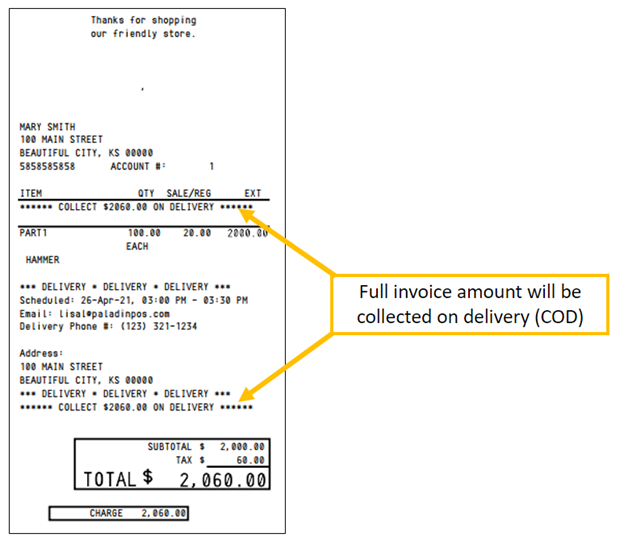
Figure 22: Full amount collected on delivery
How to cancel a delivery
To cancel a delivery, you need to pay extra attention to what it is that you are wanting to do. The Reason list in the Cancel Delivery window provides two options:
- Cancel Order – This will cancel the order, not just the delivery.
- Local Pickup – This will cancel the delivery but not the order. The customer will have to come to the store to pick up their item(s).
A safeguard has been created to avoid the misunderstanding of “cancel order.” If you do select Cancel Order, the Cancel Delivery window opens asking if you really want to cancel the delivery and credit the customer for the purchase.
To cancel a delivery:
- In Paladin, on the top ribbon, select the Invoice/Quote module.
- On the bottom ribbon of the module, click F6 Recall Transaction.
- On the top of the Recall Transaction pane, select Delivery.
- Double click the trash can icon next to the transaction.
- In the Cancel Delivery window, in the Reason list, select Cancel Order.
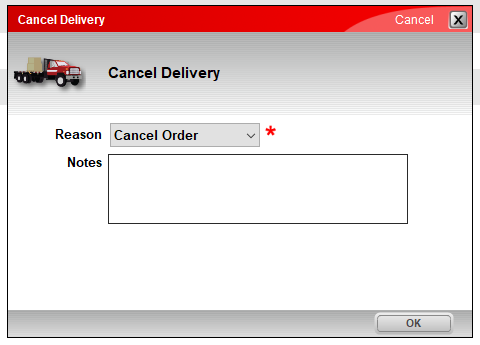
Figure 23: Cancel Delivery window
- Optional: In the Notes box, enter information about this cancellation.
- Click OK.
- In the Cancel Delivery window, click Yes.
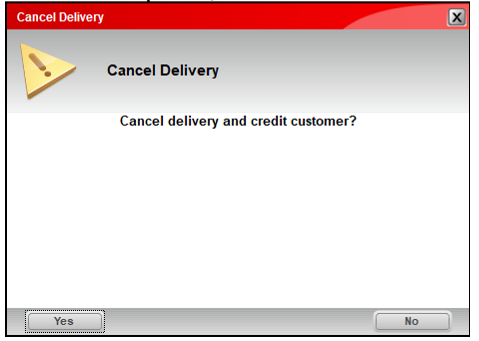
Figure 24: Cancel Delivery option
In the Status column of the Recall Transaction window, a red X will indicate that the delivery was cancelled.
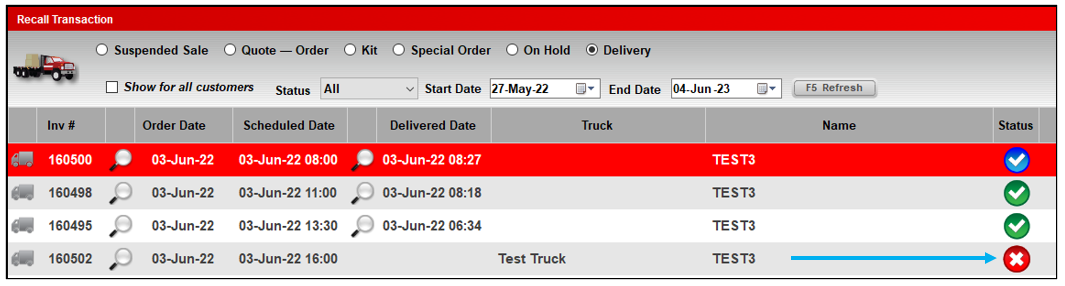
Figure 25: Status column of the Recall Transaction window
A note that the delivery was cancelled shows on the receipt.
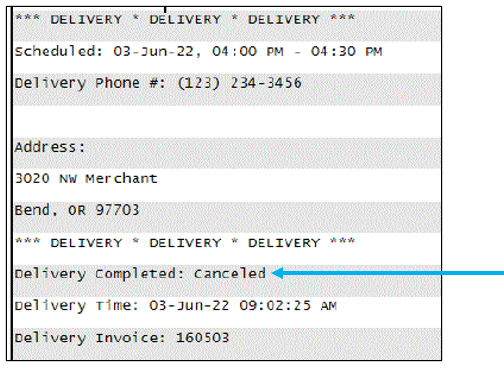
Figure 26: Delivery canceled shown on receipt
Tax return on canceled delivery
Canceling a delivery returns taxes based on the customer’s account tax settings rather than the tax settings selected during checkout.
If the City, County, or State Tax on a delivery is a different value than the tax Information on a customer account when canceling a delivery, then the tax amount that is credited to the customer’s account is calculated based on the tax information on the customer account, not the tax information on the original delivery order.
How to set Local Pickup for a delivery
The Local Pickup option cancels the delivery but not the order. The customer will have to come to the store to pick up their item(s).
To set Local Pickup of a delivery:
- In Paladin, on the top ribbon, select the Invoice/Quote module.
- On the bottom ribbon of the module, click F6 Recall Transaction.
- On the top of the Recall Transaction pane, select Delivery.
- Double click the trash can icon next to the transaction.
- In the Cancel Delivery pane, in the Reason list, select Local Pickup.
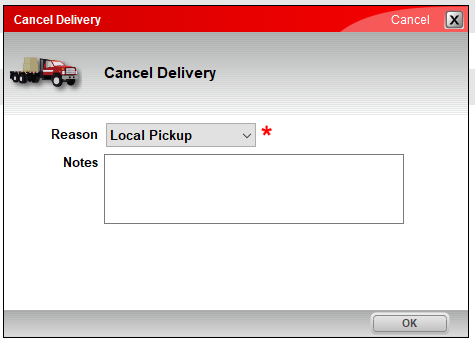
Figure 27: Cancel Delivery/Local Pickup option
- Click OK.
In the Status column of the Recall Transaction window, a blue X will indicate that the delivery was changed for Local Pickup.

Figure 28: Status column of the Recall Transaction window
A note that the delivery is for Local Pickup shows on the receipt.
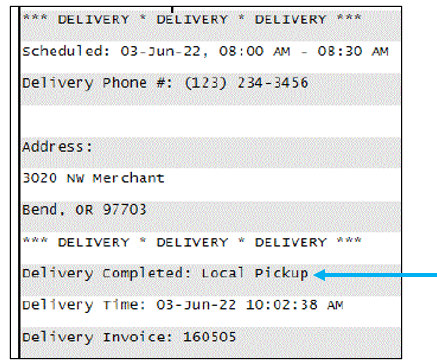
Figure 29: Delivery is for Local Pickup shown on receipt
How to mark delivery as complete within Paladin (not in Mobile2Deliver)
To mark a delivery as complete, the most common way is using a Mobile2Deliver app device and gaining a signature at time of delivery and marking the delivery as complete. But there are times when a Mobile2Deliver app device is not available. With this, Paladin has an option to mark a delivery as complete within Paladin.
To use this option:
- In Paladin, on the top ribbon, select the Invoice/Quote module.
- Enter or select a customer account in the Customer list.
- On the bottom ribbon of the module, select F6 Recall Transaction.
- On the top of the Recall Transaction window, enable Delivery.
- Double click the trash can icon at the end of the delivery line.

Figure 30: Recall Transaction window
- In the Cancel Delivery window, from the Reason list, select Complete Delivery.
- Add any notes in the Note box.
- Click OK.
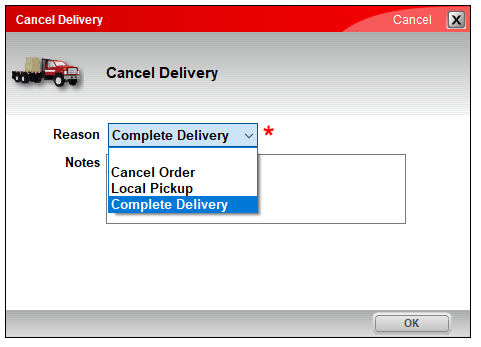
Figure 31: Cancel Delivery window/Complete Delivery option
- The Complete Delivery window opens asking Complete the delivery and accept the invoice “as is”?
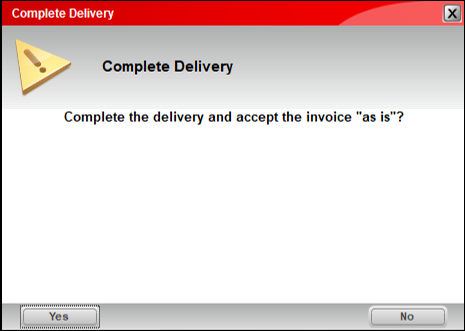
Figure 32: Complete Delivery window/Complete the delivery and accept the invoice “as is?”
- Click Yes.
- In the Recall Transaction window, a green check mark is displayed under Status indicating the delivery was made and closed.

Figure 33: Recall Transaction window
How to create the Delivery Transactions Report
- In Paladin, on the top ribbon, select the Reports module.
- In the Report Area pane, select Sales Analysis > What I Need to Know.
- In the Report List pane, select Transaction Report.
- In the Choose Report pane, click F12 Next.
- In the Transaction Report window, enter or select sorting information to create the report.
- In the Additional Settings pane, select NoteField from the Keyword Search list, then enter Delivery in the box next to it.
- Click F12 Run Report.
A PDF file of the report opens.
If you have questions or suggestions about this information, contact support@paladinpos.com.
