
This article provides instruction and information on the following:
- About Avalara AvaTax™
- Client requirements for integrating with Avalara
- How to set up Avalara AvaTax™ with Paladin
- How to manually update Avalara AvaTax™ address information
- How to manually send offline transactions to Avalara AvaTax™
- How to manually update Avalara AvaTax™ tax information
- How to manually compare invoice tax information between Avalara AvaTax™ and Paladin
- How to assign an Avalara AvaTax™ tax exempt category to a customer
- How to assign an Avalara AvaTax™ tax code to a department
- How to assign an Avalara AvaTax™ tax code to an inventory item
About Avalara AvaTax™
Avalara AvaTax™ is a cloud-based solution that automates transaction tax calculations and the tax filing process. Avalara AvaTax™ computes real-time tax amounts using up-to-date tax rules from more than 12,000 United States taxing jurisdictions and from more than 200 countries.
To learn more about Avalara AvaTax™, click here. In the Learn more about Avalara section, enter your information and click Get info now; a Paladin Support representative will contact you.
Client requirements for integrating with Avalara
The Avalara AvaTax™ integration process flow is as follows:
- The client requests information about the Avalara AvaTax™ integration with Paladin by completing the online form that is available by selecting Get info now in the Learn more about Avalara section.
- Paladin Support will email the client information and include an Avalara representative on the Cc line.
- An Avalara representative will contact the client.
- If the client agrees to the service, the Avalara representative will create an Avalara AvaTax™ account.
- After the Avalara AvaTax account is set up, Avalara will notify Paladin Support.
- Paladin’s Support team will set up the Avalara AvaTax™ integration. For more information, refer to: How to set up Avalara AvaTax™ with Paladin.
- When Avalara AvaTax™ goes live, Paladin’s Support team will make sure that the Use Avalara in Test mode only checkbox is cleared in the Taxes tab in Paladin Configuration.
How to set up Avalara AvaTax™ with Paladin
Important: These steps must be performed by Paladin Support and require an Avalara AvaTax™ account. To sign up for the Avalara AvaTax™ service, refer to the Client requirements for integrating with Avalara section of this article.
To set up Avalara in Paladin:
- In Paladin, from the main menu, select File > Setup.
- Select the Taxes tab.
- In the Tax Definitions pane, click New.
- In the Name box, enter Avalara.
- In the Tax % box, enter a percentage.
- Click Save.
- In the Tax Settings pane, select Avalara from the Default state tax list.
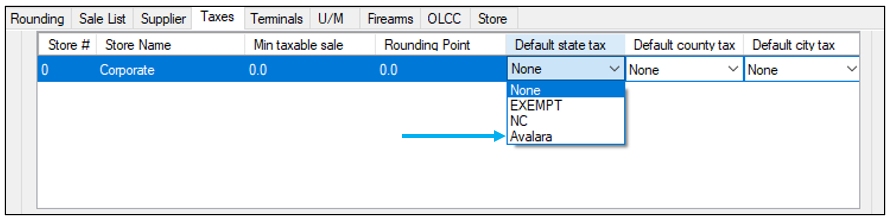

Figure 1: Avalara choice and set as Default state tax
- In the Invoices pane, check Use Avalara for Sales Tax Calculation.
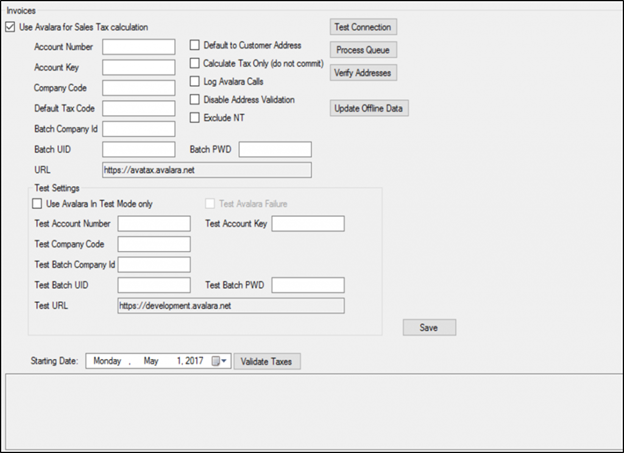
Figure 2: Use Avalara for Sales Tax calculation
- Enter the Avalara AvaTax™ credentials:
-
- In the Account Number box, enter the client’s Avalara AvaTax™ account number.
- In the Account Key box, enter the client’s Avalara AvaTax™ software license key.
- In the Company Code box, enter the company code from the AvaTax Admin Console.
- In the Batch Company ID box, enter the batch company ID from the AvaTax Admin Console.
- In the Batch UID box enter the client’s username from the AvaTax Admin Console.
- In the Batch PWD box, enter the client’s password from the AvaTax Admin Console.
-
- Click the Test Connection button and verify the Avalara AvaTax™ connection. One of the following messages will appear:
- Successfully connected to Avalara: Continue with the next step.
- Failed to connect to Avalara: You must troubleshoot and resolve the connection issue before continuing.
- The following options are turned off by default because they are not required for most clients. If an option is required, select the checkbox.
-
-
- Default to Customer Address: If the store primarily delivers purchased products to the customer, select this option so that Avalara AvaTax™ calculates tax using the customer’s address. When this option is not selected, tax is calculated using the store’s location.
- Calculate Tax Only (do not commit): If the store submits invoices from a different system (not Paladin) that integrates with Avalara AvaTax™, select this option so that Paladin uses the Avalara AvaTax™ service to calculate the tax but does not submit the invoice.
- Log Avalara Calls: If you are troubleshooting and issue and need a detailed transaction log, select this option.
- Disable Address Validation: If the store uses another system to validate addresses, select this option.
-
- Optional: Test the services before going live.
- In the Test Settings pane, enter the values provided by Avalara:
-
-
- Test Account Number
- Test Account Key
- Test Company Code
- Test Batch Company ID
- Test Batch UID
- Test Batch PWD
-
- To turn on the test mode, check Use Avalara in Test Mode only.
Important: After testing is complete, and you are ready to go live with the Avalara AvaTax™ service, clear the Use Avalara in Test Mode only checkbox, then save your changes.
- Click Save, then click Close.
The Confirm Tax Changes window opens. If you are confident that all your tax changes need to take place, click Yes.
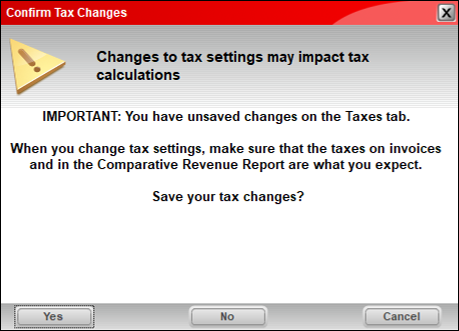
Figure 3: Confirm Tax Changes window
Note: If you see the tax subtotal on the main Invoice screen, Avalara isn’t enabled. Only the pre-tax subtotal is shown in the bottom-right corner of the screen when Avalara is enabled. If you just enabled Avalara, restart Paladin before testing an Invoice.
How to manually update Avalara AvaTax™ address information
Important: These steps must be performed by Paladin Support and require an Avalara AvaTax™ account. To sign up for the Avalara AvaTax™ service, refer to the Client requirements for integrating with Avalara section of this article.
Notes:
- Paladin periodically updates Avalara AvaTax™ with a current list of client delivery addresses, but you can also manually perform these client address updates at any time.
- During the update process, Avalara AvaTax™ automatically verifies each address and may update the Delivery Address in Paladin. For example, Avalara AvaTax™ may correct a misspelled street, town, or add ‘W’ (for west) to a street name. The client’s primary address that displays at the top of Paladin’s Customers tab is never updated by Avalara AvaTax™.
To view/file a listing of customers and their addresses:
- In Paladin, from the main menu, select File > Setup.
- Select the Taxes tab.
- In the Invoices pane, click Verify Addresses. An Excel icon appears on the bottom taskbar of your computer. Click the Excel icon to open the worksheet.
- Click Save, then click Close.
How to manually send offline transactions to Avalara AvaTax™
Important: These steps must be performed by Paladin Support and require an Avalara AvaTax account. To sign up for the Avalara AvaTax™ service, refer to the Client requirements for integrating with Avalara section of this article.
During an Internet outage, Paladin will use saved offline Avalara AvaTax™ information to process transactions. When the store is back online, Paladin will send the transactions that were processed during the outage to Avalara AvaTax™, typically within an hour.
- In Paladin, from the main menu, select File > Setup.
- Select the Taxes tab.
- In the Invoices pane, click Process Queue.
- Click Save, then click Close.
How to manually update Avalara AvaTax™ tax information
Important: These steps must be performed by Paladin Support, and require an Avalara AvaTax™ account. To sign up for the Avalara AvaTax service, refer to the Client requirements for integrating with Avalara section of this article.
Paladin periodically saves offline Avalara AvaTax™ information so a store can process transactions during an Internet outage, but you can also manually update offline tax information at any time.
- In Paladin, from the main menu, select File > Setup.
- Select the Taxes tab.
- In the Invoices pane, click Update Offline Data.
Note: The offline tax information update process can take time and will run in the background. A status bar at the bottom of the Paladin window will show progress. Do not close Paladin until the update process completes and a window with the following message opens: Offline Tax Data Updated.
- Click Save, then click Close.
How to manually compare invoice tax information between Avalara AvaTax™ and Paladin
Important: These steps must be performed by Paladin Support and require an Avalara AvaTax™ account. To sign up for the Avalara AvaTax™ service, refer to the Client requirements for integrating with Avalara section of this article.
This process will find the transaction tax and tax location differences between Avalara AvaTax™ and Paladin.
- In Paladin, from the main menu, select File > Setup.
- Select the Taxes tab.
- In the Invoices pane, select the Starting Date value for the tax validation.
- Click Validate Taxes. Any discrepancies will be listed in the box below the Starting Date value.
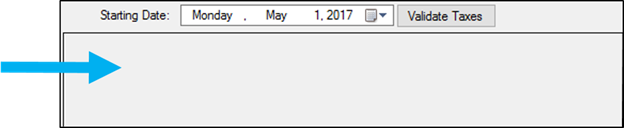
Figure 4: Start Date/Validate Taxes
How to assign an Avalara AvaTax™ tax exempt category to a customer
- In Paladin, on the top ribbon, select the Customers module.
- Enter or select a customer account from the Customer list.
- On the bottom ribbon of the module, click F8 Taxes.
- In the Tax Window, in the State column, select None, and then click F12 Finish.
- Click the Electronic tab.
- In the Alternate Customer IDs pane, in the Tax Exempt Code list, select the customer’s tax exempt code.
|
Tax exempt codes |
|
A – Federal government (United States) |
|
B – State government (United States) |
|
C – Tribe / Status Indian / Indian Band (both) |
|
D – Foreign diplomat (both) |
|
E – Charitable or benevolent org (both) |
|
F – Religious or educational org (both) |
|
G – Resale (both) |
|
H – Commercial agricultural production (both) |
|
I – Industrial production / manufacturer (both) |
|
J – Direct pay permit (United States) |
|
K -Direct mail (United States) |
|
L – Other (both) |
|
M – Not Used |
|
N -Local government (United States) |
|
O – Not Used |
|
P – Commercial aquaculture (Canada) |
|
Q – Commercial Fishery (Canada) |
|
R – Non-resident (Canada) |
- Click F12 Save.
Note: If a customer’s State Tax value is not None, and you set a tax-exempt code, you cannot save the changes. A message stating this will appear.
How to assign an Avalara AvaTax™ tax code to a department
- In Paladin, from the main menu, select File > Setup.
- Select the Dept tab.
- Select the department from the list.
- In Item Information pane, in the Tax Code box, enter the Avalara AvaTax™ tax code. To see a list of Avalara AvaTax™ tax codes, click http://taxcode.avatax.avalara.com
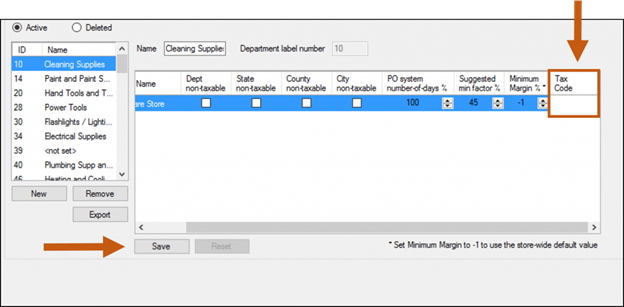
Figure 5: Paladin Dept tab/Tax code
- Click Save, and then click Close.
Note: An inventory item can override its department’s tax code by setting it in the Inventory module. To learn more, see How to assign an Avalara tax code to an inventory item.
How to assign an Avalara AvaTax™ tax code to an inventory item
Note: You can assign an Avalara AvaTax™ tax code to a department, and then use this procedure to override the department tax code for individual inventory items. To learn more, see How to assign an Avalara tax code to a department.
- In Paladin, on the top ribbon, select the Inventory module.
- Enter the part number for the inventory item in the Part # box and press Enter.
- Click the General tab.
- In Item Information pane, in the Tax Code box, enter the Avalara AvaTax™ tax Code.
To see a list of Avalara AvaTax™ tax codes, refer to: http://taxcode.avatax.avalara.com
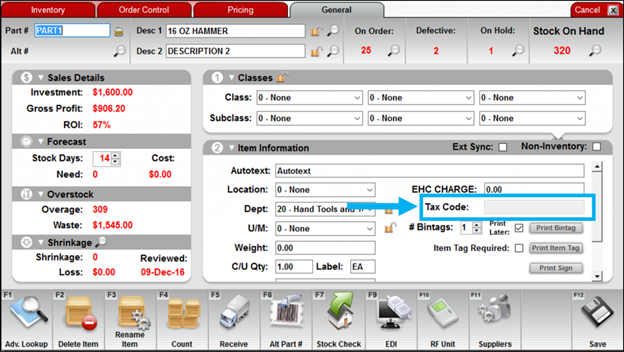
Figure 6: Paladin Inventory module/General tab/Tax Code
- Click Save, and then click Close.
If you have questions or suggestions about this information, contact support@paladinpos.com.
