Speed up invoicing and purchase order processing with Paladin’s quick access menus. Right-click any line item on an invoice or purchase order, and get immediate access to commonly used tasks and tools.
This article provides instruction and information on quick access menus for the:
Invoice/Quote module
To open the quick access menus in the Invoice/Quote module:
- In Paladin, on the top menu, select the Invoice/Quote module.
- Enter a part in the Part Number box.
- Press Enter several times until a new line item row opens.
- Place your cursor in the Part Number box with the associated part and right-click.
- Insert Line Item
- Delete Line Item
- Insert Note
- Add Precision
- Profit Analyst
- Weight Analyst
- Footage Calculator
- Square Footage Calculator
- Insert Subtotal
- Insert Dynamic Kit Group
- View Images
- Tax Holiday
- Create a PO
- Copy/Paste
- Update to Current Price and Update All to Current Prices
- Add Managed Item
- Edit Quote Qty

Figure 1: Quick Access menu
Available when working with a managed order, the Add Managed Item option becomes available. Items can be added to a managed order by right-clicking on an item(s) added below the Items below this line are not part of the managed order note. This moves the added item(s) to above the note with a quote quantity equal to the quantity that had already been input for that line to be sold.
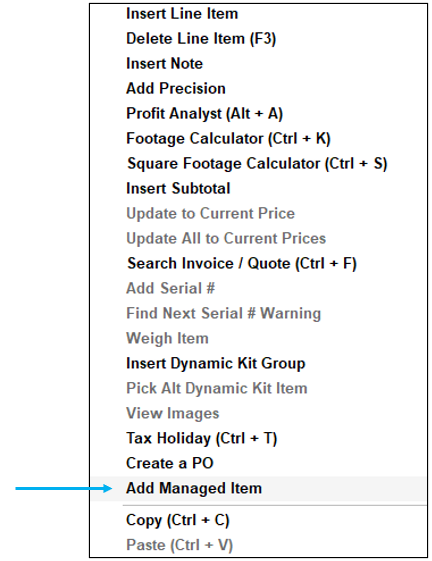
Figure 2: Add Managed Item option
When working with a managed order, the Edit Quote Qty option becomes available.

Figure 3: Edit Quote Qty option
Insert Line Item
In the Invoice/Quote module, when you right-click a line item and select Insert Line Item on the quick access menu, a new line item is inserted above the selected line.
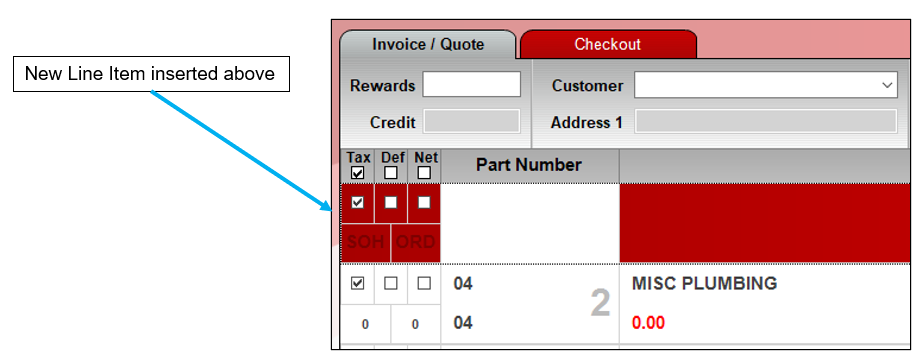
Figure 4: Insert Line Item option
Delete Line Item
In the Invoice/Quote module, when you right-click a line item and select Delete Line Item on the quick access menu, the line item is deleted.
Insert Note
In the Invoice/Quote module, when you right-click a line item and select Insert Note on the quick access menu, a note field is inserted above the line item.

Figure 5: Insert Note option
Add Precision
The Add Precision option provides high precision values for items that do not come in whole quantities, such as grains, seed, and gravel. In the Add Precision window, you can enter changes to Quantity and Price. When you do so, the calculated real-time Extension value appears.
In the Invoice/Quote module, when you right-click a line item and select Add Precision, you can add additional precision to these line item values:
- Quantity: Up to four decimal places
- Price: Up to six decimal places
When you select the Add Precision menu option, an Add Precision window opens, and you can enter more precise Quantity and Price values. A real-time Extension value is calculated as you adjust the Quantity and Price.
When you click OK, the new Quantity, Price and Extension values appear in a note below the line item.
Note: When you update a line item price or quantity to a higher precision, the line item Price may appear as an approximate value that is slightly different than the price you entered. When this happens, a tilde (~) appears next to the price value. This variation is expected and a function of how the feature works. The additional precision is always maintained in the line item Extension.

Figure 6: Add Precision option
Important: If you change the customer name after Add Precision has been applied, the item price and quantity will change according to the new customer’s pricing level(s). However, the note field below the item will retain the original quantity and price. If you reapply the original quantity and price, right click on the line item, select Add Precision, then click Update. This reverts the quantity and price to the original setting for the newly assigned customer.
Optional: Quantity discount breaks may be used instead of the Add Precision feature. If you are consistently adding precision to certain line items on the invoice, use quantity discount breaks in the Pricing section of the inventory module. If you sell bulk feed, rather than using Add Precision, add various pricing levels based on a series of quantities.
For example, if you sell bulk feed for $0.765 cents per pound, and you continuously sell large quantities, set up 3 quantity discount breaks for the feed item resembling:
1 @ $0.77
100 @ $76.5
1000 @ $765.00
(The price of 1 through 99 pounds will be higher because level one must be no more than 2 decimal places)
Using quantity discount breaks enables the system to calculate out to 3 decimal places (or more) without having to use the Add Precision feature during the checkout process. This means the cashier can enter a quantity, and the system will calculate the pricing based on the additional decimal places factored into the quantity discount pricing levels.
For example, if the cashier were to sell between 1 and 99, the price would be slightly higher at $0.77 cents per pound (which is less than a 50 cent difference when selling 99 pounds). However, once they enter a quantity equal to or greater than 100, the pricing will be accurate to the third decimal place.
Examples:
1 x $0.77
99 x $0.77 = $76.23
100 x $0.765=$76.50
500 x $0.765 = $382.50
1000 x $0.765 = $765.00
2000 x $0.765 = $1,530.00
4000 x $0.765 = $3,060.00
Profit Analyst
Profit Analyst lets you view cost, profit, and margin for any line item in your invoice or quote along with the invoice or quote total. You are also able to select Average Cost or Market Cost. An employee must be explicitly granted access to use this feature.

Figure 7: Profit Analyst option
Weight Analyst
Weight Analyst lets you view items unit and weight for any line item in your invoice or quote along with the invoice or quote total.

Footage Calculator
The Footage Calculator lets you create a tally of items by defining pieces with different lengths (feet and inches). This feature is useful when you sell items in multiple lengths, such as lumber and metal roofing.
For more information on the Footage Calculator, refer to the Footage Calculators KBA.
Square Footage Calculator
The Square Footage Calculator calculates the line item quantity in square feet for one or more pieces of different dimensions (length x width). Use this calculator for items that you sell by the square foot, such as flooring.
For more information on the Square Footage Calculator, refer to the Footage Calculators KBA.
Insert Subtotal
The Insert Subtotal option allows customers to break their invoices in to job categories (electrical, plumbing, etc.), or by their clients/jobs (West job, John Doe, etc.).
You must enter, in sequence, the items you want for a subtotal. When done entering items in sequence, you need to enter at least one item that is not part of the sequence (or the start of the next sequence). Then, right click the item that is not part of the sequence and select Insert Subtotal from the quick access list. An Invoice Subtotal window opens, and you have the option to enter a name for the subtotal. A name is not required.

Figure 8: Invoice Subtotal window, Subtotal Name
After clicking OK [F8], a subtotal is inserted above the line item.

Figure 9: Subtotal added to group in invoice
If no prior subtotal is created, the subtotal is calculated from the start of the invoice.
Insert Dynamic Kit Group
This is currently an internal-only feature. However, a client may notice that Insert Dynamic Kit Group appears in the quick access menu.
View Images
Opens an item’s image. This is only active when Supplier Inventory Images and/or Store’s Inventory Images are selected in the Remote Data Access pane of Paladin Configuration’s Remote Access tab.
Tax Holiday
A tax holiday is a time period when some items are sold tax-free or partially tax-free. For example, during a tax holiday, customers may purchase outdoor recreation items or school supplies and not pay sales tax. Or customers may purchase some more expensive items, such as a $400 bicycle, but only pay tax on the amount over $250.
The Tax Holiday feature allows stores to easily apply these discounts at checkout and track the tax holiday amounts using the Comparative Revenue Report and the Sale Tax Details Report.
Note: This feature is not supported for stores that use our Avalara AvaTax™ integration.
For more information on the Tax Holiday option, refer to the Tax Holiday Set Up KBA.
Create a PO
- In Paladin, on the top ribbon, select the Invoice/Quote module.
- Enter a part number in the Part Number box.
- Press Enter.
- Select all parts by highlighting the first part, and holding the Shift key, click in the last part entered.
- Right click on the highlighted parts, and select Create a PO from the quick access list.
- The Items added to Purchase Orders window opens letting you know how many items have been added.

Figure 10: Items added to Purchase Orders window
- Click OK.
- Exit/cancel out of the Invoice/Quote tab.
- The Incomplete Invoice window opens.

Figure 11: Incomplete Invoice window
- Click Yes.
- In Paladin, on the top ribbon, select the PO module.
- On the bottom ribbon of the module, select F6 Recall PO.
- In the Recall PO window, select the PO you created and press F12 Recall.
- The PO opens in the Confirm PO tab where you can finish/confirm the PO.
Copy/Paste option
You can copy and paste editable line item values, such as Note text or a Price value, from within the Invoice/Quote module with the Copy and Paste options.
Update to Current Price/Update All to Current Prices
In the Invoice/Quote module, recall a transaction and right-click a line item to update retail prices to current prices using these two options:
- Update to Current Price: Update the selected line item to the current retail price.
- Update All to Current Prices: Update all the line items on the invoice to current retail prices.
On a recalled quote, when an item’s saved price is different from its current retail price, its current retail price appears in blue text.

Figure 12: Current retail price in blue text
To update a single item to a new current price, right-click the item, then select Update to Current Price.

Figure 13: Update to Current Price
The price will automatically update to the current price. As shown in Figure 14, the price went from 150.00 to 169.99

Figure 14: Updated price
To update all prices on a recalled quote to the current prices in blue text, right-click any line item, then select Update All to Current Prices.

Figure 15: All prices updated
Compare Figure 15 to Figure 12 to see all prices are back to their current price.
Note: Use the Update All To Current Prices feature with caution. Over time, not all item prices may have increased, and some current retail prices may be less than the quoted prices. Paladin Best Practices recommend that you go through the invoice items and compare each new price (in blue) with the recalled price on an item-by-item basis. By doing this, you can make an informed decision on which prices to update.
Add Managed Item
Items can be added to a managed order by right-clicking on an item(s) added below the Items below this line are not part of the managed order note. This moves the added item(s) to above the note with a quote quantity equal to the quantity that had already been input for that line to be sold.
To add items to a managed order:
- On the bottom ribbon of Paladin’s Invoice/Quote module, press F6 Recall Transaction.
- On the top of the Recall Transaction window, enable Quote – Order.
- Highlight the transaction and press F12 Recall.
- On the bottom ribbon of the module, press F5 Order Manager.
The Order Manager tab opens with the Items below this line are not part of the managed order note on the bottom line of the invoice.
- Enter an item number in the Part Number box below the note and close the invoice.
- The Incomplete Invoice window opens asking if you want to exit. Click Yes.
- In the Invoice/Quote module, press F6 Recall Transaction.
- On the top of the Recall Transaction window, enable Quote – Order.
- Highlight the transaction and press F12 Recall.
- Right click on the item and select Add Managed Item.
Note: Multiple items can be selected.

Figure 16: Add Managed Item selection
The item(s) is moved to above the Items below this line are not part of the managed order note, and a note stating items were added, and by whom, is added above the addition(s).

Figure 17: New managed Order Items Added note
Edit Quote Qty
In Paladin Configuration’s Invoice (Store) tab, when Automatically Put Items ON HOLD When In Order Manager is NOT enabled, items an a managed order can have their quoted quantity modified via the right-click menu. This prompts the user to input a new quantity, greater than the amount already sold, or reduce the quoted quantity to equal the amount sold (or 0). Users will also be able to use F3 Delete to remove an item from the order.
To disable this option:
- In Paladin, from the main menu, select File > Setup.
- Select the Invoice (Store) tab.
- Scroll to the bottom of the tab, then uncheck Automatically Put Items ON HOLD When In Order Manager.
- Click Save, then click Close.

Figure 18: Automatically Put Items ON HOLD When In Order Manager
Once Automatically Put Items ON HOLD When In Order Manager is disabled:
- In the Invoice/Quote module, press F6 Recall Transaction.
- On the top of the Recall Transaction window, enable Quote – Order.
- Highlight the transaction and press F12 Recall.
- Right click on the item and select Edit Quote Qty.

Figure 19: Edit Quote Qty
The opens Modify Quote Quantity window opens.

Figure 20: Modify Quote Quantity
- In the New Quote box, input a new quantity, greater than the amount already sold, or reduce the quoted quantity to equal the amount sold (or 0).
- Click OK.
The update, either add or remove item, shows on the item line.

Figure 21: Quantity update shown on item line
PO module
Quick Access menus are available in both:
- Mode PO and
- Mode Receive
Mode PO menu options
Insert Line Item
Similar to Invoice/Quote, in the PO mode, when you right-click a line item and select Insert Line Item on the quick access menu, a new line item is inserted above the selected line.
Insert Note
Similar to Invoice/Quote, in the PO mode, when you right-click a line item and select Insert Note on the quick access menu, a note field is inserted above the line item.
Delete Line Item
Similar to Invoice/Quote, in the PO mode, when you right-click a line item and select Delete Line Item on the quick access menu, the line item is deleted.
Add Precision
Similar to Invoice/Quote, in the PO mode, when you right-click a line item and select Add Precision, you can add additional precision to these line item values:
- Quantity: Up to four decimal places
- Price: Up to six decimal places
When you select the Add Precision menu option, an Add Precision window opens, and you can enter more precise Quantity and Price values. A real-time Extension value is calculated as you adjust the Quantity and Price.
When you click OK, the new Quantity, Price and Extension values appear in a note below the line item.
Note: When you update a line item price or quantity to a higher precision, the line item Price may appear as an approximate value that is slightly different than the price you entered. When this happens, a tilde (~) appears next to the price value. This variation is expected and a function of how the feature works. The additional precision is always maintained in the line item Extension.

Figure 22: Add Precision option
Dropship
To add dropship information to a purchase order and then to the invoice:
- In the PO module, enter items to a purchase order.
- When complete, right click on an item and select Dropship from the quick access menu.
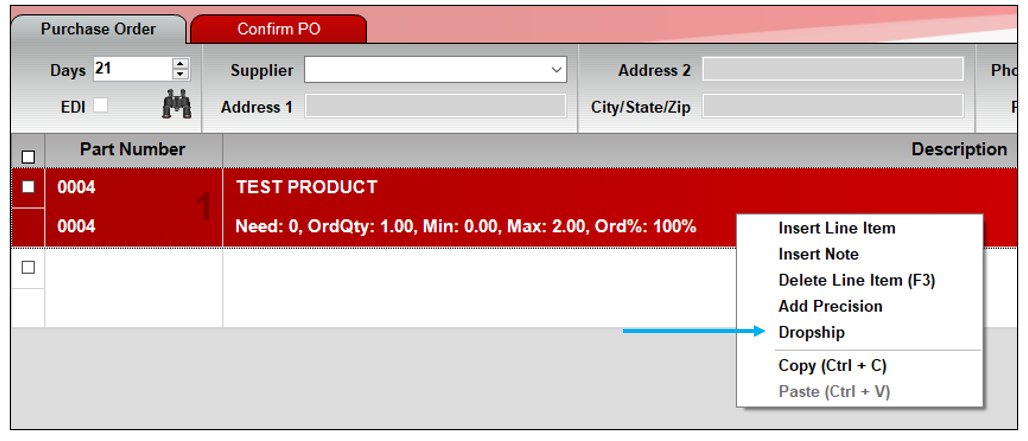
Figure 23: Dropship option
- In the Dropship Information window, in the Bill to Payment method list, select a payment type:
- The options are:
- Cash
- Check
- Credit
- The options are:
- In the Ship via Shipping list, select a shipping type:
- The options are:
- Truck
- UPS
- Fed Ex
- The options are:
- In the Ship via Bill freight to list, select a billing type:
- The options are:
- Cash
- Check
- Credit
- The options are:
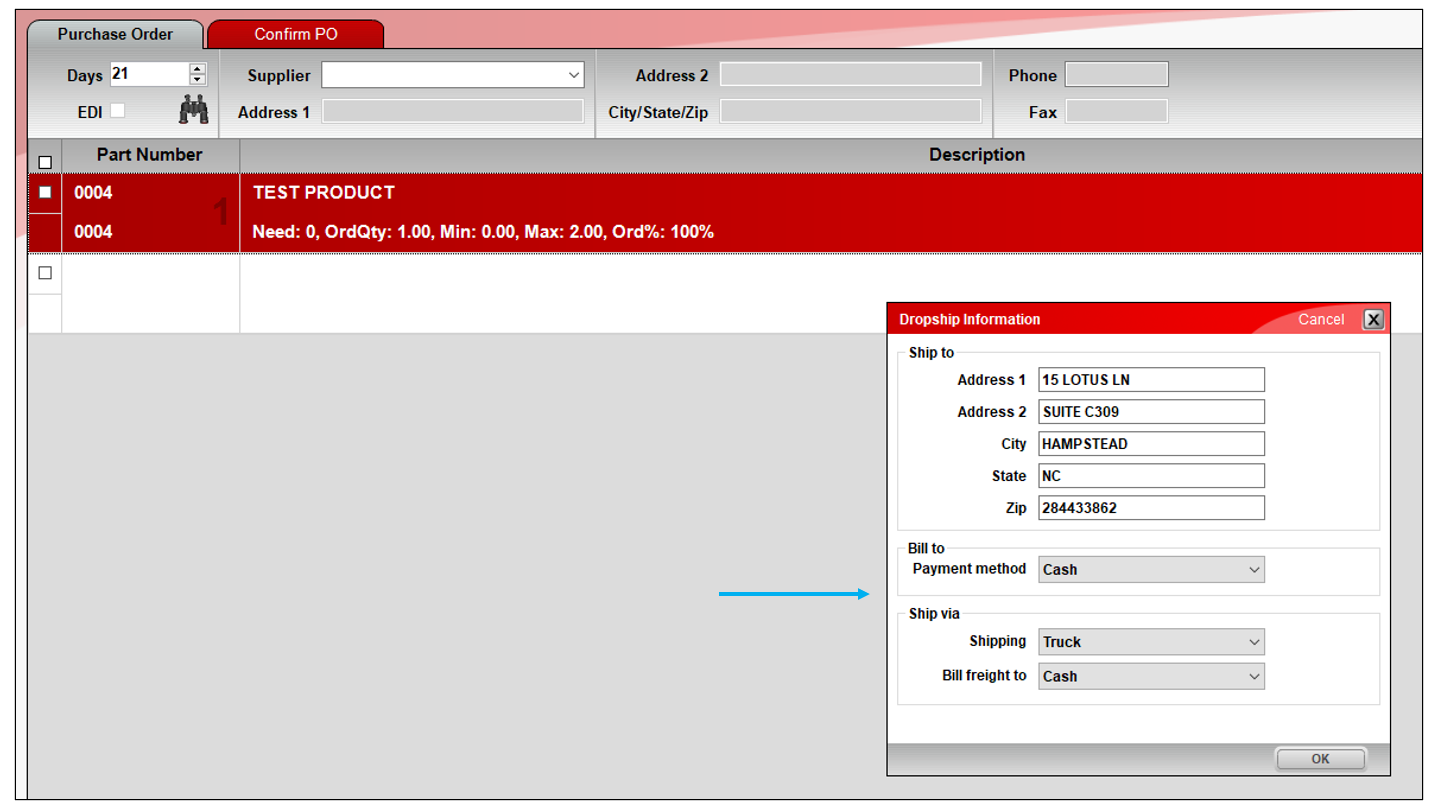
Figure 24: Dropship Information window
- Click OK.
The dropship information appears on the top of the purchase order.
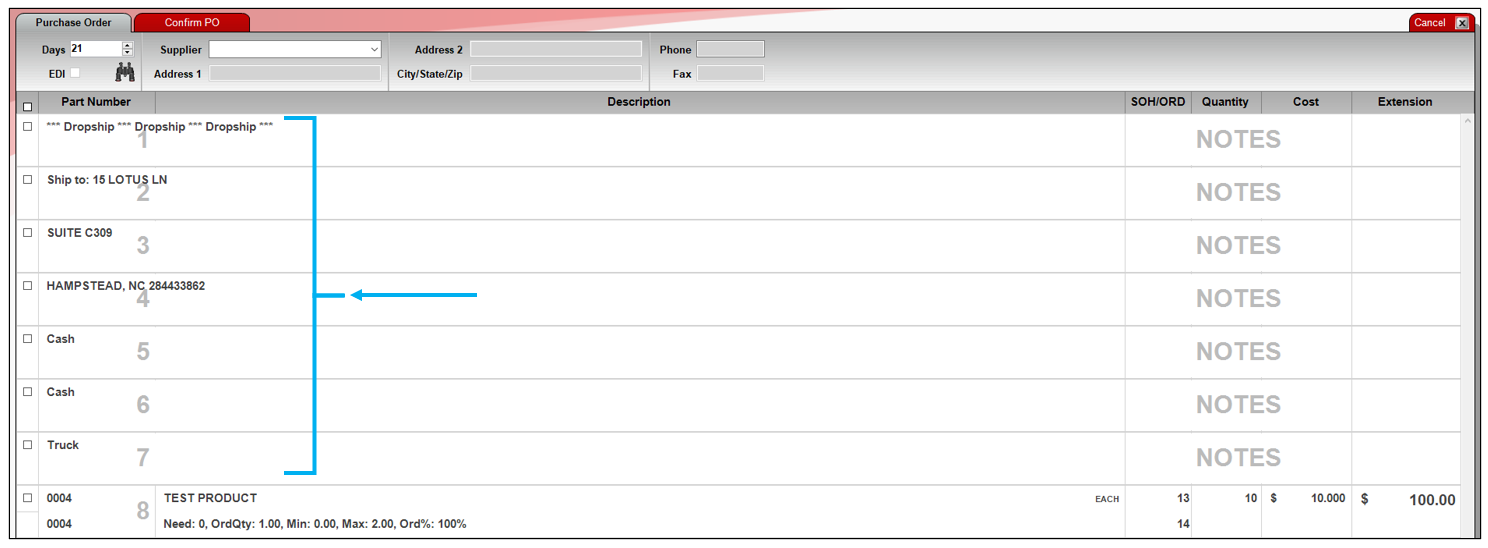
Figure 25: Dropship information at top of purchase order
- On the bottom ribbon of the Purchase Order tab, select F8 Confirm PO.
- On the bottom of the Confirm PO tab, select F1 Buy.
The Dropship Information window opens.
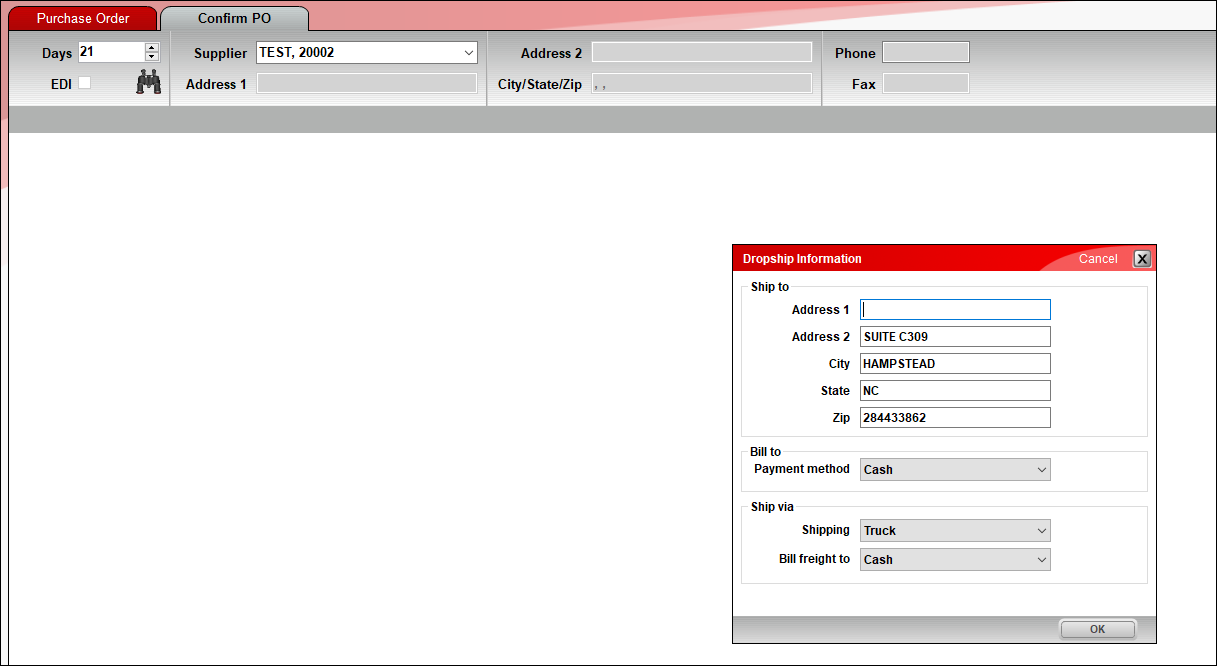
Figure 26: Confirm PO/Dropship Information window
- If all the information is correct, click OK.
- In the PO Number window, enter a PO Number and click Next >>.
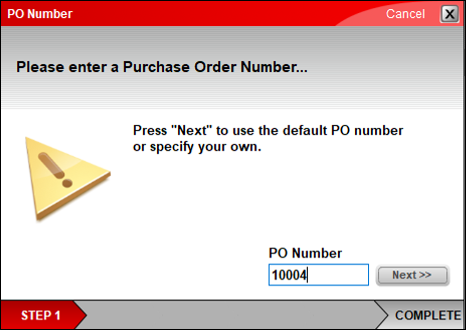
Figure 27: PO Number window
- In the PO Complete window, select an option:
- The options are:
- 1 None
- 2 Duplicate PO
- 3 Fax
- 4 Email
- The options are:
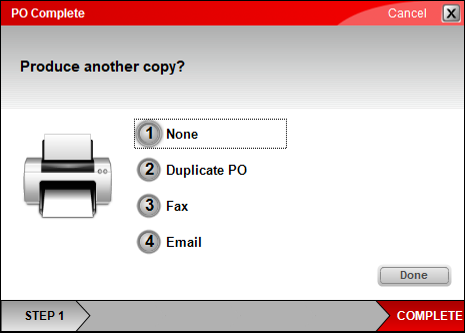
Figure 28: PO Complete window
- Click Done and save the invoice to your computer.
In the Ship to: field of the invoice, the invoice will state See PO details for dropship instructions. The top of the invoice will have all the dropship information created in the purchase order.
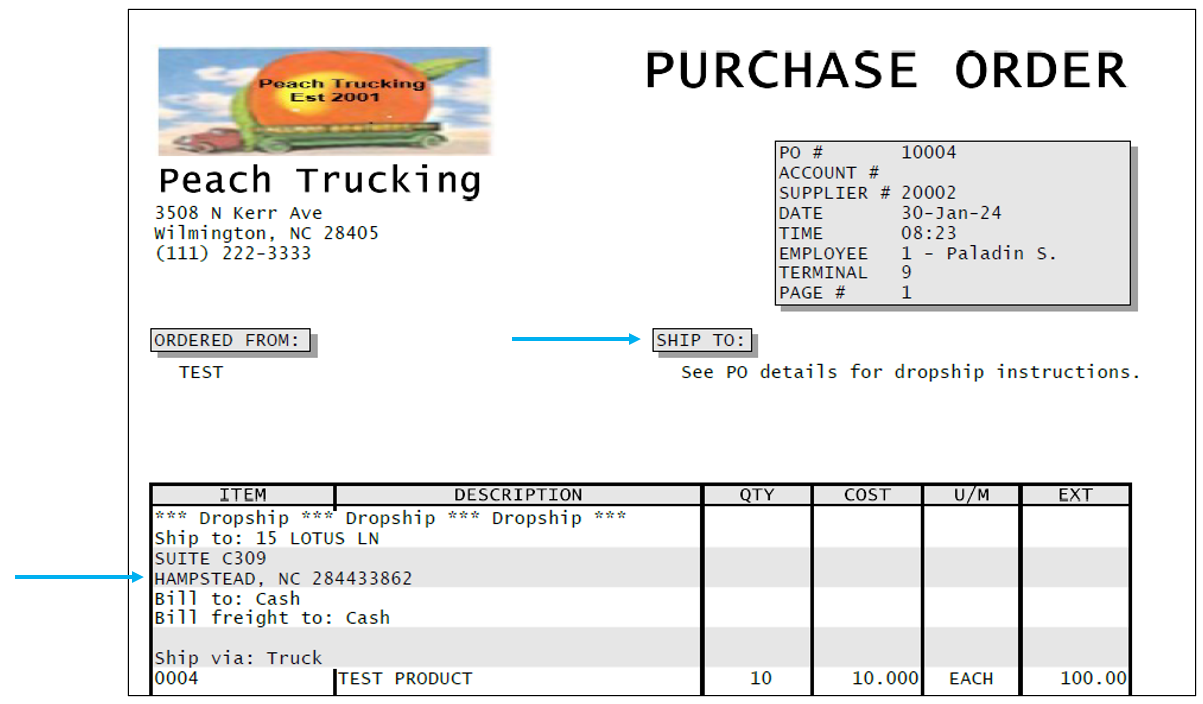
Figure 29: Dropship information on invoice
Copy/Paste option
You can copy and paste editable line item values, such as Note text or a Price value, from within the PO module with the Copy and Paste options.
Mode Receive menu option
The only quick access menu option in Mode Receive is Update PO Order Quantity and Cost.
Note: This option is not available (grayed out) for Closed POs.

Figure 30: Update PO Order Quantity and Cost option
To update the PO Order quantity and/or cost:
- In Paladin, on the top ribbon, select the PO module.
- On the bottom ribbon of the module, press F5 to set Mode Receive.
- Click F6 Find PO.
- In the Find PO window, in the PO Details pane, enable Open POs.
- Matching Purchase Orders pane, highlight the PO and press F12 Open.
- In the Receive PO tab, right click on the item and select Update PO Order Quantity and Cost from the quick access menu. The Update Purchase Order window opens.

Figure 31:Update Purchase Order window
- Make adjustments, then click Update.
- Exit/cancel to close the PO.
- To open the updated PO, click F6 Find PO.
- In the Find PO window, in the PO Details pane, enable Open POs.
- in the Matching Purchase Orders pane, highlight the PO and press F12 Open. The changes will be reflected on the PO.
If you have questions or suggestions about this information, contact support@paladinpos.com.

