
This article provides instruction and information on the following:
- How to set up Paladin to send email statements
- How to email a statement
- Set Email delay
- How to print a message on emailed statements
- How to set company name in emailed statements
- Itemized Excel spreadsheet added to email statements
- How to turn off Excel attachments for emailed statements
How to set up Paladin to send email statements
- In Paladin, from the main menu, select File > Setup.
- Select the Forms tab.
- In the Email Options pane, enter the following information:
| Name | Information |
| Enable SMTP Server | Check this box if using SMTP (see SMTP values below). |
| From Email Address |
Emails will be sent from this email address, and replies will be sent to it. This includes statements and purchase receipts. |
| From Email Address (Purchase Orders) | Emailed POs will be sent from this email address, and replies will be sent to it. |
| BCC Email Address |
This email address will be copied. The recipient will not see this email address. |
| SMTP Server Address | The Internet Service Provider can provide this information. |
| SMTP Server Port | The Internet Service Provider can provide this information. |
| SMTP Server User Name | Typically, this is the username used to sign into an email account. Contact the Internet Service Provider if needed. |
| SMTP Server Password |
Typically, this is the password used to sign into an email account. Contact the Internet Service Provider if needed. Gmail users: If the client is using Gmail, they must generate an App password to be used. Learn more. Note: 2-step verification should NOT be turned on when setting up an App password for Yahoo and AT&T email. Yahoo email users: If the client is using Yahoo email, they must generate an App password to be used. Learn more. AT&T email users: If the client is using AT&T email, they must generate an App password to be used. Learn more. |
| Enable SSL |
Secure Sockets Layer (SSL) is a type of security for web browsers, web sites, and email accounts. |
| Compress (Zip) Email Attachments |
The statement, transaction report, and invoices can be compressed (to decrease file transfer time on the email server) and zipped into a folder to be sent as an email attachment. To see/extract files, open the zip folder. |
| Enable Advanced Email Logging | For TSR to test and debug email issues. |
| Use Company Name in Emailed Statements | To personalize your email, select this option. |
- In the Send Test Email To box, click Send Test Email To. If your settings are correct, you will receive an email message from Paladin.
- Click Save, then click Close.
- Update the CRM account with this note: Email statements and invoices: Yes
Note: Email messages can be sent through a Simple Mail Transfer Protocol (SMTP) server via two types of SSL—explicit or implicit.
- Explicit SSL: Paladin only supports sending email messages via explicit SSL. This means that an unencrypted connection to the SMTP server issues a command to start using encryption before it authenticates the server and sends the email. Port 587 is usually the default port. However, your Internet Service Provider (ISP) may provide other ports.
- Implicit SSL: Paladin does not support sending email messages via implicit SSL. If you are trying to send email messages via port 465, it indicates that your ISP is probably set up to communicate implicit SSL to the SMTP server. This process is similar to HTTPS (a web browser) encrypting communication before it is transmitted via the email client and the server.
If you receive an email message stating that you use an SMTP server with SSL on port 465, try to use port 587 instead. If using port 587 does not work, contact your email provider to see if it has an alternative SMTP port with SSL enabled.
How to email a statement
- In Paladin, on the top ribbon, select the Customers module.
- Enter or select a customer account from the Customer list.
- Press Enter.
- In the Contact Information pane, in the E-mail box, enter an email address.
- In the Form Control pane, select E-mail Statement Copies?
- Click Save, then exit out of the module.
When an invoice is created for this customer, or when statements are run, the customer will receive an emailed copy.
Note: By default, email statements include a PDF statement and an Excel spreadsheet with the following information on separate tabs:
- Statement Information – Store information and statement summary.
- All Transactions – An itemized list of the customer’s transactions organized by project.
If you do not want to include the Excel spreadsheet, refer to: How to turn off Excel attachments for emailed statements
Set Email delay
To set email delay:
- In Paladin, from the top menu, select Maintain > Data Viewer > Settings.
- In the Reports/Statements pane, there are two options:
- Email Statements – Pause 60s After Each Email Failure checkbox. Check this to have a 60 second delay after an error sending email.
- Pause After Each Statement Email. Enter the time in the box up to 60 seconds. As noted, the time is in seconds and decimals allowed.
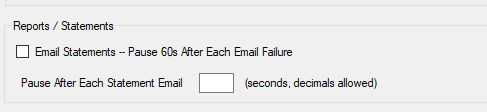
Figure 1: Email delay options
- Click Save, then close the Data Viewer.
How to print a message on emailed statements
- In Paladin, from the main menu, select File > Setup.
- Select the Forms tab.
- In the Form Information section, enter a message in the Statement Email Message box.
- Click Save, then click Close.
How to set company name in emailed statements
In Paladin, a store can place their store name in the email subject line followed by the additional message of “Account Statement.” The company name used is pulled from the Store Name field on the Company tab in Paladin Configuration.
To enable this feature:
- In Paladin, from the main menu, select File > Setup.
- Select the Forms tab.
- in the Email Options pane, check Use Company Name in Emailed Statements. You are able to view the name that will be used in the field to the right of the checkbox.
- Click Save, then click Close.
Itemized Excel spreadsheet added to email statements
For customers that receive statements by email, this feature automatically includes an Excel spreadsheet with a customer’s monthly charges, itemized by project if applicable. The spreadsheet complements the PDF statements that customers already receive and includes individual sheets (tabs) for:
- Statement Information – Store information and statement summary.
- All Transactions – An itemized list of the customer’s transactions organized by project.
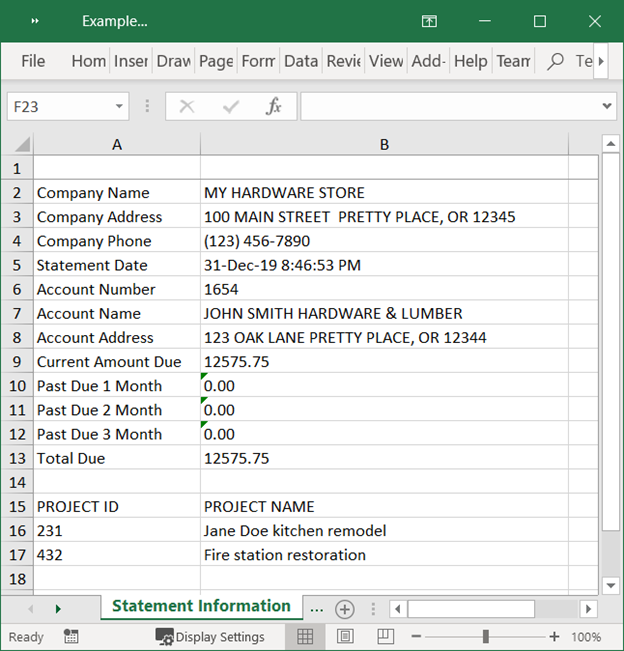
Figure 2: Statement Information tab
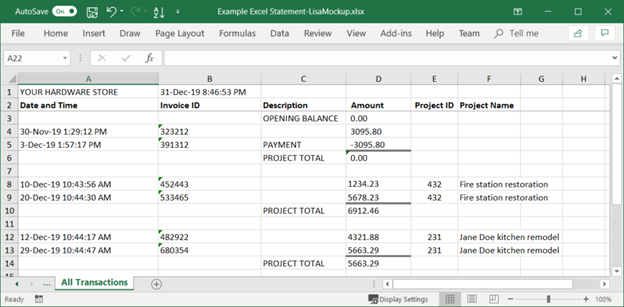
Figure 3: All Transactions tab
The spreadsheet allows your customers to easily see and categorize their charges and gives them the ability to work with the data in their statements.
How to turn off Excel attachments for emailed statements
This feature is turned on by default. If you want to exclude Excel attachments from emailed statements:
- In Paladin, from the main menu, select File >Setup.
- Select the Receivables tab.
- In the Statements pane, check Disable Emailing Project Workbooks.
- Click Save, then click Close.
If you have questions or suggestions about this information, contact support@paladinpos.com.
