
This article provides instruction and information on the following:
- About Invoice Importer
- How to create an invoice transaction file that you can import into Paladin
- How to import invoice transactions into Paladin
- How to view a revenue report with imported invoice information
About Invoice Importer
With the Invoice Importer, you can import transactions from other systems into Paladin. This option is useful when you want to use Paladin to manage your inventory and sales history for items that you sell using another system.
For example, if you have hardware section in your grocery store, or you sell all of your items in a web store, you can use one system to check out customers, then use Paladin to analyze and track your inventory and sales.
You can import invoice data files in the following formats:
- Excel (XLS)
- Excel (XLSX)
- XML
- Tab-delimited text file
Important things to know about the invoice import process
- Data must be correctly formatted and must pass a data validation test before you can import it. If errors are found, you must correct them and try again.
- Customer information is not imported.
- An Import Coupon payment type is used for all imported transactions. Actual payment types, such as cash or credit card, are not imported.
Imported invoice values are found in the revenue reports that are created in the Reports module.
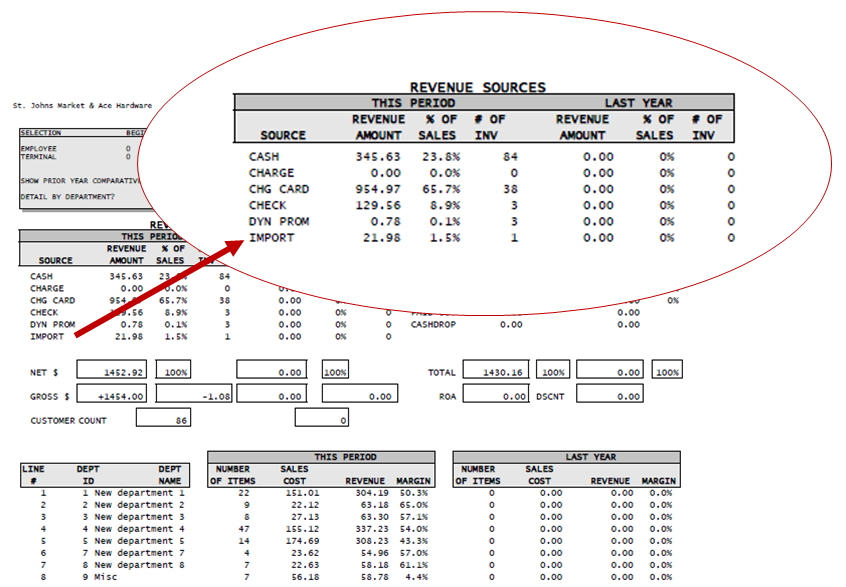
Figure 1: Revenue Sources/Import detail shown
How to create an invoice transaction file that you can import into Paladin
- In Paladin, from the top menu, select Maintain > Data Viewer.
- In the Data Viewer window, select the Invoices tab.
- Select the Export tab.
- Select the file type that you want to use to import your invoice data from the Export File Template list, then click Export.
- Important: Depending on the file format selected, an XML or Excel template file opens with sample data. Save this file to your computer and use it to create your invoice import file. To create a tab-delimited file, download the Excel template and save it as a tab-delimited text (.txt) file.
- With the template that you downloaded, create an invoice transaction file. Make sure that the data titles match and the transaction values are formatted to match the sample data in the template. If you are using an XML file, you may want to use an XML validator before you import the file into Paladin. When you are ready to import the file into Paladin, refer to: How to import invoice transactions into Paladin
How to import invoice transactions into Paladin
- Create an invoice import file using the process described in How to create an invoice transaction file that you can import into Paladin.
- In Paladin, from the top menu, select Maintain > Data Viewer.
- In the Data Viewer window, select the Invoices tab.
- Select the Import tab.
- Click the ellipsis […] next to the Read File box, then select the file that you want to import.
- Click Read File to start the data validation process.
- If data appears in the Errors pane, or an error window opens, find and correct the issues. Then, click Read File to try again. You may have to do this multiple times. To open the error information in an Excel spreadsheet, click Save. You must have Microsoft Office 2007 or later to open the error information in Excel. Look for any of the following issues:
- Correct column names or XML tag names that match the template download file.
- Correct data values. Make sure that you use the data format that appears in the template download file.
- Well-formed XML. Use an XML file validator to make sure your XML is valid. XML issues, such as missing or unmatched start or end tags, can cause an XML file import to fail.
- When the file validation succeeds, data appears in the Invoices, Invoice Items, and Invoice Payments panes, and a message appears indicating how many invoices were read.
- In the Invoices pane, click Save to view, verify, and optionally save the information before you process the upload.
- In the Invoice Items pane, click Save to view, verify, and optionally save the information before you process the upload.
- In the Invoice Payments pane, click Save to view, verify, and optionally save the information before you process the upload.
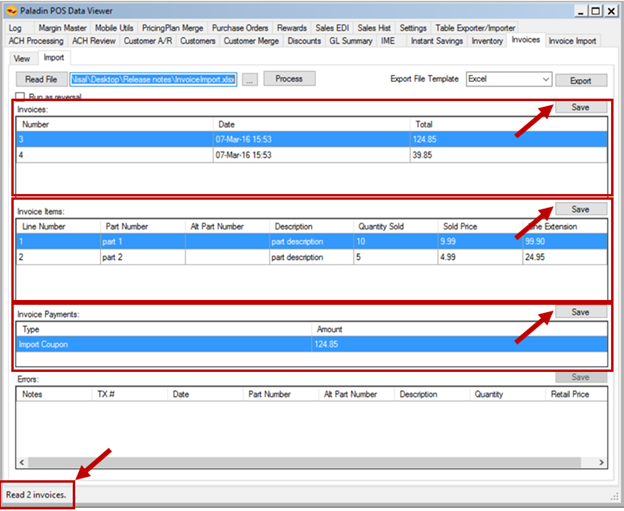
Figure 2: Data Viewer/Invoices tab/Invoices items and payments
- When you have verified the invoice information, and are ready to import it, click Process. When the process is complete, a message appears indicating that the import is complete (Figure 3)..
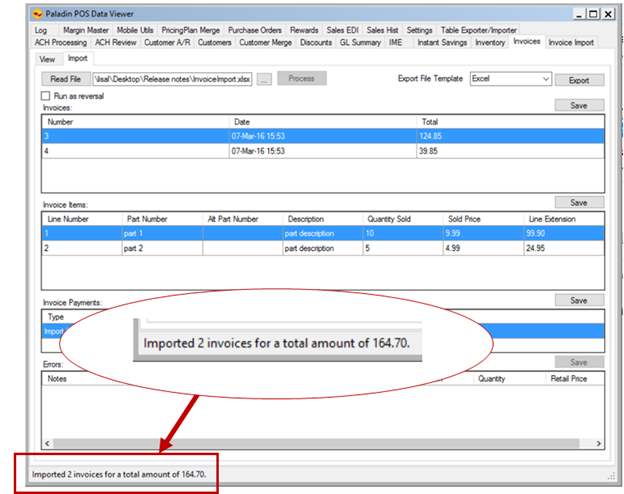
Figure 3: Import complete message
How to view a revenue report with imported invoice information
- In Paladin, on the top ribbon, select the Reports module.
- In the Report Area pane, select Sales Analysis > Revenue.
- In the Report List pane, click the revenue report that you want to create.
- In the Choose Report pane, click F12 Next.
- In the Report Settings pane, customize the report settings for your needs.
- In the Sorting Options pane, click F12 Run Report.
- When a PDF file of the report opens, the imported invoice values appear in the Revenue Sources section as an Import revenue source.
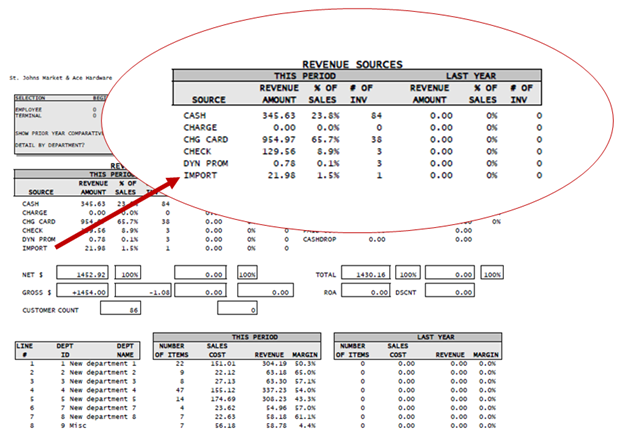
Figure 4: Revenue Sources/Import detail shown
If you have questions or suggestions about this information, contact support@paladinpos.com.
