
This article provides instruction and information on the following:
- EDI file system enhancements
- EDI Preview
- EDI processing tied to open purchase orders
- How to set EDI lock on unit of measure
- How to prevent EDI updates to specific items
- EDI processing safeguards
- Duplicate EDI invoice safeguard
- EDI processing protection during receiving
- View and analyze EDI report data in an Excel workbook
- How to set up EDI reports to use the PDF format
- How to run the EDI Masked Item Report
- How to apply freight cost to items received by EDI
- Reversing freight cost
- EDI option will set pack and single item prices
- Setting Department and Class
- Override EDI supplier’s department choice for a class of items
- How to turn on/off EDI updated classes
- How to update stock on hand when EDI receiving was delayed
- How to set up delayed EDI stock on hand updates
- How to prevent EDI from changing retail on an item
- How to print or save the EDI status message history
- How to return unordered items from an EDI supplier that accepts credit (negative) purchase orders
- How to manage discontinued items from EDI suppliers
- How to find and rename discontinued items from EDI suppliers
- How to merge a discontinued item with a replacement item
- EDI missing retail prices calculated
- How to set New Inventory Items in Specified Class
- How to reverse stock on hand counts for an EDI invoice
- Undo EDI vendor PO
- How to block EDI class and subclass control
- How to control supplier order number search
- EDI reporting Include all changes made by EDI uploads
Note: After successfully downloading EDI, follow the steps in the following KBA to generate your bin tags or shelf tags: Batch and print EDI price changes on full sheet bin tags or shelf tags
EDI file system enhancements
All unprocessed EDI files reside in the EDI supplier’s main folder (C:\PaladinPOS\Export), and a copy of all processed files will be in the supplier’s backup folder (C:\PaladinPOS\Export\backup).
After EDI files are downloaded, a date stamp is added to the file name. Files remain in the supplier’s main folder until they are processed. This allows multiple unprocessed EDI files to reside in the same folder. After EDI files are processed, the original file is deleted for all suppliers.
Note: A copy of the EDI file is always created before the file is processed and is always available in the supplier’s backup folder.
When you use the EDI Preview feature, the downloaded EDI file is not modified or moved.
EDI Preview
If there is a need to delay processing a particular download until you have adequate staff to distribute all the new bin tags, Paladin has a Preview option that processes the entire EDI file and generates reports you are familiar with, but NO changes are made to your system.
To use this feature:
- In Paladin, on the top ribbon, select the Inventory module.
- On the bottom ribbon of the module, select F9 EDI.
- In the EDI Processing window, click Download Files (there is also the option to Browse for specific files).
- Once your files have downloaded, a window opens where you can select Preview Only.
If you decide to preview, all progress indicators function the same as real processing.
EDI processing tied to open purchase orders
In Paladin, every line of an EDI invoice directly updates the open purchase order(s) used to create the electronic order. This provides an automatic means to support both backorders from your EDI suppliers and maintain quantity on orders from suppliers other than your primary EDI source.
The Find PO window opens at the conclusion of an EDI invoice processing In the Matching Purchase Orders pane. Each PO displays a PO number, date, number of line items, PO cost, and received cost.

Figure 1: Matching Purchase Orders pane/PO info.
Note: Paladin closes all filled POs; therefore, only open POs appear in the Matching Purchase Orders pane of the Find PO window.
There are six tools to finish the receiving event:
- Rcvd Items Report
- Recvd PO Report:
- Print Item Tags
- Create item Tag File
- Cancel BO
- Revise PO
![]()
Figure 2: Matching Purchase Orders pane options
Note: Any PO line item with an outstanding backorder quantity is still on order and will be displayed as such in the inventory screens, reports, and suggested order calculations. If unreceived items are likely to never be received, cancel the backorders by highlighting the PO and clicking Cancel BO.
If you exit this screen without canceling one or more outstanding purchase orders, you can still close these purchase orders by following these steps:
- In Paladin, on the top ribbon, select the PO module.
- Toggle F5 Mode PO to change to F5 Mode Receive.
- Press F6 Find PO.
- Enter the supplier you have been working with. From this screen, you have all the options listed above.
If you need line-by-line control, perform the following:
- Highlight the desired PO.
- Press F12 Open.
- Highlight all PO lines
- Press F3 Zero Qty Received.
- Scroll to the individual line(s) to cancel.
- Check Del on the left side of the screen.
- When complete, press F8 Process.
- Press F1 Process to complete the task.
Limitations: Virtually no EDI supplier allows Paladin to transmit your PO number to them; therefore, they don’t transmit your PO number back to you. When an EDI invoice line is processed, Paladin looks in all open purchase orders for a match. A match may or may not be the specific PO used to order this item, but the item was ordered and is now received. Items received from the supplier that were not found on any open PO are received to stock, but no updates have been performed on purchase orders. If a received quantity is greater than the quantity ordered on a PO, other purchase orders are searched in an attempt to place the remaining received quantity with other purchase orders. If no other orders for this item are found, the received quantity of the first PO contains the entire received amount.
Feature Startup: Since EDI-based purchase orders have never been closed, most stores have hundreds, if not thousands, of past EDI purchase orders open. To solve the potential overload this presents to users, Paladin automatically cancels backorders on all EDI suppliers. Most stores have this performed in the middle of the night during the daily (nightly) data validation. No purchase orders from non-EDI suppliers will be touched.
Again, Paladin closes all filled POs; therefore, only open POs appear in the Matching Purchase Orders pane of the Find PO window.
How to set EDI lock on unit of measure
Occasionally, incoming EDI data will change a Unit of Measure label that you have established on an item. Paladin can block that field for any inventory item you need to protect from your supplier’s data.
To enable this:
- In Paladin, on the top ribbon, select the Inventory module.
- Enter the item’s part number in the Part # box.
- Press Enter.
- Select the General tab.
- In the Item Information pane, click the padlock at the end of the U/M list.
- Click F12 Save.
How to prevent EDI updates to specific items
Incoming EDI data can change information for your items. Paladin can block several fields for any inventory item you need to protect from your supplier’s data.
To enable this:
- In Paladin, on the top ribbon, select the Inventory module.
- Enter the item’s part number in the Part # box.
- Press Enter.
- Select/lock the padlock icon next to the part number field.
- Lock the fields you would like to prevent updates.
- Press Update at the bottom right of the Master EDI field lock window.
- Click F12 Save.
EDI processing safeguards
Note: EDI processes can only run one at a time.
If you try to start an EDI process while another EDI process is running, the new process is put on hold until the current process completes. Paladin will check every two minutes to see if it can start the new EDI process.
Figure 3 shows the message that appears in the EDI Processing window when your EDI process is waiting to start.

Figure 3: EDI Processing window when EDI process is waiting to start
Note: If you want to cancel the EDI process before it starts, click Cancel to close the EDI Processing window.
If the terminal currently running an EDI process is in another store, you will see the following variation of the message.
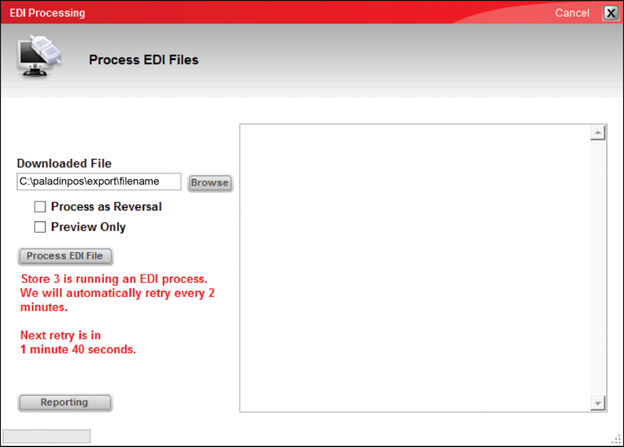
Figure 4: EDI Processing window when EDI process is in another store
When you manually update items and other information in Paladin, your updates are made individually in real-time. An EDI process is a batch process that updates large numbers of items all at the same time. If you run two or more batch processes at the same time, they may interfere with each other. By finishing an EDI process before starting another, you avoid any potential issues.
Additional protection for multi-store installations
Before an EDI process starts in a multi-store installation, Paladin tries to communicate with the shared enterprise database installed on the computer known as the publisher server. If communication with the database is not possible, the message shown in Figure 5 appears, and the EDI process is put on hold until the communication issue is corrected.
Important: If you see this message, this is a Store Down Emergency, and you must do the following:
- Contact your network provider to restore the network connection.
- Report the emergency to Paladin Point of Sale Emergency Support.
-
- Call (800) 725-2346.
- Press 2 for Customer Support.
- Press 2 for Store Down Emergency.
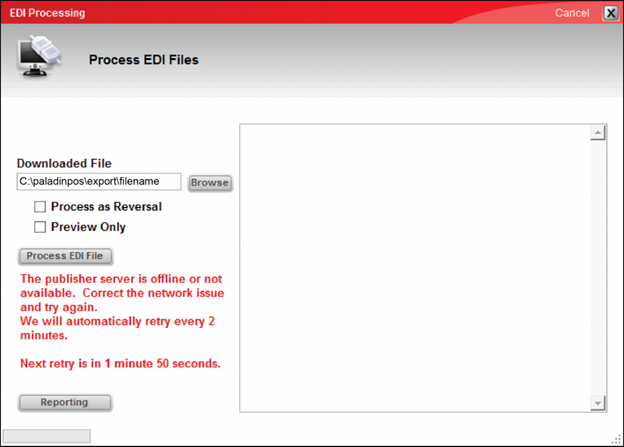
Figure 5: EDI Processing window showing communication with the database is not possible
If you keep the EDI Processing window open when this message appears, Paladin will try to communicate with the publisher server every two minutes. Once the connection to the publisher server is established, the EDI process is started.
Duplicate EDI invoice safeguard
Paladin provides a safeguard to prevent invoices from being processed more than once by pausing EDI processing when a previously-processed invoice is identified. When this occurs, the EDI Processing message window opens. To continue EDI processing, in the EDI Processing message window, you must choose from these options:
- Click No to skip the invoice and continue processing the file.
- Click Yes to process the invoice anyway.
- Caution: If you process the invoice, you may create a duplicate transaction and stock on hand quantities may be incorrect.
To apply your choice again to any other previously processed invoices in the current EDI invoice file, check Apply to All.
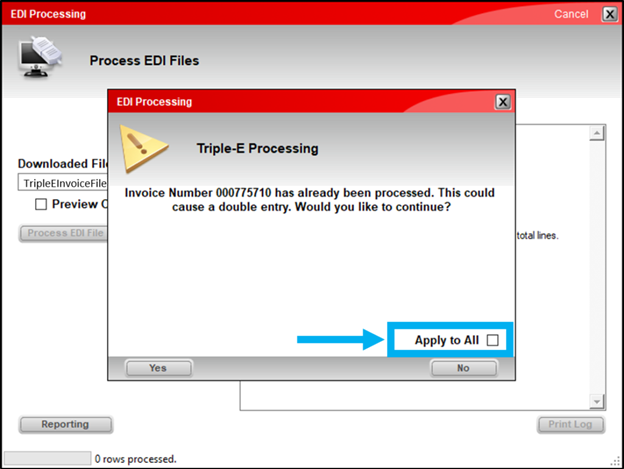
Figure 6: EDI Processing message/Apply to All
A record of your choices appears in the EDI Processing message log in the EDI Processing window. To print or save this log when EDI Processing is complete, click Print Log.
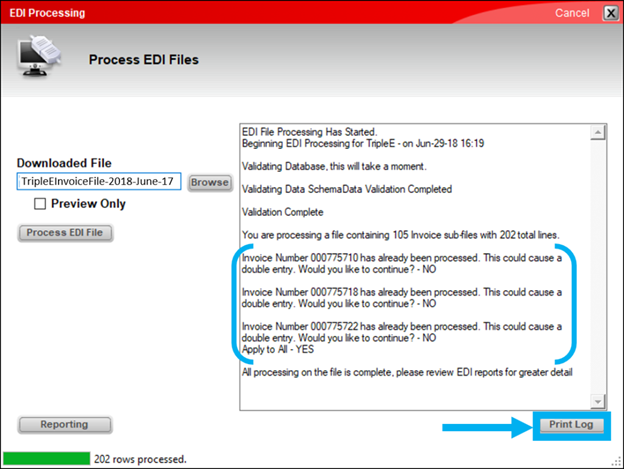
Figure 7: EDI Processing window/Print Log option
EDI processing protection during receiving
When you process an EDI invoice file to receive recently ordered items, Paladin first compares the number of items in the EDI file to the number of open purchase order items. If the difference is significant, a message appears, and you have the option to cancel the EDI process. This is designed to prevent you from processing an incomplete EDI file. If you receive this message, and didn’t expect to receive notably fewer items than you ordered, we recommend that you cancel the EDI process and ask the supplier to provide a new EDI invoice file.
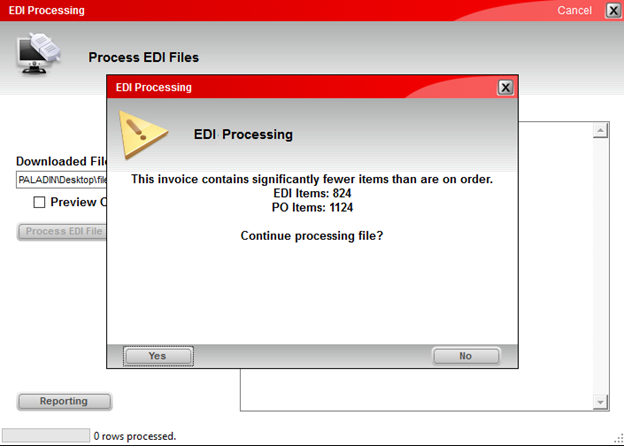
Figure 8: EDI Processing message/Fewer items than are on order warning
What causes incomplete EDI invoice files?
You may download an incomplete file if the supplier was in the process of updating it or because of file transfer issues.
View and analyze EDI report data in an Excel workbook
To provide fast data access and intelligent analysis, EDI report data (available in the EDI Reporting window) is presented as an Excel workbook with individual Excel worksheets for each EDI report section.
Clearly labeled worksheet tabs and columns identify the data and match the labels from the prior PDF versions of the report. Report details are found on the first worksheet tab.
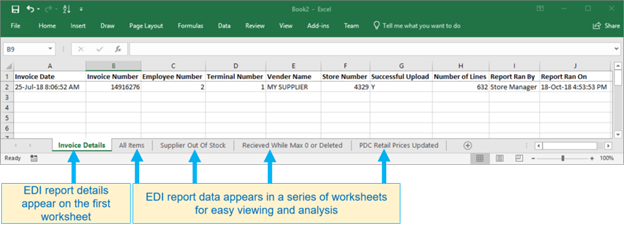
Figure 9: EDI Excel worksheet
The power of Excel makes it easy to organize, sort, and analyze the data on each spreadsheet. You can also print or share all or part of the report data with others.
Figures 10 and 11 show examples of Excel report organization for invoice and maintenance files. The worksheet column and tab names may be different for your EDI supplier.
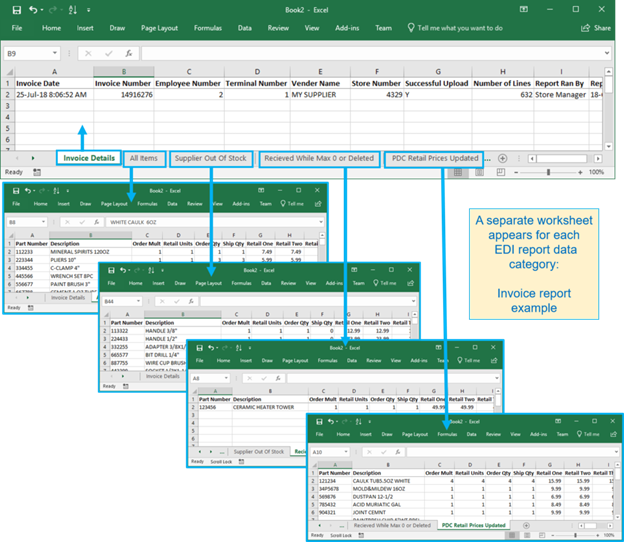
Figure 10: EDI invoice file Excel report
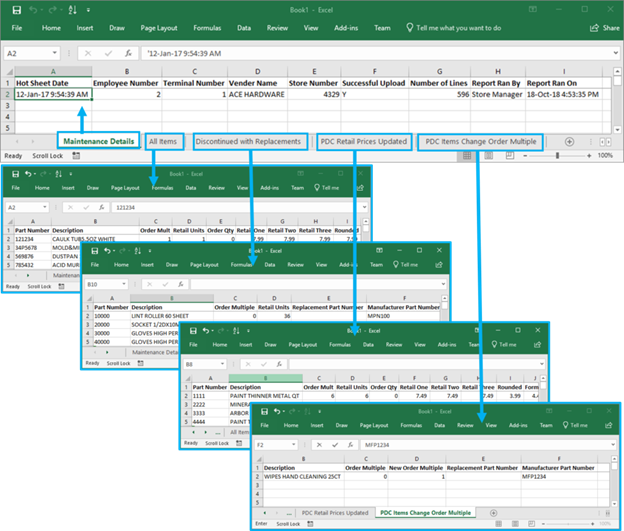
Figure 11: EDI Maintenance file Excel report
While most worksheet categories are intuitive, the following categories may need additional clarification:
|
Items on this worksheet |
Did not allow EDI updates to these inventory values because the values are locked |
|
EDI Lock Pricing Levels Group |
Pricing tab > Pricing Levels pane values |
|
EDI Lock Order QTY and/or Supplier Ratio |
Order Control tab > Stock Information pane > Order Qty value Order Control tab > Suppliers pane > Sup. Ratio value |
|
EDI Lock Item Cost Group |
Pricing tab > Item Cost pane values |
|
Nonprimary Supplier Rejection |
Details when an item has updates rejected due to supplier ownership (for example, Ace not Supplier 1). Figure 13 below |
To access any EDI Report in Excel, in the EDI Reporting window, search for the EDI process report that you want to view. When it appears in the search results, click its magnifying glass or highlight it, then click Generate Report.
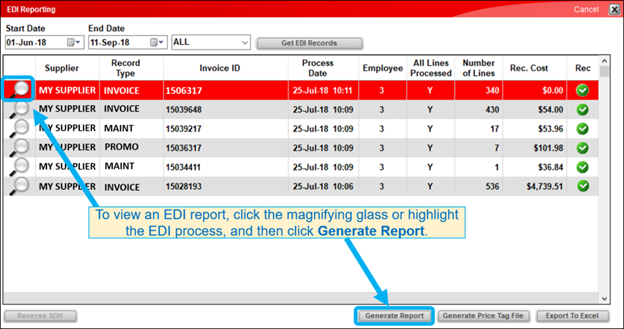
Figure 12: EDI Reporting window/Generate Report option
A Nonprimary Supplier Rejection subreport tab is added to the Excel workbook when an item has updates rejected due to supplier ownership (for example, Ace not Supplier 1).
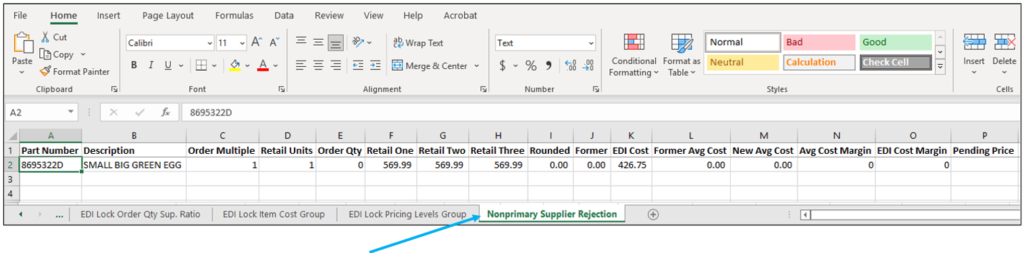
Figure 13: Excel subreport in Nonprimary Supplier rejection tab
How to set up EDI reports to use the PDF format
- In Paladin, from the main menu, select File > Setup.
- Select the Company tab.
- In the EDI pane, select Revert to PDF Reporting.
- Click Save, then click Close.
How to run the EDI Masked Item Report
This PDF format report will show you the EDI LOCKS you have enabled within your system. Part number and Description are included on this report.
- In Paladin, on the top ribbon, select the Reports module.
- In the Report Area pane, select Inventory > General.
- In the Report List pane, select EDI MASKED ITEM REPORT.
- In the Choose Report pane, click F12 Next.
- In the Report Settings pane, make your selection for Part Number, Department, Supplier, Class, SubClass, and/or Location.
- In the Additional Settings pane, the Exclude items with zero Max Stock checkbox is selected by default. This is optional.
- In the Sorting Options pane, select F12 Run Report.
A PDF file of the EDI Masked Item report opens.
How to apply freight cost to items received by EDI
You can apply a freight cost to an EDI invoice and then distribute the cost across its received items. Cost distribution can be by weight or item cost. This feature is already available for manual receiving.
To apply a freight cost after an EDI invoice is processed:
- In Paladin, on the top ribbon, select the Inventory module.
- On the bottom ribbon of the module, click F9 EDI.
- In the EDI Processing window, click Reporting.
In the EDI Reporting window, invoices that are eligible for a freight cost have a red X icon in the Freight column. Highlight an invoice with a red X and click Apply Freight.
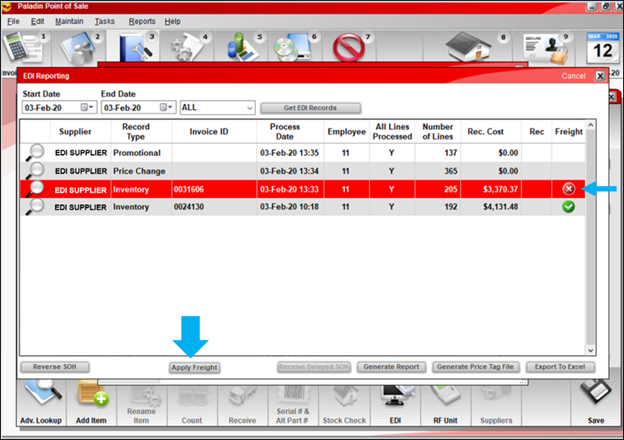
Figure 14: EDI Reporting window/Apply Freight cost
In the EDI Freight Cost window, select the freight cost distribution method:
- If you select Item Cost, the cost will be distributed in proportion to each item’s individual cost.
Example: If the shipment contains two items that cost $10 and $20 respectively, the $10 item will receive 1/3 of the freight cost, and the $20 item will receive 2/3 of the freight cost.
- If you select Weight, the cost will be applied in proportion to the weight of each item.
Example: If the shipment contains two items that are 10 and 20 pounds respectively, the 10 pound item will receive 1/3 of the freight cost, and the 20 pound item will receive 2/3 of the freight cost.
If you select Weight, and not all items have a specified weight, a message will appear. In Figure 15, the message tells you that 6 of the 89 invoice items do not have a defined weight and, therefore, will not receive a freight cost.
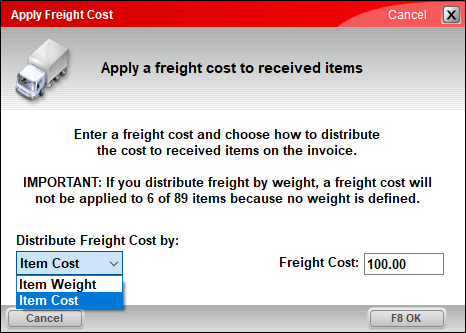
Figure 15: Apply Freight Cost window/6 of the 89 invoice items do not have a defined weight
After you choose a distribution method, enter the Freight Cost and click F8 OK to complete the process. An informational message window opens when the freight cost is applied.
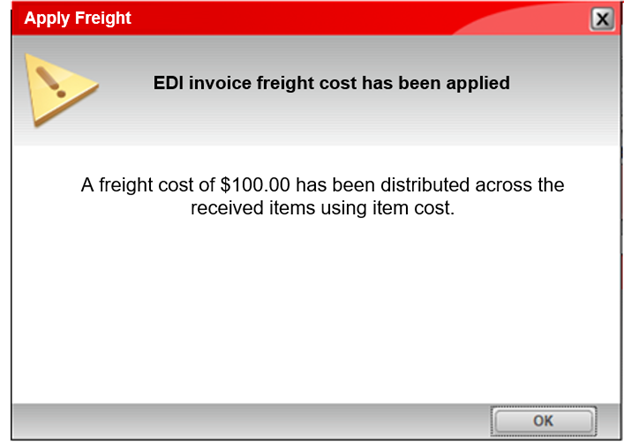
Figure 16: Apply freight window/Freight cost applied message
Click OK to close the message window. Then, in the EDI Reporting window, you will notice that the red X icon for the EDI invoice you processed has become a green check mark.
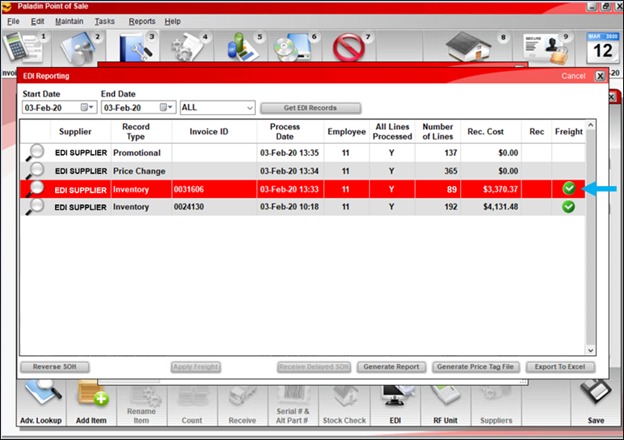
Figure 17: EDI Reporting window/Freight cost verified
Tip: It is best practice to apply freight cost soon after the EDI invoice is processed and before received items are sold.
Note: Freight applied to EDI is uploaded to external account systems as part of the PO, not the GL.
Reversing freight cost
If mistakes or miscalculation of freight costs occur, you can reverse the freight cost within 24 hours of original application.
To reverse freight cost:
- In the EDI Reporting window, click Undo Freight.
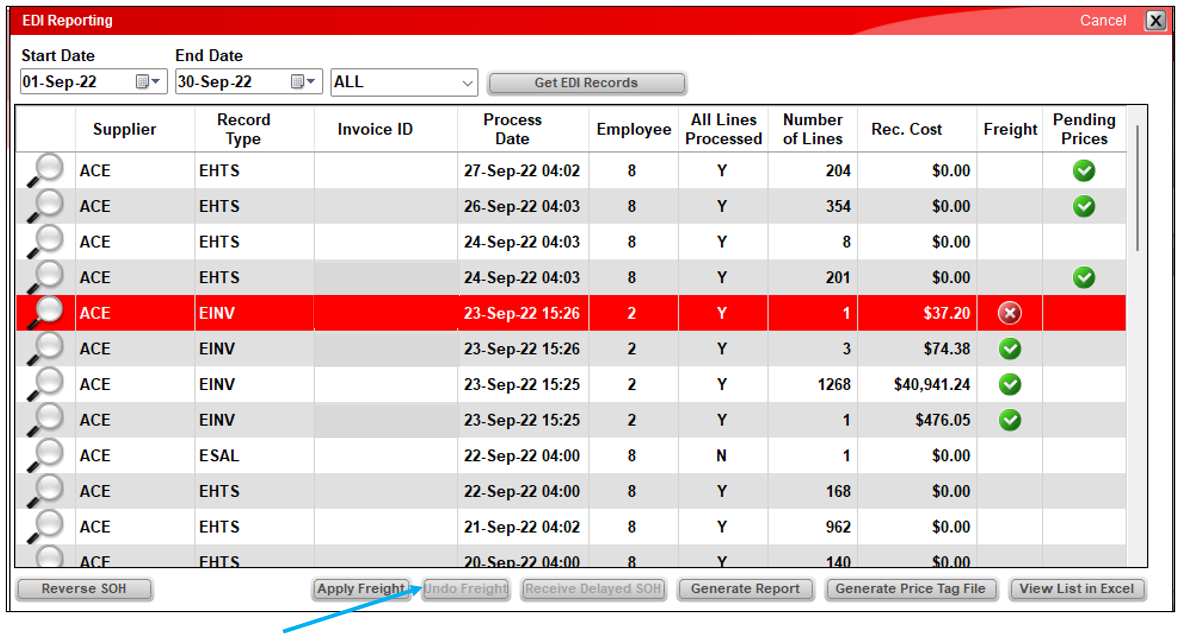
Figure 18: Undo Freight
The reversal of the cost will show in the last row in the SOH History table.

Figure 19: Undo Freight in SOH History
EDI option will set pack and single item prices
Note: This feature is only available to stores that use EDI and applies to all EDI suppliers except Do It Best.
When an item has a supplier ratio that is set and locked, an (optional) EDI processing feature will do the following for items bought in pack quantities:
- Set Pricing Level 1 to the individual item quantity and price.
- Set Pricing Level 2 to the pack quantity and price.
Example
Given these conditions:
- This feature is turned on.
- You buy wire from an EDI supplier by the spool (100 feet) and sell it by the foot.
- The Supplier Ratio for the wire inventory item is 1/100 or 0.01 and is set and locked.
- In the EDI file, the price per spool is $50.00, and the price per foot is $1.00.
EDI processing will set these values:
Pricing Level 1
- Quantity: 1
- Price: $1.00
Pricing Level 2
- Quantity: 100
- Price: $50.00
How to turn on this feature
To turn on this feature, you must contact Paladin Support (1-800-725-2346, option 2 or support@paladinpos.com).
To determine if this feature in turned on in your store:
- In Paladin, from the main menu, select File > Setup.
- Select the Company tab.
- In the EDI pane, if the Manage Pack Prices for Custom Supplier Ratio Items check box is selected, this feature is turned on.
Note: This text and checkbox appear in light gray text. To update this or other EDI settings, contact Paladin Support (1-800-725-2346, option 2 or support@paladinpos.com).
- Click Save, then click Close.
Setting Department and Class
Only one supplier can update classes, and it must be the same one as is updating departments. A message opens when radio buttons are enabled stating that only one EDI supplier can update departments/classes.

Figure 20: EDI Supplier message
Override EDI supplier’s department choice for a class of items
Important: You only need to set a custom default department when the EDI supplier department is different from your preferred department for a class of items.
How to override your EDI supplier’s department choice for a class of items
- In Paladin, from the main menu, select File > Setup.
- Verify that the EDI supplier’s settings allow for department updates.
- Select the Supplier tab.
- Select the EDI supplier that you want to override.
- Check EDI Supplier Services.
- Verify that the Update Departments setting is set to Yes.
Note: This setting appears in light gray text because you cannot modify this setting. If Update Departments is set to No, this feature does not apply to your store’s customized EDI supplier solution. When Paladin Support sets up an EDI supplier in Paladin for your store, they discuss your needs and goals and then set up the EDI system to support them. If you feel the custom department feature is something you may be interested in, contact Paladin Support to discuss your options.
- Click Save.
- Click the Class tab.
- In the Classes pane, enable Active, then select the class of items that will receive your custom department assignment.
- In the Default Dept. list, select the department that will be assigned to items in that class during EDI processing.
- Click Save, then click Close.
If departments and class/subclass need to be recalled from obscure after the original department/class/subclass has been deleted, the following setting is turned on by default. If set to OFF, it will not restore the values from deleted; however, will set it to the defaults (Unknown(999) for department and None(-1) for class/subclass).
- Select the Company tab.
- In the Inventory pane, check Restore Classes and Subclasses from Obscure.
- Click Save, then click Close.

Figure 21: Restore Classes and Subclasses from Obscure
How to turn on/off EDI updated classes
Note: When EDI class updates are turned off for a supplier, class locked notifications will no longer appear during EDI processing.
To set up the EDI class update preference for a supplier:
- In Paladin, from the main menu, select File > Setup.
- Select the Supplier tab.
- In the Suppliers pane, select the supplier.
- Check EDI Supplier Services.
- In the Update Classes pane, select one of the following:
- No: EDI processing will not be allowed to update inventory item class information.
- Yes [recommended]: EDI processing can update inventory item class information.
- Click Save, then click Close.
How to update stock on hand when EDI receiving delayed
Note: This feature only applies to Ace and ACE EJD (Emery Jensen Distribution).
Note: To set up this feature, contact Paladin Support at support@paladinpos.com.
Follow these steps to receive items from an EDI supplier that is set up for delayed EDI invoice updates:
- In Paladin, on the top ribbon, select the Inventory module.
- On the bottom ribbon of the module, click F9 EDI.
- In the EDI Processing window, click Reporting.
- Enter a Start Date and End Date that include the original EDI invoice processing date, then click Get EDI Records.
- In the list of invoices, the Rec column shows the received status of each invoice.
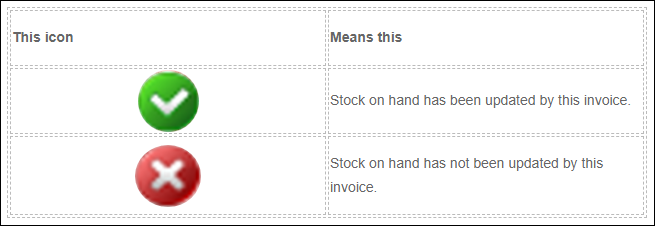
Figure 22: Stock on Hand Icons and their definition
6. Highlight the invoice you want to receive, then click Received Delayed SOH.
How to set up delayed EDI stock on hand updates
Note: This feature only applies to Ace Hardware and ACE EJD (Emery Jensen Distribution) EDI.
- In Paladin, from the main menu, select File > Setup.
- Select the Supplier tab.
- Check EDI Supplier Services.
- Select the EDI system from the EDI System Choice list (either ACE or ACE EJD (Emery Jensen Distribution)
- Check Delay SOH Receiving.
- Click Save, then click Close.
- Close and restart Paladin.
- Refer the client to this KBA: How to update stock on hand when EDI receiving delayed
How to prevent EDI from changing retail on an item
This section describes how to prevent the retail price of an item from being changed when inventory is automatically updated via EDI.
Option 1: Lock the retail price (prevents all automatic price updates)
- In Paladin, on the top ribbon, select the Inventory module.
- In the Part # box, enter a part number.
- Press Enter.
- Select the Pricing tab.
- Under Pricing Levels pane, click the lock icon.
This locks the sale price, preventing all automated changes, including those from EDI and manual receiving of purchase orders.
- Click F12 Save.
Option 2: Use a reference margin (allows updates within a controlled range)
If you want to allow price updates while still protecting retail pricing from significant changes via EDI:
- In the Pricing tab, under the Ref column, enter the target margin percentage.
This will allow Paladin to adjust prices during EDI based on the cost while maintaining your desired margin.
- Do not lock the Pricing Levels pane if you want this behavior to remain active.
- Click F12 Save.
For information on reference margins, refer to the How to add a reference margin to an inventory item section of the Reference margins KBA.
How to print or save the EDI status message history
When you process an EDI file, status messages appear in the EDI Processing window. After the EDI file is processed, a Print Log button lets you view, print, or save the status message history.
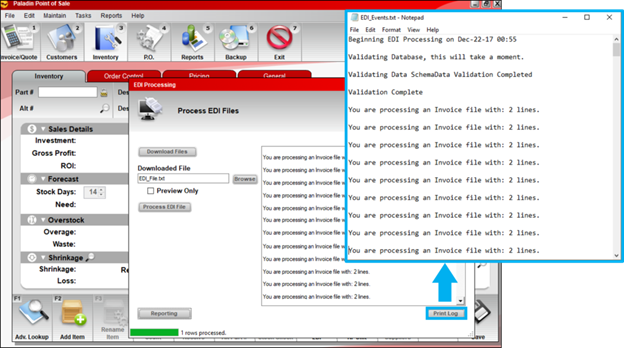
Figure 23: EDI Processing window/Print Log option
The status message history opens in a Notepad window.
To print the status message history, in the Notepad window, select File > Print.
To save the status message history, in the Notepad window, select File > Save As, then browse to a location for saving these files. The default filename is set to EDI_Events.txt. In the Save As window, specify a new file name (optional), then click Save.
How to return unordered items from an EDI supplier that accepts credit (negative) purchase orders
Note: Before you perform this procedure, make sure that the EDI supplier can accept credit (negative) purchase orders.
- In Paladin, on the top ribbon, select the Inventory module.
- On the bottom ribbon of the module, select F9 EDI.
- In the EDI Processing window, select Process EDI File.
- Process the EDI invoice file.
Note: This will add the items to your inventory and create new inventory items if they don’t already exist.
- Create a credit (negative) purchase order with the unordered items or item quantities.
Note: A credit purchase order is a purchase order with negative quantity values.
- Process the purchase order. This will remove the unordered items from your inventory stock on hand.
- Send the physical items back to the supplier.
How to manage discontinued items from EDI suppliers
When an EDI supplier identifies discontinued items in a EDI maintenance or invoice file, EDI processing will make the following changes to the item in Paladin to prevent future orders:
- The order quantity (Order Qty) is set to 0, and the value is locked.
- The maximum quantity (Max Qty) is set to 0, and the value is locked.
- The second item description (Desc 2) will contain this text (or something similar): Item cancelled by (supplier name)
When EDI processing is completed, a discontinued item list with replacement items (if provided by the supplier) appears in the corresponding EDI report in Paladin.
Suppliers may reuse discontinued part numbers. To prevent part number conflicts or erroneous updates from unrelated items due to part number reuse, you are required to rename discontinued inventory item part numbers. Steps are provided in: How to find and rename discontinued items from EDI suppliers
After you have renamed the discontinued item, if you know the replacement part number, you can optionally merge the discontinued item with the replacement item. When you do this, the discontinued part number is added as an alternate part number, and the following information from both items will be combined in the replacement item:
- Stock on hand (SOH)
- Sales history (Sales Figures)
- Quantity on order (On Order)
After the merge is completed, the discontinued item is deleted.
Steps for merging items are provided in: How to merge a discontinued item with a replacement item
How to find and rename discontinued items from EDI suppliers
- In Paladin, on the top ribbon, select the Inventory module.
- On the bottom ribbon of the module, click F9 EDI.
- In the EDI Processing window, click Reporting.
- Select a Start Date and End Date, then click Get EDI Records.
- For each report that you have not reviewed, do one of the following to create the report:
- Click its magnifying glass.
- Highlight the row, then click Generate Report.
Tip: To sort the list by the values in a column, click the column header.
Discontinued items and replacement items (if specified) appear in the following EDI report sections:
|
In this EDI report |
Discontinued items appear in this section |
|
Maintenance Report |
Supplier Discontinued, Items Max set to 0 W/ Replacement Part Number |
|
Invoice Report |
Supplier Discontinued Item With Replacement Part Numbers. |
Figure 24 and 25 show examples of the discontinued item lists.
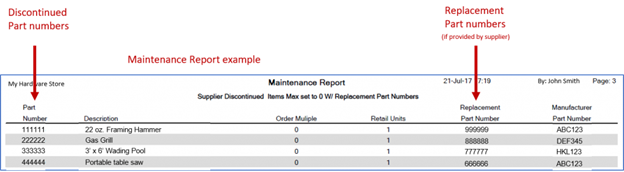
Figure 24: Maintenance Report
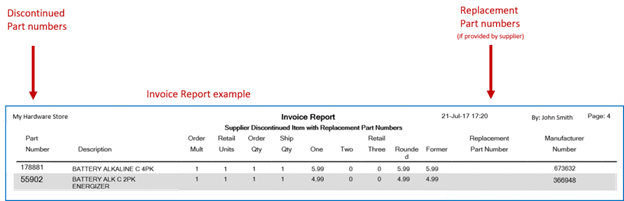
Figure 25: Invoice Report
- Print and/or save the reports with discontinued items.
Tip: You only need to print the page(s) that show discontinued items.
- In the Inventory module, you must rename the discontinued part number.
Note: EDI suppliers may reuse discontinued part numbers. To prevent future part number conflicts or unwanted updates to discontinued inventory items by new unrelated items, you are required to rename a discontinued part number.
Example: If the supplier uses a six-digit numeric part number, you can use any value except a six-digit number. For example, you can preface the discontinued part number with the letter Z.
- In Paladin, on the top ribbon, select the Inventory module.
- In the Part # box, enter the discontinued part number, then press Enter.
- On the bottom ribbon, click F3 Rename Item.
- In the Rename Part # window, in the New Part # box, modify the part number so it no longer fits the supplier’s part number scheme.
Example: If the supplier uses six-digit part numbers, and the original part number is 123456, in the New Part # box, you can enter Z123456.
- Click F12 Rename.
- Repeat the renaming procedure for each discontinued item.
How to merge a discontinued item with a replacement item
Important: Before you begin the merge process:
- You must make a backup of your database.
- Perform this after business hours.
- Do not merge any items that are on order.
An inventory merge cannot be undone. You must have also renamed the discontinued item part numbers. For instructions, see the previous procedure: How to find and rename discontinued items from EDI suppliers
- In Paladin, on the top ribbon, select the Inventory module.
- In the Part # box, enter the replacement part number, then press Enter.
- Press Ctrl + M to open the Inventory Merge window.
- In the search box, enter the discontinued part number, then click Find >>.
Note: If you renamed the discontinued part number, enter the new name.
- In the list of search results, in the discontinued item’s row, in the Select column, select the checkbox, then click Merge.
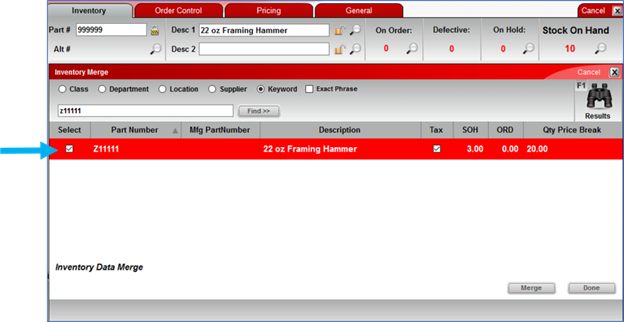
Figure 26: Inventory Merge window/Inventory Data merge
- In the Database Merge window, do one of the following:
-
- If you have verified that you have a backup of your Paladin database, click Yes.
- If you do not know if you have a current database backup, click No to stop the inventory merge process. You cannot undo an inventory item merge.
- When the inventory merge is completed, and the Merge Success window opens, click OK to close the window. To view the updated replacement item, close the inventory item and re-open it.
Note: The merge process deletes the discontinued item.
- Repeat these steps for the remaining replacement inventory items.
EDI missing retail prices calculated
When an invoice item is missing a retail price, EDI processing calculates a suggested retail price using the item cost and a default margin for new EDI items. For example, if the default margin is 35%, and the cost of the item is $10, then the calculated suggested retail price is $15.38.
To set the default margin for new EDI items:
- In Paladin, from the main menu, select File > Setup.
- Select the Company tab.
- In the EDI pane, in the Default Margin on new EDI items box, enter a percentage value (without the percentage sign %). For example, if the default margin is 35%, enter 35.
- Click Save, then click Close.
How to set New Inventory Items in Specified Class
EDI invoice processing can set a user-defined, new-item class for items that are added to your inventory from the supplier’s all-item catalog. The new-item class is set in addition to the class specified by the supplier.
You can specify the new-item class by:
- In Paladin, from the main menu, select File > Setup.
- Select the Company tab.
- In the EDI pane, check Put New Inventory Items in Specified Class and enter the class name in the in the associated box.
- Click Save, then click Close.
Many suppliers provide an all-item catalog that can be imported into Paladin using an EDI process. While the complete catalog is stored, only items in your active inventory appear in reports or searches (unless you search for the item specifically). Catalog items that are not in active inventory are called obscure inventory items.
An obscure inventory item becomes an active inventory item in the following scenarios:
- You add the item to a purchase order.
- You receive the item when you process a purchase order.
- You view the item in Paladin’s Invoice/Quote or Inventory modules.
- You scan the item using an RF unit or barcode scanner.
If you viewed an obscure item in Paladin, and did not want to make it an active inventory item:
- In Paladin, on the top ribbon, select the Inventory module.
- Enter the items part number in the Part # box.
- Press Enter.
- On the bottom ribbon, select F2 Delete Item.
To specify a class for new items:
- In Paladin, from the main menu, select File > Setup.
- Select the Company tab.
- In the EDI pane, check Put New Inventory Items in Specified Class and enter an existing class in the associated box. When a store receives new items using EDI, the class you specified will be assigned to the item. This is in addition to the class set by the supplier (if any).
- Click Save, then click Close.
How to reverse stock on hand counts for an EDI invoice
- In Paladin, on the top ribbon, select the Inventory module.
- On the bottom ribbon of the module, click F9 EDI.
- In the EDI Processing window, click Reporting. The EDI Reporting window opens with a history of all EDI processing, including electronic invoices.
- Highlight an invoice, then click Reverse SOH. Depending on the EDI vendor, the invoice name will include one of the following terms:
- EIN
- INVENTORY
- INVOICE
Note: If you highlight an invoice in the EDI history, and the Reverse SOH button is not available, one of the following situations has occurred:
- The stock on hand (SOH) has already been reversed for the invoice.
- The SOH cannot be reversed because the invoice is over seven (7) days old.
If multiple invoices were processed by one EDI file, reverse the SOH on the newest invoices, then work backward in time.
Undo EDI vendor PO
A purchase order received by an EDI process can only be reversed in the EDI Reporting window. If you try to reverse an EDI-received purchase order in the PO module using the F9 Undo Receiving option (on the Confirm PO tab), you will receive the following message (Figure 25), and your stock-on-hand (SOH) and quantity-on-order values will not change. This feature prevents duplicate SOH adjustments.
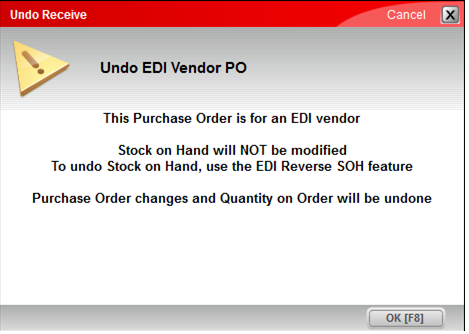
Figure 27: Undo Receive window/Undo EDI Vendor PO
How to block EDI class and subclass control
To block incoming Class and Subclass data from EDI suppliers:
- In Paladin, from the main menu, select File > Setup.
- Select the Supplier tab.
- Check EDI Supplier Services.
- Under Update Classes, select No.
- Click Save, then click Close.
Note: The default value for this switch is “Yes” to continue the default action that has always been present in Paladin.
How to control supplier order number search
During EDI, Paladin searches manufacturer’s part numbers for a match. If part number match, alternate part number match, and supplier order number match fail, you can disable this “4th level” search. Also, if your store(s) are not multi-branded, you can turn this legacy feature off.
To disable this search function:
- In Paladin, from the main menu, select File > Setup.
- Select the Company tab.
- In the EDI pane, uncheck Include Supplier Order Number in Item Lookup during EDI.
- Click Save, then click Close.
EDI reporting Include all changes made by EDI uploads
This functionality helps stores maintain their inventories and spot changes made by EDI that are not discernible by the client.
This feature adds three additional tabs to EDI reporting (when data of each type is changed):
- Adding a new supplier to items
- ALT Part Numbers
- Description changes.
If you have questions or suggestions about this information, contact support@paladinpos.com.
