Customer types let you categorize customers in Paladin. You can assign these types to your customer accounts in Paladin’s Customers module. Paladin provides a default set of customer types, and you can define your own (except for Ace Hardware stores, which must use the default set).
Many reports provide business statistics by customer type, including the Transaction Report and the Comparative Revenue Reports. Customer types appear in Paladin’s Customers module and Invoice/Quote module when setting up an Ace Rewards member.
This article provides instruction and information on the following:
- Customer types for customer accounts
- How to set up and manage customer types
- How to add a customer type to a customer account
- How to create the Customer File Export report
- How to create the Customer Sales Ranking report
- How to view transactions for a customer type in the Transaction report
- How to view revenue by customer type in the Comparative Revenue report
Customer types for customer accounts
The customer type list is defined in the Customer Type tab of Paladin Configuration and is set separately on each individual account. Steps for creating the list, and then assigning a customer type to a customer, are provided below.
You can use this feature to identify a specific set of customers. For example, you can create customer types with names, such as “government purchaser” and “Farm Use.”
Note: The customer types for Ace stores are the default choices. Ace stores cannot create new customer types or hide them from the list of default customer types. For more information, refer to the How to set up and manage customer types section of this article.
You can also use the default set of customer types that come with this feature. Unlike types you create, these default types cannot be changed or removed. The default types are:
- Contractor
- Employee
- Farm/Agriculture
- Healthcare
- Homeowner/DIY
- Manufacturer
- Municipality/Government
- Non-profit Organization
- Other Business
- Property Management
- Religious Organization
- Restaurant
- Retail Business
- School/Education
- Service Industry
- Store Use
Customer types appear in Paladin’s Customers module and Invoice/Quote module when setting up an Ace rewards member.
To create and manage the list of customer types:
- In Paladin, from the main menu, select File > Setup.
- Select the Customer Type tab. The current list of customer types appears in the Types pane.
- To add a new customer type, click New. Then, in the Type box, enter the customer type.
- To remove a customer type, highlight the customer type in the list, and then click Remove.
- Click Save, then click Close.
- Close and restart Paladin.
To add a customer type to a customer account:
- In Paladin, on the top ribbon, select the Customers module.
- Enter or select a customer name in the Customer list.
- Press Enter.
- Select the Electronic tab.
- In the Alternate Customer IDs pane, in the Customer Type list, select a customer type.
- On the bottom ribbon, click F12 Save.
How to set up and manage customer types
In Paladin, you can assign customer types to your customer accounts. Paladin provides a default set of customer types, or you can define your own using the following procedure.
Note: Ace stores must accept the default types. Ace stores cannot create user-defined types or hide the default types. Customer types will be uploaded with your nightly Ace upload data. To avoid any confusion, when Paladin is set as an Ace store, the New button is disabled, and the Hide Default types from dropdowns check box is removed from the Customer Type tab in Paladin Configuration.

Figure 1: Customer Type tab: View of Ace and non-Ace stores
- In Paladin, from the main menu, select File > Setup.
- Select the Customer Type tab. The current list of customer types appears in the Types pane.
- To add a new customer type, click New. Then, in the Type box, enter the customer type name, then click Save.
- To remove a user-defined customer type, highlight the customer type in the list, and then click Remove. Note: Default customer types cannot be removed.
- To show only customers types that you created in Paladin when you select a customer type for a customer (Customers module) or in reports, select Hide default types from dropdowns (again, this is not available for Ace stores.)
- Click Save, then click Close.
- Close and restart Paladin.
How to add a customer type to a customer account
- In Paladin, on the top ribbon, select the Customers module.
- Enter or select a customer account in the Customer list.
- Press Enter.
- Open the Electronic tab.
- In the Alternate Customer IDs pane, in the Customer Type list, select a customer type.
- On the bottom ribbon, click F12 Save.
How to create the Customer File Export report
In Paladin, you can export customer account information for both active and inactive accounts. This information is sent to an Excel worksheet.
The following customer type details are provided in the following Excel worksheet columns:
- Customer Type ID: The integer ID assigned to the customer type in Paladin.
Example: 16 - Customer Type: The customer type name.
Example: Farm/Agriculture - Customer Type Code: The customer type code used by the supplier.
Example: P
To set up and run the report:
- In Paladin, on the top ribbon, select the Reports module.
- In the Report Area pane, select Customers > Customer Lists.
- In the Report List pane, select Customer File Export.
- In the Choose Report pane, click F12 Next.
- In the Sorting Options pane, click F12 Run Report.
- An Excel icon appears on the bottom taskbar of your computer. Click the Excel icon to open the spreadsheet. The customer type information is in the last three columns.
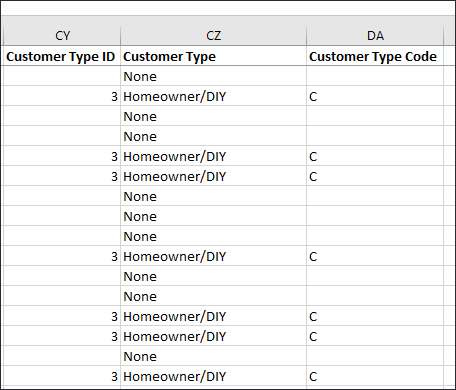
Figure 2: Customer File Export report
How to create the Customer Sales Ranking report
The Customer Sales Ranking report exports Paladin customer account information for customers who made purchases during a specific time period. This information is sent to an Excel worksheet.
Customer type details are provided in the following Excel worksheet columns:
- Customer Type ID: The integer ID assigned to the customer type in Paladin.
Example: 16 - Customer Type: The customer type name.
Example: Farm/Agriculture - Customer Type Code: The customer type code used by the supplier.
Example: P
To set up and run the report:
- In Paladin, on the top ribbon, select the Reports module.
- In the Report Area pane, select Customers > Ranking.
- In the Report List pane, select Customer Sales Ranking.
- In the Choose Report pane, click F12 Next.
- In the Reports Settings pane, select a Starting Date and Ending Date for the report.
- Check Export To Excel.
- Select a customer type from the Customer Type list ( the default is All).
- In the Sorting Options pane, set your sorting options (if any) and click F12 Run Report.
- An Excel icon appears on the bottom taskbar of your computer. Click the Excel icon to open the spreadsheet. The customer type information is in the last three columns.
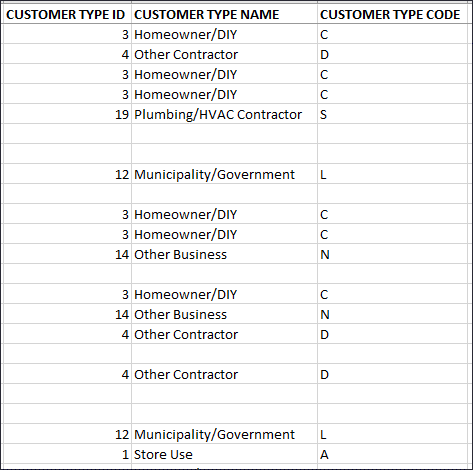
Figure 3: Customer Sales Ranking report
How to view transactions for a customer type in the Transaction report
To view transactions for a customer type in the Transaction Report:
- In Paladin, on the top ribbon, select the Reports module.
- In the Report Area pane, select Sales Analysis > What I Need To Know.
- In the Report List pane, select Transaction Report.
- In the Choose Report pane, click F12 Next.
- In the Transaction Report window, in the Additional Settings pane, select CustomerType from the Keyword Search list.
- Select the customer type from the adjacent list.
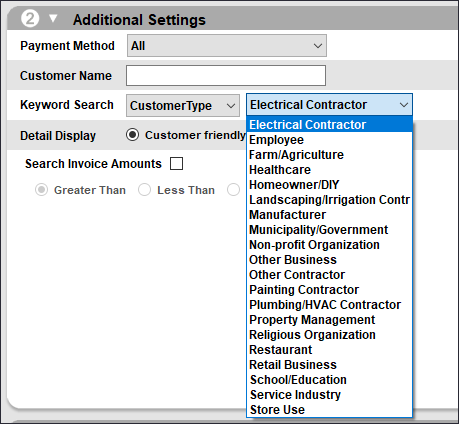
Figure 4: Customer types
- In the Sorting Options pane, set your sorting options (if any) and click F12 Run Report.
- A PDF file of the Customer Transaction Detail report opens showing the Customer Type.
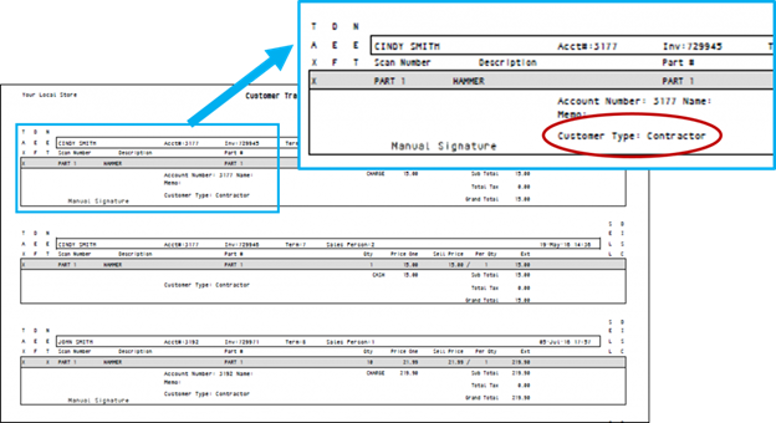
Figure 5: Customer Transaction Detail report/Customer type
How to view revenue by customer type in the Comparative Revenue report
Tip: To accurately show revenue distribution, set the customer type for each customer account before you run the report.
- In Paladin, from the top ribbon, select the Reports module.
- In the Report Area pane, select Sales Analysis > Revenue.
- In the Report List pane, and select one of the comparative revenue reports:
- Today’s Comparative Revenue Report
- Yesterday’s Comparative Revenue Report
- Period Comparative Revenue Report
- In the Choose Report pane, click F12 Next.
- In the Report Settings pane, set the report parameters.
- In the Additional Settings pane, select Customer Type from the Detail by: list.
- In the Sorting Options pane, set your sorting options (if any) and click F12 Run Report.
- A PDF file of the Comparative Revenue report (Period Comparative Revenue report for this example) opens showing the Customer Type.
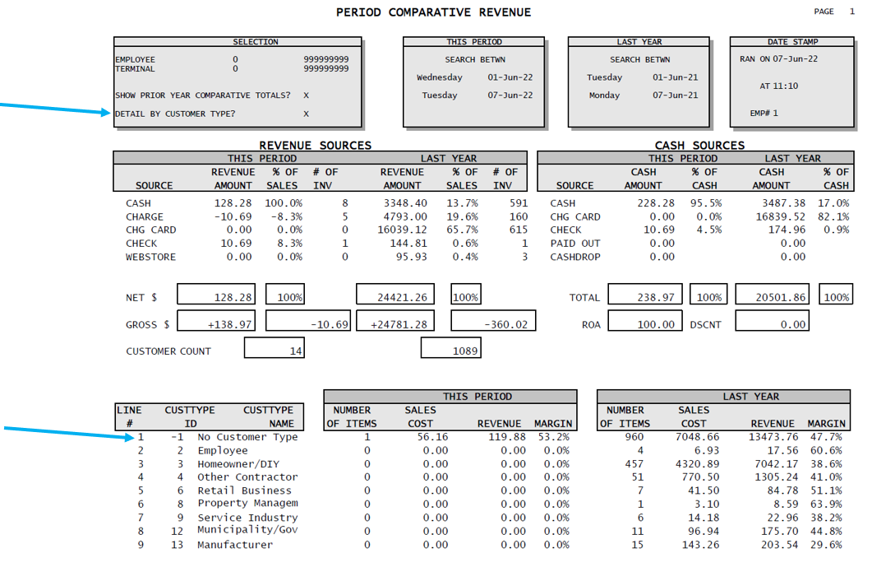
Figure 6: Period Comparative Revenue report/Customer type
If you have questions or suggestions about this information, contact support@paladinpos.com.

