
Customer projects are specific categories defined in Paladin’s Customers module and assigned to an invoice when a customer pays by cash, credit card, or charges their account. With manager approval, a customer project can also be created or restored at checkout. Later, a customer’s sales history can be filtered by project in reports, such as the Transactions Report and the Recent Sales History viewer.
This article provides instruction and information on the following:
- How to set up customer projects for credit card purchases
- How to add, edit, remove, or restore a customer project
- How to select a customer project at checkout
- How to add a new customer project at checkout
- How to view customer invoices by project in Sales History or in Recent Sales History
- How to view a customer’s projects in Excel
- How to create a Transaction report for customer projects
How to set up customer projects for credit card purchases
Note: Customer projects are automatically set up for charge purchases.
- In Paladin, from the main menu, select File > Setup.
- Select the Credit Card tab.
- In the Signatures pane, check Enable Auth Signer for Credit Cards on File.
- Click Save, then click Close.
How to add, edit, remove, or restore a customer project
With this feature, you can create a new project, edit a project, make a project inactive, or restore an inactive project.
- In Paladin, on the top ribbon, select the Customers module.
- Enter or select a customer account in the Customer list.
- On the bottom ribbon of the module, click F4 Projects & Auth. Signers.
- In the Authorized Signers & Projects window, enable Projects.
- Enable either Active or Inactive.
- In this window, you have the following options:
- Clicking Add opens the fields to enter a project name, description, and address.
- Clicking Edit opens the fields to edit a project name, description, and address.
- Clicking Remove. This makes the project inactive, but does not permanently delete the project. You can always restore the project (steps mentioned below/Figure 2).
- Clicking View in Excel opens a worksheet with the project information.
- Enter a Project Name.
- Enter a Project Description.
Note: This field allows up to 512 characters, which enables the ability to provide project-specific details under the items sold on full sheet invoices.

Figure 1: Long description on full sheet invoice
- When you have made all your changes, click F12 Exit.
- In the Customers module, click F12 Save.
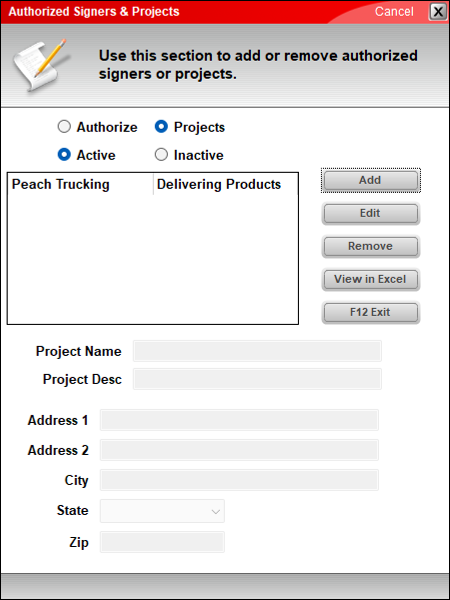
Figure 2: Authorized Signers & Projects window
To restore a project that was removed:
- Enable Projects and Inactive.
- Highlight the project to restore.
- Click Restore.
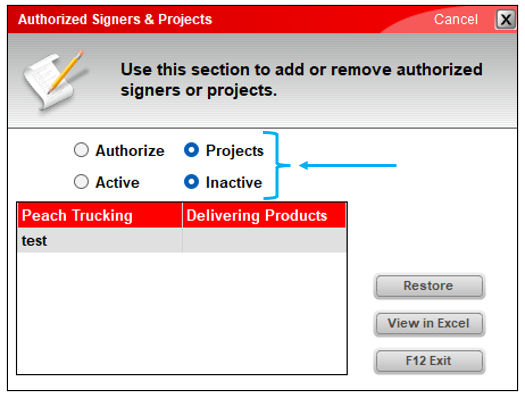
Figure 3: Restore a project
How to select a customer project at checkout
Note: To associate the current invoice with a project, even if the customer is paying cash, set the following in Paladin Configuration:
- In Paladin, from the main menu, select File > Setup.
- Select the Invoice (Store) tab.
- At the bottom of the tab, check Assigning a Project to an invoice: Open Invoice Info message window for all payment types.
- Click Save, then click Close.

Figure 4: Assigning a Project to an invoice: Open Invoice Info message window for all payment types
- In Paladin, on the top ribbon , select the Invoice/Quote module.
- Enter or select a customer account in the Customer list.
- Add items to the invoice and press F8 Checkout to start the checkout process.
- On the Checkout tab, on the bottom ribbon, select one of the following payment options.
- Click F1 Cash,
- Click F2 Charge, or
- Click F3 Credit Card, swipe the credit card, then click Next.
To use a credit card to add a project:
-
-
- In Paladin, from the main menu, select File > Setup.
- Select the Credit Card tab.
- In the Signatures pane, check Enable Auth Signer for Credit Cards of File.
- Click Save, then click Close.
-
- In the Invoice Information window, select the project from the Projects list.
- Click Next.
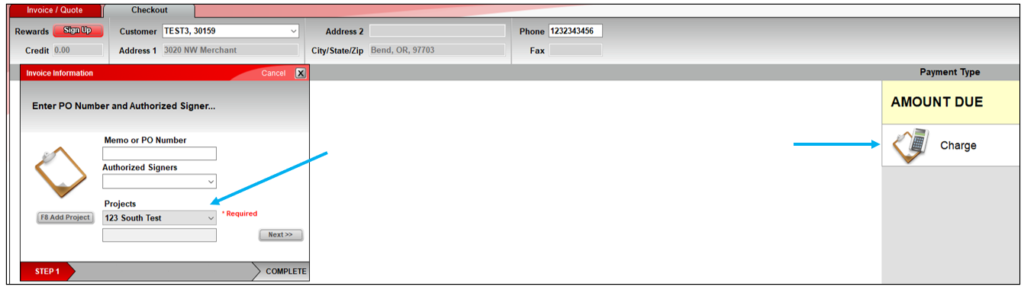
Figure 5: Select and charge a project in the Invoice Information window
- Complete the checkout process.
The project will appear on the invoice/receipt and can be used to look up the invoice later in the Recent Sales History window in the Inventory module and running a report or when running a Transactions Report from the Reports module.
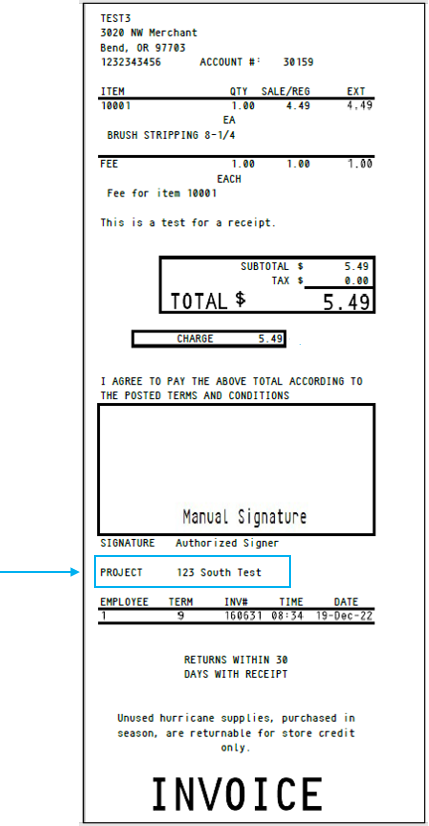
Figure 6: Project shown on invoice
How to add a new customer project at checkout
- In Paladin, on the top ribbon, select the Invoice/Quote module.
- Enter or select a customer account in the Customer list.
- Add items to the invoice, then start the checkout process.
- On the bottom ribbon of the Checkout tab, select one of the following payment options.
- Click F1 Cash,
- Click F2 Charge, or
- Click F3 Credit Card. Swipe the credit card, then click Next.
To use a credit card to add a project, from Paladin’s main menu:
-
-
- In Paladin, from the main menu, select File > Setup.
- Select the Credit Card tab.
- In the Signatures pane, check Enable Auth Signer for Credit Cards of File.
- Click Save, then click Close.
-
- In the Invoice Information window, click F8 Add Project.
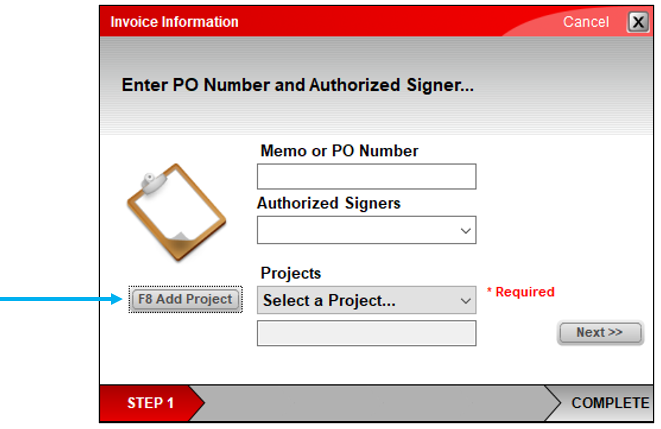
Figure 7: Invoice Information window/F8 Add Project
- The Add or Restore Projects window opens.
- In the Project Name box, enter a new project name.
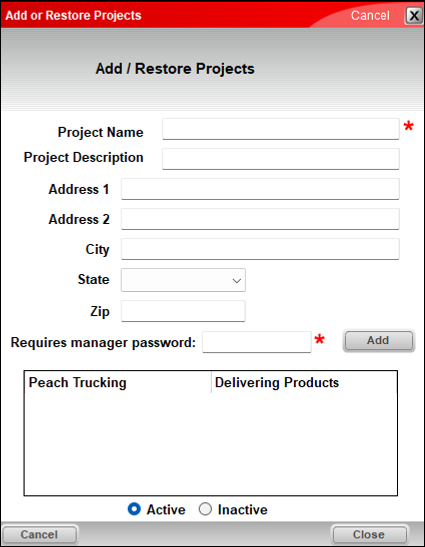
Figure 8: Manager Approval Required message
- In the Requires manager password box, enter a manager’s password.
- Click Add.
- In the Invoice Information window, select the new project from the Projects list.
- Click Next, then click Done.
- Complete the checkout process.
The project appears on the invoice/receipt and can be used to look up the invoice later in the Recent Sales History window and running a report or when running a Transactions Report from the Reports module.
How to view customer invoices by project in Sales History or in Recent Sales History
Note: When you assign a project to an invoice, the project appears on the invoice/receipt (Figure 8).
- In Paladin, on the top ribbon, select the Customers module.
- Enter or select a customer account in the Customer list.
- Select the Credit tab.
- In the Sales History pane, click the Customer Friendly or Accounting Department magnifying glass, depending on the view that you want to see.
- In the Recent Sales History window, select a project from the Project list. There is also the option to check Show Inactive Projects.
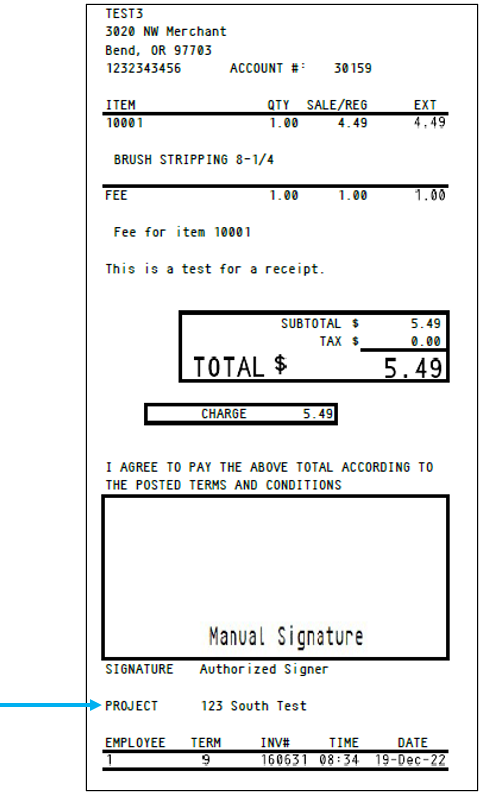
Figure 9: Project shown on invoice
How to view a customer’s projects in Excel
Excel provides a view of frequently-requested customer data, which eliminates the need to transcribe the information manually. From Excel, you can easily print, email, and share this information with other software programs or the customer. The Excel view is editable, and you can edit the data before you print, share, or save it.
There are two ways to create Excel reports within the Customers module:
- View in Excel from the Authorized Signers & Projects window
- Report button in the Recent Sales History window
View in Excel feature
To use the View in Excel feature:
- In Paladin, on the top ribbon, select the Customers module.
- Enter or search a customer account in the Customer list.
- On the bottom ribbon of the module, click F4 Projects & Auth. Signers.
- In the Authorized Signers & Projects window, enable Projects.
- Enable Active.
- Click View in Excel.
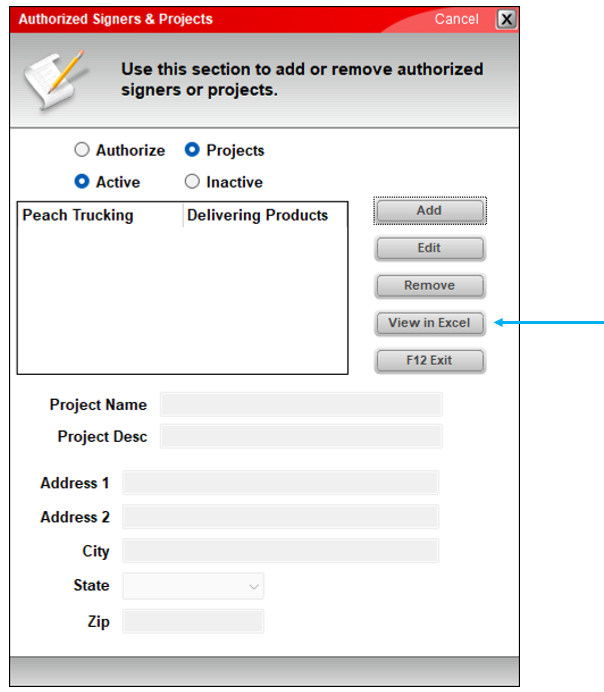
Figure 10: Setting Project to be viewed in Excel in Authorized Signers & Projects window
An Excel worksheet opens.
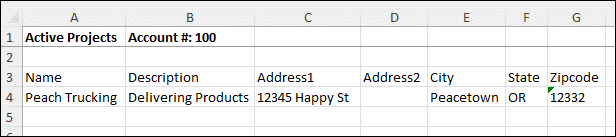
Figure 11: Project info in Excel
Report button in the Recent Sales History window
- In Paladin, on the top ribbon, select the Customers module.
- Enter or search a customer account in the Customer list.
- Click the Credit tab.
- In the Sales History pane, click the Customer Friendly or Accounting Department magnifying glass, depending on the view that you want to see.
- In the Recent Sales History window, select a project to show invoices for that project only.
- Click Report.
- An Excel worksheet opens.
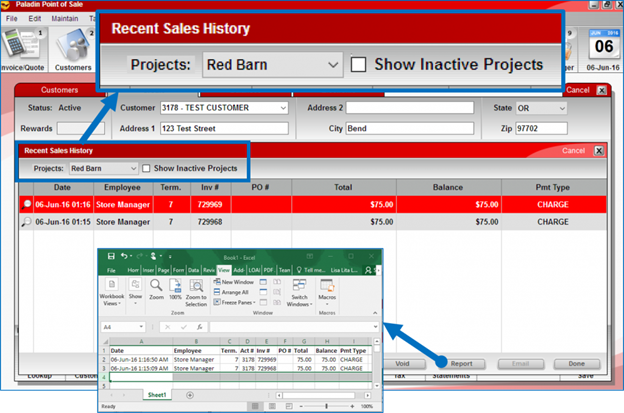
Figure 12: Report button in Recent Sales History window
How to create a Transaction report for customer projects
- In Paladin, on the top ribbon, select the Reports module.
- In the Report Area pane, select Sale Analysis > What I need To Know.
- In the Report List pane, select Transaction Report.
- In the Choose Report pane, click F12 Next.
- In the Transaction Report window, in the Report Settings pane, select a Beginning and Ending date from the InvoiceDate lists.
- Select a customer project by selecting an account from the Account lists.
- In the Additional Settings pane, in the Keyword Search list, enable one of the following options:
- ActiveProjects: See a list of customer’s active projects.
- InactiveProjects: See a list of customer’s inactive projects.
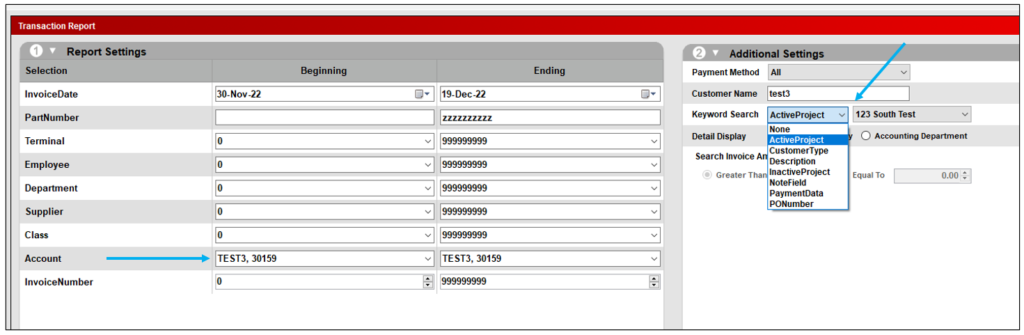
Figure 13: Transaction report settings
- In the box next to the Keyword Search list, select a project.
- In the Sorting Options pane, click F12 Run Report.
A PDF of the report opens.
If you have questions or suggestions about this information, contact support@paladinpos.com.
