This article contains instruction and information on the following:
- How to create/add a customer account
- Exiting a customer account
- How to delete (inactivate) a customer account
- How to close (write off) an uncollectible account
- Exclude inactive (deleted) customer accounts
- How to restore a deleted customer account
- How to rename a customer account
- How to add detailed contact information for a new customer
- How to create more than one ID for a customer account
- How to edit customer account IDs
- How to remove a customer ID
- How to merge duplicate customer accounts
- How to set the default customer ID
- How to clear a negative balance on a customer account
- How to change the credit limit for a customer account
- How to set up percentage discount for a customer
- How to refund credit on an account
- Customer account discount settings safeguards
- How to transfer a customer account balance to Paladin
- How to print customer account balances on account payment invoices
- How to add a checkout screen note to a customer account
- How to add a list of authorized signers
- How to set up the authorized signers list for credit cards on file
- How to add a new non-US customer record
- How to edit an existing non-US customer record
- How to credit a customer account without printing a transaction
- How to set the Customer button if disabled for a particular employee
- How to export customer account data from the Data Viewer to Microsoft Excel
How to create/add a customer account
- In Paladin, on the top ribbon, select the Customer module.
- On the bottom ribbon of the module, click F2 Add Customer.
- In the Add Customer window, fill out all fields with appropriate information.
Note: If the Credit Limit is not established and left at 0 (zero), the customer account you are creating will NOT be able to charge anything to the account.
- Click F12 Add.
- On the bottom ribbon of the module, select F8 Tax.
- In the Tax Window, select all tax applicable to the customer.
- Click F12 Finish.
Exiting a customer account
To ensure changes/updates are saved, the following message window opens if you cancel or X out ![]() of the Customers module without saving any changes/updates.
of the Customers module without saving any changes/updates.
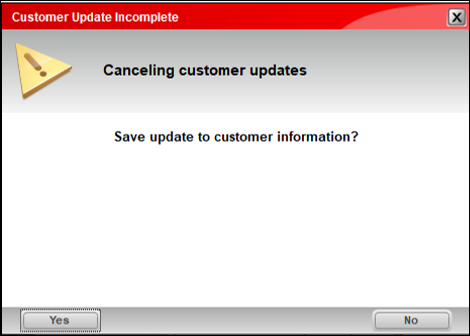
Figure 1: Customer Update Incomplete
How to delete (inactivate) a customer account
Note: Although the wording in Paladin is to “delete” a customer account, you are actually only inactivating it. Customer accounts are not deleted and can be recalled/activated at any time. Work is being done to clear up the terms and will be addressed in future releases, but for now, be confident that customer account information is not deleted and can be reinstated. Therefore, in this article, we will use the term “inactivate” unless referring to various messages and buttons that use the term “delete.”
To inactivate a customer account in Paladin:
- In Paladin, on the top ribbon, select the Customers module.
- Enter or select a customer account from the Customer list.
- Press Enter.
- Select the Balances tab.
- On the bottom ribbon, click F5 Account Payment.
- In the Account Payment window, under the Totals pane, in the Discount Allowed box, enter the total amount owed.
- In the Amount of Payment box, enter: 0.00
- In the Check number box, enter: 0000
- Click F12 Accept.
- Select the Credit tab.
- In the Credit pane, in the Credit Limit box, enter: 0
- On the bottom ribbon, select F6 Payment Management.
- In the Payment Management window, in the Credit Invoices pane, select the line item that includes the Discount Allowed amount.
- In the Credit Notes Field, click inside the empty field, enter notes, then click Save Item.
- On the bottom ribbon, select F2 Delete Customer.
- In the Delete Customer window, click Delete.
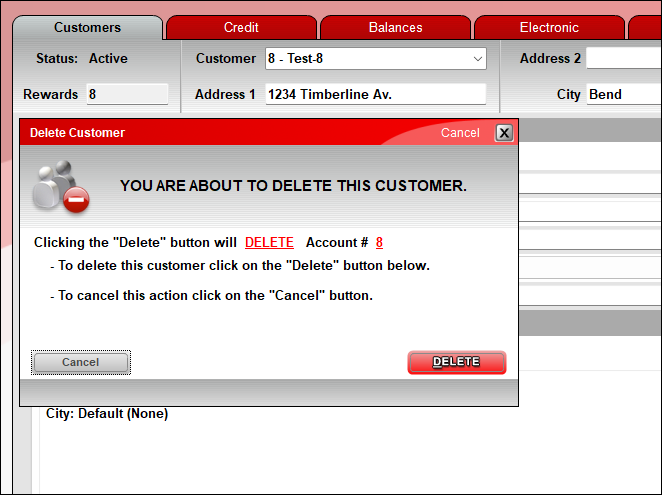
Figure 2: Delete Customer window
Again, even though the message states that the customer will be deleted, they technically will not be and can be recalled/activated at any time.
How to close (write off) an uncollectible account
For information on closing (writing off) an uncollectable account, refer to the Close an uncollectible account KBA.
Exclude inactive (deleted) customer accounts
To exclude inactive (deleted) customer accounts:
- In Paladin, from the top ribbon, select the Customers module.
- On the bottom ribbon of the module, select F1 Advanced Lookup.
- In the Advanced Lookup window, check Exclude Inactive.
- Click Save, then click Close.
All inactive (deleted) customer accounts will not appear in the Advanced Lookup window.
How to restore a deleted customer account
Note: An account can only be restored by a manager.
To recall/activate a customer account that has been “deleted,” perform the following:
- In Paladin, on the top ribbon, select the Customers module.
- On the bottom ribbon of the module, click F1 Advanced Lookup.
- On the top of the Advanced Lookup window, enable All.
- In the Keyword Search box, enter the customer’s name, then click Find.
- Find then double-click on the desired customer account.
- On the bottom ribbon of the Customers tab, click F12 Save.
- In the Restore Customer window, click Restore.
- In the Customers tab, click the Credit tab.
- Change the Credit Limit back to the preferred amount.
- Click F12 Save.
How to rename a customer account
- In Paladin, on the top ribbon, select the Customers module.
- Enter or select the customer account in the Customer list.
- Press Enter.
- On the bottom ribbon of the module, click F3 Rename Customer.
- In the Rename Customer window, enter the new name in the New Customer Name box.
- Click F12 Rename.
How to add detailed contact information for a new customer
- In Paladin, on the top ribbon, select the Customers module.
- Enter or select the customer account from the Customer list.
- Press Enter.
- In the Contact Information pane, enter the customer’s contact information.
- Click F12 Save.
How to create more than one ID for a customer account
You can include multiple rewards numbers or other IDs, such as a pharmacy customer ID, in a customer account. This feature lets families or other groups have one account and one purchase history all in one place.
-
- Each customer account can have unlimited alternate IDs, but must have one ID as the default.
- Each ID must have a number and a type that identifies how the ID is to be used, such as Rapid Rewards or specific pharmacy brands.
- All ID numbers must be unique within Paladin. For example, you cannot have two customers that both have alternate IDs of 100.
- The default ID will be listed first in the Electronic tab in the Customers module.
- To find a customer account using Advanced Lookup, select the Rewards Number search option and enter any of the alternate IDs.
- In Paladin, on the top ribbon, select the Customers module.
- On the bottom ribbon of the module, click F1 Advanced Lookup.
- Search for the customer. When found, highlight the customer row, then click F8 Select Customer.
- Click the Electronic tab. A list of IDs for this account appear in the Alternate Customer IDs pane.
- To add a new ID or edit existing IDs, click Edit ID Data.
- In the Alternate ID Manager window, in the Enter Alt ID box, enter the new ID number.
Note: This ID number must be unique among all customer IDs in Paladin. If you enter a number that is already in use, a message appears, and you must enter a different number.
- Highlight the new ID, then select the correct Type from the list.
- If there is only one type available in your store, the type is set automatically, and a list of options will not appear.
- If there is more than one type, only the types your store uses will be in the list.
- For as many IDs as you want to add, repeat the previous two steps, then click F12 Finish to save your changes.
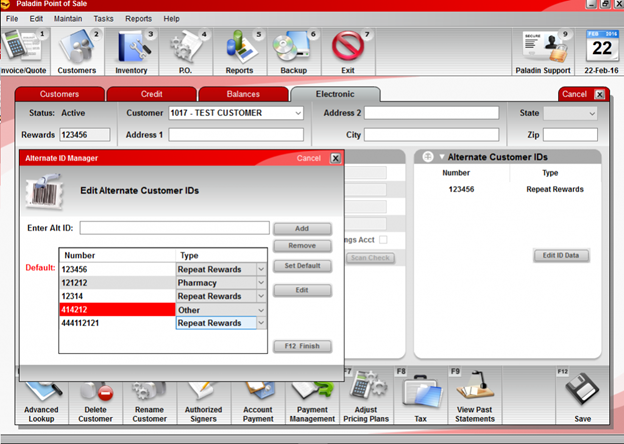
Figure 3: Alternate ID Manager window
How to edit customer account IDs
- In Paladin, on the top ribbon, select the Customers module.
- On the bottom ribbon of the module, click F1 Advanced Lookup.
- Search for the customer. When found, highlight the customer row, then click F8 Select Customer.
- Click the Electronic tab. A list of IDs for this account appears in the Alternate Customer IDs pane.
- Click Edit ID Data.
- In the Alternate ID Manager window, do one of the following procedures:
- To edit the ID Type, click the ID Type value, then select a type from the list.
- To edit the ID Number, highlight the ID, click Edit, then type a new number.
- Click F12 Finish to save your changes.
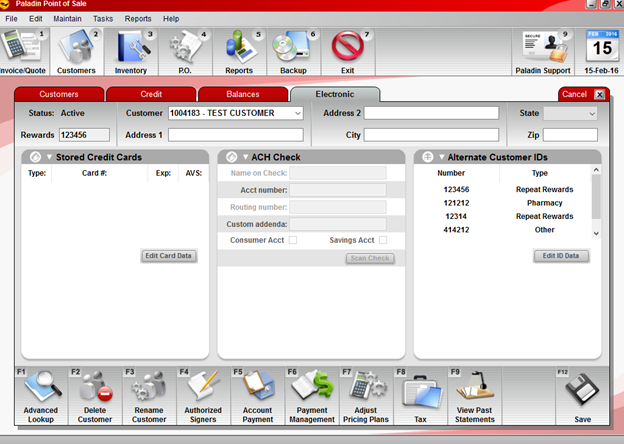
Figure 4: Customers module/Electronic tab/Alternate Customer IDs pane
How to remove a customer ID
- In Paladin, on the top ribbon, select the Customers module.
- On the bottom ribbon of the module, click F1 Advanced Lookup.
- Search for the customer. When found, highlight the customer row, then click F8 Select Customer.
- Click the Electronic tab. A list of IDs for this account appears in the Alternate Customer IDs pane.
- Click Edit ID Data to display the Alternate ID Manager.
- In the Alternate ID Manager window, highlight the ID, then click Remove.
- Click F12 Finish to save your changes.
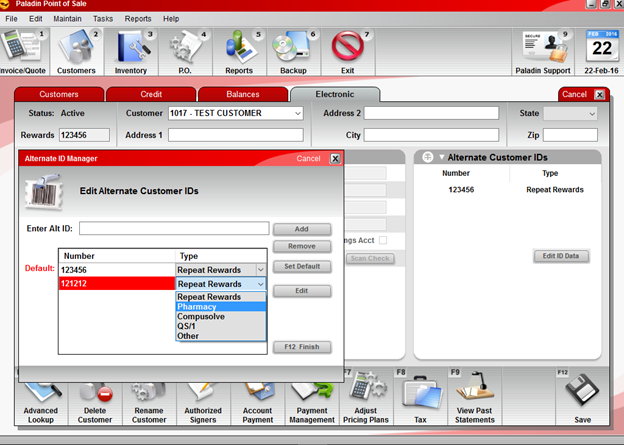
Figure 5: Alternate ID Manager window
How to merge duplicate customer accounts
Duplicate customer accounts can exist for various reasons.
- Example: Different family members may have created separate accounts over time.
- Example: One pharmacy account could be created manually when the customer calls in a prescription, and the second pharmacy account could be created by Paladin when the prescription is scanned and the pharmacy system provides a rewards number.
You can combine these duplicate accounts into a single customer account. To merge accounts, you choose a primary account, then search for and select duplicate accounts. After the merge, the primary account is retained, and the designated duplicate accounts are deleted.
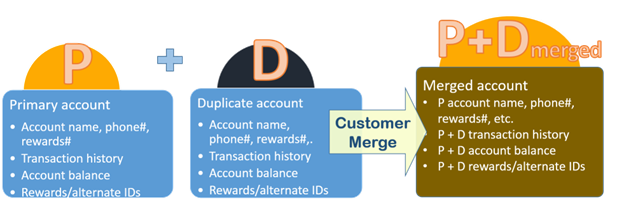
Figure 6: Merged account flow
Only the following information from the duplicate accounts will be merged into the primary account.
|
Information that is merged |
After the merge |
|
Account transaction history |
The primary account will contain a combined transaction history of the merged accounts. |
|
Account balances. |
The primary account balance will be a sum of the balances of the merged accounts. Example: If the original primary account balance is $5.25, and the duplicate account balance is $2.75, the new combined account balance will be $8.00. |
|
Rewards and other Alternate Customer IDs |
The primary account will contain all the Rewards and other Customer IDs from the primary and duplicate accounts. |
Important:
- Before you merge any customer accounts, back up your database
- Perform this task while the store is closed and while no other changes are being made in Paladin.
- If you want to keep duplicate account information that will not be merged, you must add it to the primary account before you start the merge.
- A merge of customer accounts cannot be undone.
To merge duplicate accounts:
- In Paladin, on the top ribbon, select the Customers module.
- Search for and display the customer account that will be the primary account.
- With the primary account appears, press Ctrl+M to display a Customer Merge window.
- If prompted, enter your admin password.
- In the Customer Merge window, use one of the following search options to find and display duplicate accounts:
|
How to search with Find Matches By |
Examples |
|
This search will find accounts with values that exactly match in all of the selected fields. Therefore, as you select more field values, fewer matches are likely. a. Select the Find Matches By checkbox. b. Select any of the following account values:
c. Click Search. |
If only the Name field is selected, accounts that exactly match the primary account Name value are returned. If both Name and Phone fields are selected, a match occurs when accounts have the exact same Name and Phone values. If the primary account has Name and Phone value, and second account has the same Name, but the Phone field is blank, these accounts are not considered a match and the second account will not be displayed. If you are not getting the results that you expect, select fewer options. To deselect any option, click its checkbox to clear it. The list of matches can include both active and inactive (deleted) accounts. |
|
How to search with Advanced Lookup |
Examples |
|
This search will find customer accounts with the search term and the account that you select. It is independent of the primary account and does not try to match primary account values. Therefore, the primary account may appear in the list of results. a. Select the Adv Lookup check box, then select one of the following search options for the duplicate account:
b. Optional: To exclude inactive customer accounts from the search, select the Exclude Inactive checkbox, then select the options that you want to exclude. c. Click Search. |
If you search by Name, and the customer’s name was John Doe, enter John Doe in the Adv Lookup text box. If the primary account name is John Smith, you may want to search for accounts that have “Smith” in the Name field to find other family members.
|
- In the search results, for every account that you want to merge, check Merge.
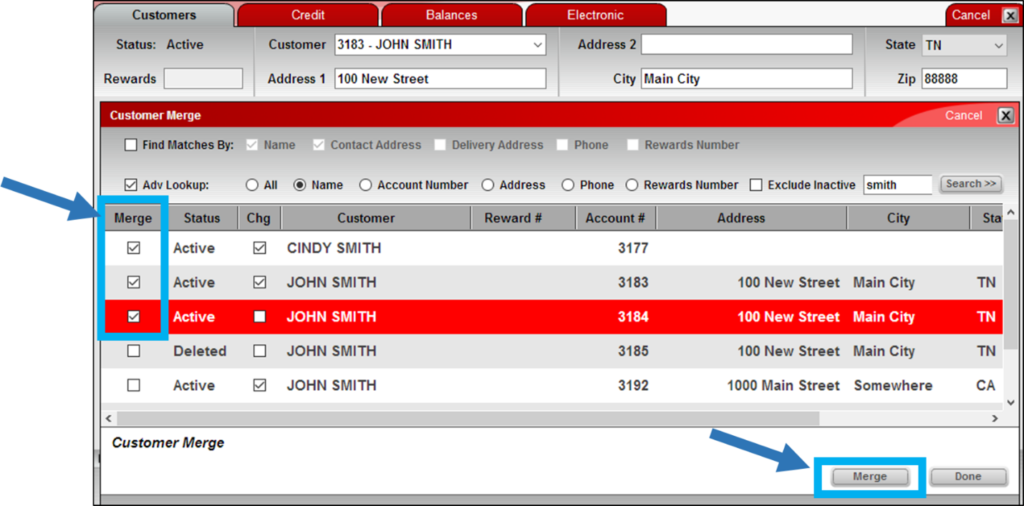
Figure 7: Customer Merge window
Note: If the primary account appears in the search results, do not select it.
- When you are ready to start merging, click Merge.
- In the Database Merge window, if you are certain that you have a backup of your Paladin database, click Yes. Otherwise, click No to stop the customer merge process.
- For each account that you want to merge, the Merge Success window opens. In each window, click OK.
Note: If the primary account appears in the search results, the Merge Error window opens. Click OK to proceed with the merge.
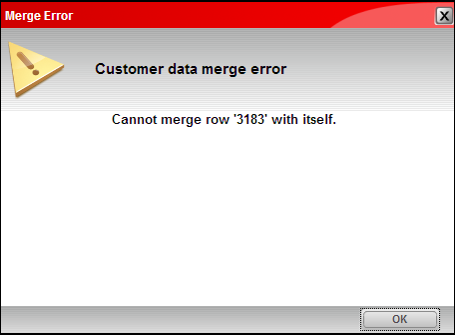
Figure 8: Merge Error message window
- Close and restart Paladin.
The primary account appears in the Customer module with merged transaction data from both accounts.
How to set the default customer ID
- In Paladin, on the top ribbon, select the Customers module.
- On the bottom ribbon of the module, click F1 Advanced Lookup.
- Search for the customer. When found, highlight the customer row, then click F8 Select Customer.
- Click the Electronic tab. A list of IDs for this account appears in the Alternate Customer IDs pane.
- Click Edit ID Data.
- In the Alternate ID Manager window, highlight the ID that is to be the default, then click Set Default.
- Click F12 Finish.
How to clear a negative balance on a customer account
A negative balance occurs when a client has to write off a debt owed by a customer.
- In Paladin, on the top ribbon, select the Customers module.
- Enter or select the customer account from the Customer list.
- On the bottom ribbon of the module, click F5 Account Payment.
- In the Account Payment window, in the Totals pane, in the Discount Allowed box, enter the negative amount with a negative sign, a dollar sign, and decimal points.
- Make sure to clear the Amount of Payment box so double charges do not occur.
- Click F12 Accept. The Discount Amount message window opens with the following message: Does the Discount amount represent a normal Discount being used?
- Click No.
- In the Totals pane, in the Check # box, enter an explanation.
- Click F12 Accept.
- Click F12 Save.
How to change the credit limit for a customer account
- In Paladin, on the top ribbon, select the Customers module.
- On the bottom ribbon of the module, click F1 Advanced Lookup.
- On the top of the Advanced Lookup window, enable a search category.
- In the Keyword Search box, enter a customer name, then click Find.
- Click F8 Select Customer.
- Click the Credit tab.
- In the Credit pane, in the Credit Limit: box, enter the changed amount.
- Click F12 Save.
How to set up percentage discount for a customer
This procedure shows you how to apply an overall percentage discount to a customer’s statement balance.
You can also set up trade discounts that can be limited to specific departments or classes and that are also applied to individual customers. Trade discounts are applied at checkout. To learn more, refer to: Set up and apply trade discounts.
Tip: To encourage your customers to pay on time, you can specify an expiration date for the discount by using the prompt payment feature. To learn more, refer to: Set up a prompt payment discount.
- In Paladin, on the top ribbon, select the Customers module.
- Enter or select the customer account from the Customer list.
- Click the Credit tab.
- In the Credit pane, select Percentage and enter a percentage (without the % sign) in the box.
- Optional, but recommended: Select Respect Min Margin to ensure that all item discounts respect the minimum margin for that item.
- Click F12 Save.
How to refund credit on an account
- In Paladin, on the top ribbon, select the Invoice/Quote module.
- Enter or select the customer account from the Customer list.
- Press Enter.
- On the bottom ribbon of the module, click F5 Account Payment.
- In the Account Payment window, enter the credit as a negative amount in the Payment box. Example: -25.00
- Press Enter twice.
- In the Note box, indicate why the credit is being issued. Example: Payout or payoff on account
- In the Account Payment window, click F12 Checkout.
- On the bottom ribbon, select one of the following payment types.
- Cash
- Credit Card
- Check
- Verify the amount of credit being issued. If necessary, correct the amount.
- Press Enter.
Note: If the payment type is a check, the check number and the account name must be added to the transaction.
Customer account discount settings safeguards
To prevent issues from competing customer account discounts, only one the following two discount options can be selected at a time.
Min Balance for Discount
When this option is selected, a customer is eligible for a statement discount when their balance is greater than the number you specify.
- In Paladin, from the main menu, select File > Setup.
- Select the Receivables tab.
- In the Statements pane, in the Min Balance for Discount box, enter a minimum balance.
- Click Save, then click Close.
Display Prompt Payment Discount After Balance is 0
When this option is selected, prompt payment discounts that were not used by a customer are displayed in the Account Payment window when the customer’s account balance is zero ($0).
- In Paladin, from the main menu, select File > Setup.
- Select the Receivables tab.
- In the Invoice/Quote pane, check Display Prompt Payment Discount After Balance is 0.
- Click Save, then click Close.
Note: When you select the Display Prompt Payment Discount After Balance is 0 option, the Min Balance for Discount is unavailable.
How to transfer a customer account balance to Paladin
Note: This section provides procedures for transferring a customer balance from one type of accounting method to Paladin. To maintain accurate record keeping, perform the procedures in the following order:
- Create a balance transfer department
- Create a balance transfer SKU
- How to create a customer account
- How to transfer a balance from another system to Paladin
Create a balance transfer department
- In Paladin, from the main menu, select File > Setup.
- Select the Dept tab.
- Click New.
- In the Name box, enter Balance Transfer.
- In the Department label number box, enter a department ID number.
- Click Save, then click Close.
Create a balance transfer SKU
- In Paladin, on the top ribbon, select the Inventory module.
- On the bottom ribbon of the module, click F2 Add Item.
- In the Add New Item window, enter the following information:
|
Name of box |
What to enter |
|
Part # |
BALTRN |
|
Description |
Balance Transfer |
|
Cost |
0.00 |
|
Sell Price |
0.00 |
|
SOH |
0 |
|
Department |
The department ID that you just created. |
- Click F12 Add.
- Click the General tab.
- On the top of the Item Information pane, check Non-Inventory.
- In the Administrator Login window, enter administrator credentials, then click OK.
- On the bottom ribbon, click F12 Save.
- Click the Pricing tab.
- In the Pricing Levels pane, in the Ref column, enter the amount of the reference margin.
Note: When you set a reference margin, you will maintain a constant margin on the item when cost fluctuates.
- Uncheck Taxable.
- Click F12 Save.
How to create a customer account
- In Paladin, on the top ribbon, select the Customers module.
- On the bottom ribbon of the module, click F2 Add Customer.
- In the Add Customer window, enter the customer’s information.
- Click F12/Add.
- Click the Credit tab.
- In the Credit pane, enter a Credit Limit that is greater than the balance transfer amount, then press Enter.
- Click F12 Save.
How to transfer a balance from another system to Paladin
- In Paladin, on the top ribbon, select the Invoice/Quote module.
- Enter or select a customer account from the Customer list.
- In the Part Number box, enter: BALTRN
- In the Price box, enter the Balance Transfer
- Optional: On the bottom ribbon, click F2 Add Note. In the Enter Notes box, enter the customer account number listed in the previous system, then press Enter to save the note to the transaction.
- Click F8 Checkout.
- On the bottom ribbon, click Charge, then press Enter.
- In the Invoice Information window, add a Memo – BALANCE TRANSFER.
- Click Next. The Transaction Complete window opens and a receipt will be printed. If you do not want to print another receipt, click Done.
Note: To double check that the balance was transferred, select the Customers module, then click the Balances tab. The new customer balance appears.
How to print customer account balances on account payment invoices
Clients can print their customer’s current account balance and their last statement balance on account payment invoices. The printed values show the remaining balances after the account payment has been applied.
- In Paladin, from the main menu, select File > Setup.
- Select the Forms tab.
- In the Form Information pane, make sure the Invoice/Receipt Hide Customer Info checkbox is not selected.
- Click Save.
- Click the Receivables tab.
- In the Receivable Settings pane, check Print Balances on ROA receipts.
- Click Save, then click Close.
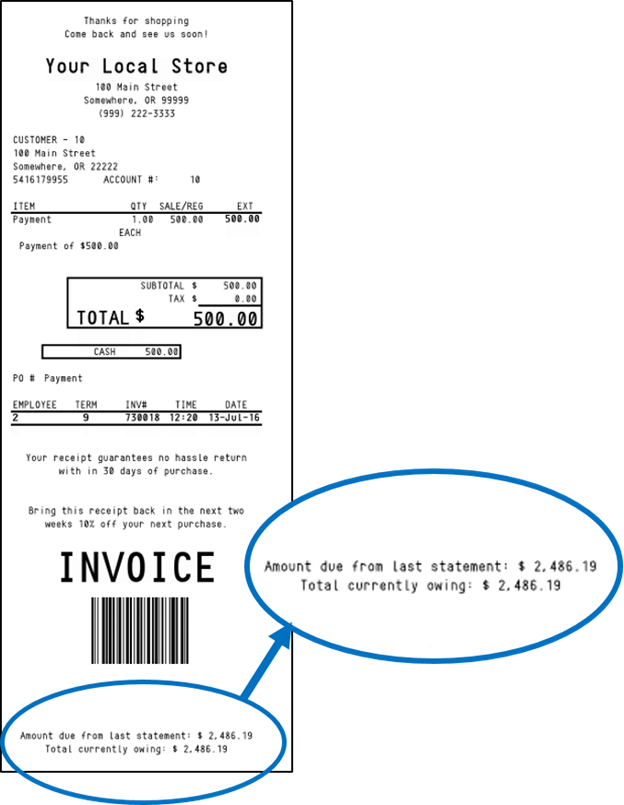
Figure 9: Customer account balance on account payment invoice
How to add a checkout screen note to a customer account
- In Paladin, on the top ribbon, select the Customers module.
- Enter or select the customer account from the Customer list.
- In the Checkout Screen Note pane, click inside the Click to edit Note box.
- Enter a message.
- Click F12 Save.
Note: When you checkout a sale for the customer, you will see the message, but it will not appear on the printed invoice.
- In the Delivery Information pane, enter the customer delivery address information.
- Click F12 Save.
How to add a list of authorized signers
- In Paladin, on the top ribbon, select the Customers module.
- Enter or select the customer account from the Customer list.
- On the bottom ribbon of the module, click F4 Projects & Auth. Signers.
- In the Authorized Signers window, in the Enter New Signer box, enter the customer’s name, then click Add.
- For each customer that you want to add, repeat step 4.
- Click F12 Finish.
- Click the Credit tab.
- In the Credit pane, check Match Authorized Signers List?
- Click F12 Save.
Note: When you select F2 Charge at checkout, the authorized signers list appears.
How to set up the authorized signers list for credit cards on file
To better protect use of customer’s credit cards/tokens on file during the invoicing process, stores may enable a feature to display the “Invoice Information – Enter PO Number and Authorized Signer” window from Charge sales. Any customer that has authorized signers listed in their customer records may set an approved list of signers that may purchase on their account. If the Customer Match Authorized Signers List check box is checked, the new purchase will be limited to the individuals listed in the authorized signers list.
To enable this feature:
- In Paladin, from the main menu, select File > Setup.
- Select the Credit Card tab.
- In the Signatures section, check Enable Auth Signer for Credit Cards on File.
- Click Save, then click Close.
Note: When you select F2 Charge or F3 Credit Card at checkout, the authorized signers list appears.
How to add a new non-US customer record
Paladin shows Canadian provinces in the State list alphabetically sorted alongside US states. Existing Zip Code fields already support alphanumeric entries.
To set this feature:
- In Paladin, from the main menu, select File > Setup.
- Select the Forms tab.
- At the bottom of the Form Information pane, check Include Canadian Provinces.

Figure 10: Include Canadian Provinces
- Click Save, then click Close.
- Close and restart Paladin.
In both the Customer module/Customer pane and the Add Customer window, the State lists have the following thirteen provinces listed:
| Province | Abbreviation in Paladin |
| Alberta | AB |
| British Columbia | BC |
| Manitoba | MB |
| New Brunswick | NB |
| Newfoundland and Labrador | NL |
| Nova Scotia | NS |
| Northwest Territories | NT |
| Nunavut | NU |
| Ontario | ON |
| Prince Edward Island | PE |
| Quebec | QC |
| Saskatchewan | SK |
| Yukon | YT |
Note: When setting up a customer for a rewards plan (Ace Rewards excluded), the State list in the associated Rewards window also includes Canadian provinces.
To add a new non-US customer record:
- In Paladin, on the top ribbon, select the Customers module.
- On the bottom ribbon of the module, click F2 Add Customer.
- In the Add Customer window, enter the customer’s name in the Name box.
- Enter the customer’s address in the Address box.
- In the City box, enter the city.
- Select a province from the State list.
- Optional: Enter a Credit Limit and/or select a customer type from the Type list.
- Click F12 Add.
- In the Customer tab, click F12 Save.
How to edit an existing non-US customer record
- In Paladin, on the top ribbon, select the Customers module.
- Enter or select the customer account in the Customer list.
- In the City box, edit the city.
- In the State list, edit the province.
- Click Save.
How to credit a customer account without printing a transaction
- In Paladin, on the top ribbon, select the Customers module.
- Enter or select the customer account in the Customer list.
- On the bottom ribbon of the module, click F5 Account Payment.
- In the Totals pane, in the Discount Allowed box, enter the credit amount.
- In the Amount of Payment box, enter 0.00.
- In the Check # box, enter 0000.
- Click F12 Accept.
How to set the Customer button if disabled for a particular employee
- In Paladin, from the main menu, select File > Setup.
- Select the Employees tab.
- In the Employees section, select an employee.
- In the Access Levels pane, check Maintain Customers.
- Click Save, then click Close.
- Log in using the employee’s ID to test the functionality.
How to export customer account data from the Data Viewer to Microsoft Excel
- In Paladin, from the top menu, select Maintain > Data Viewer.
- Select the Customers tab, then click the Export tab.
- Select Excel from the File Type list.
- Click Export.
- In the browser window, name the .xlsx file and map a destination for the file.
- Click Save.
- At the bottom of the Export tab, the number of records exporting is shown as the export is running. When complete, the number of records exported is shown.
If you have questions or suggestions about this information, contact support@paladinpos.com.

