
This article provides instruction and information on the following:
- How to add a credit card on file on Ingenico all-in-one credit card devices
- How to create the credit card deposit report
- How to create the Voided Credit Card Transaction report
- How to look for a failed VOID caused by a canceled payment card transaction
- How to set up customer projects for credit card purchases
- How to set authorized signers list for credit cards on file
- How to set up credit card transactions to skip the signature requirement process
- How to reconcile credit card and gift card purchases in Paladin
How to add a credit card on file on Ingenico all-in-one credit card devices
Important: The steps below are also used for adding a card on file with BlockChyp’s Luxe8500i. Steps referring to “Ingenico device” would be
Note: A customer can have up to three credit cards on file.
The following applies to the following devices:
-
- Ingenico isc250
- Ingenico isc350
- Ingenico isc480
- Lane 7000
- Lane 8000
To add a credit card on file on Ingenico all-in-one credit card devices:
- Open Paladin.
- Log in to the terminal connected to the Ingenico device.
- In Paladin, on the top ribbon, select the Customers module.
- Select or enter a customer account in the Customer list.
- Select the Electronic tab.
- In the Stored Credit Cards pane, click Edit Card Data.
- In the Credit Card Manager window, click Add.
- The Encrypted Device Input Manager window opens with the following message: Please make your entries in the attached payment terminal.
Note: You can make entries by swiping the credit card or entering the card information manually. If manually, check Manual Entry in the Device Manager window.
- Click OK.
- Click the blue Enter Card button on the Ingenico screen.
- Enter the card number, then press the green Enter button on the Ingenico keypad.
- Enter the card’s expiration date as MM/YY, then press the green Enter button on the Ingenico keypad.
- Enter the three-digit CVV or CID number from the back of the card, then press the green Enter button on the Ingenico keypad.
- If AVS Status appears under No AVS Data, and the account holder is present, in Paladin’s Credit Card Manager window, click Update AVS.
- Ask the customer to enter their billing address number on the Ingenico keypad, then press Enter.
- Ask the customer to enter the ZIP Code on the Ingenico keypad, then press Enter.
- If No Match appears under AVS Status, the information was entered incorrectly in Paladin’s Credit Card Manager window, or there is no AVS information available for that card.
- Try steps 10-13 again to determine if the information was entered incorrectly.
- To save the correct information, in Paladin’s Credit Card Manager window, click F12 Finish.
How to create the credit card deposit report
- In Paladin, on the top ribbon, select the Reports module.
- In the Report Area pane, select Sales Analysis > Daily Balancing.
- In the Report List pane, do one of the following:
- To only create the Credit Card Deposit report, click Credit Card Deposit.
- To create the Credit Card Deposit report as part of a register balance report, click one of the following:
- Today’s Register Balance
- Yesterday’s Register Balance
- Period Register Balance
- Click F12 Next.
- In the Report Settings pane, set the options you want.
- If you chose one of the register balance reports, make sure that the Include credit card deposit? check box is selected.
- Click F12 Run Report.
Note: When you run the report, the Non-swiped cards section only applies to credit cards whose numbers were manually entered by the cashier.
How to create the Voided Credit Card Transaction report
This report is typically used for auditing purposes and employee reviews over a specific time period. The report shows the following:
- Salesperson
- Terminal
- Time
- Last four digits of the credit card number
- The original invoice amount.
Each invoice will be clearly marked as a voided credit card transaction.
To create the Voided Credit Card Transaction report:
- In Paladin, on the top ribbon, select the Reports module.
- In the Report Area pane, select Sales Analysis > What I Need To Know.
- In the Report List pane, select Transaction Report.
- In the Choose Report pane, click F12 Next.
- In the Transaction Report window, in the Report Settings pane, in the Invoice Date row, enter dates in the Beginning and Ending boxes.
- In the Report Settings pane, enter beginning and ending dates for any other data that you want in your report.
- In the Additional Settings pane, in the Payment Method list, select Credit Card.
- Check Search Invoice Amounts, select Equal To, then select 0.00 from the list.
- In the Sorting Options pane, click F12 Run Report.
How to look for a failed VOID caused by a canceled payment card transaction
During daily credit card reconciliation, you may notice a failed VOID by the payment card’s issuing bank. When a cashier cancels the checkout process during the payment tender process, all credit card payment amounts that have been completed and approved for that customer will be automatically resubmitted to the store’s credit card platform as VOIDS.
The VOID will cancel the prior approval(s). However, a VOID does not guarantee that the credit card payment was refunded. To determine how your credit card processor responds to a voided credit card transaction, you must contact them.
If the card processing platform did not respond to the VOID, it probably did not process it. A failed VOID has the following characteristics:
- The charge appears in the credit card platform’s report.
- The charge does not appear in Paladin’s daily credit card report.
To look for a failed VOID caused by a canceled payment card transaction:
- In Paladin, on the top ribbon, click the Reports module.
- In the Report Area pane, select Sales Analysis > What I Need To Know.
- In the Report List pane, select Transaction Report.
- In the Choose Report pane, click F12 Next.
- In the Transaction Report window, in the Report Settings pane, in the Invoice Date row, enter dates in the Beginning and Ending boxes.
- In the Report Settings pane, enter beginning and ending dates for any other data that you want in your report.
- In the Additional Settings pane, in the Payment Method list, select Credit Card.
- In the text box next to the Keyword Search list, enter: VOID
- In the Sorting Options pane, click F12 Run Report.
Notes
- A VOID does not mean that the credit card purchase is refunded. To determine how voided credit card transactions are handled, contact the credit card processor.
- VOIDS to a debit card may not be refunded to the account by the issuing bank for several days.
How to set up customer projects for credit card purchases
Note: Customer projects are automatically set up for charge purchases.
- In Paladin, from the main menu, select File > Setup.
- Select the Credit Card tab.
- In the Signatures pane, check Enable Auth Signer for Credit Cards on File.
- Click Save, then click Close.
How to set authorized signers list for credit cards on file
To better protect use of customer’s credit cards/tokens on file during the invoicing process, stores may enable a feature to display the Invoice Information – Enter PO Number and Authorized Signer window from Charge sales. Any customer that has authorized signers listed in their customer records may set an approved list of signers that may purchase on their account. If the Customer Match Authorized Signers List check box is checked, the new purchase will be limited to the individuals listed in the authorized signers list.
To enable this feature:
- In Paladin, from the main menu, select File > Setup.
- Select the Credit Card tab.
- In the Signatures pane, check Enable Auth Signer for Credit Cards on File.
- Click Save, then click Close.
How to set up credit card transactions to skip the signature requirement process
To skip the signature collection process, the cashier can click Next in the Invoice Information window in the screen that normally displays the customer’s signature. The Invoice Information window opens in the Invoice/Quote module during checkout.
Note: This feature only applies to stores running Ingenico credit card payment terminals in non-EMV mode. It does not apply to stores set up to use EMV processing.
To turn on this feature:
- In Paladin, from the main menu, select File > Setup.
- Select the Credit Card tab.
- In the Signatures pane, check Allow Signature to be Skipped.
- Click Save, then click Close.
How to reconcile credit card and gift card purchases in Paladin
Although electronic credit card processing systems are generally reliable, issues can occur. To maintain accurate accounting and to catch and fix problems before they affect your business and customer relationships, you must reconcile your Paladin gift and credit card sales with your credit card processor’s records every business day.
The following steps show how to reconcile Paladin card purchases with credit card processors.
- Open Paladin Point of Sale.
- Create the Credit Card Deposit Report for the date that you want to reconcile.
For detailed instructions, see: How to create the Credit Deposit Report
At the end of the Credit Card Deposit Report, credit card purchase totals will be listed by type in the CARD TYPE DETAILS section.
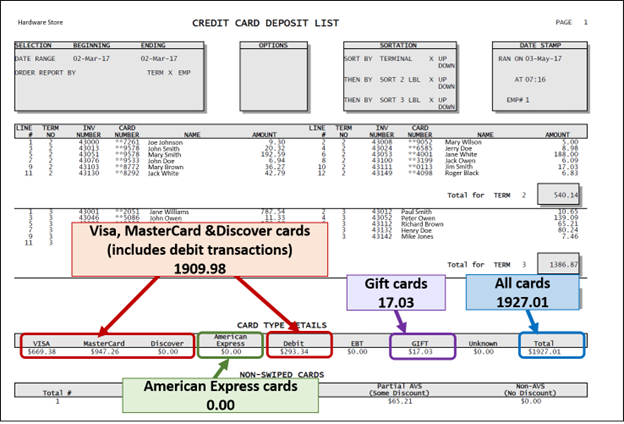
Figure 1: Credit Card Deposit List
If you have questions or suggestions about this information, contact support@paladinpos.com.
