
In Paladin, you can create messages for many purposes, including the following:
- Upsell products and services
- Broadcast upcoming events for your store or community
- Show support for local charities
- Promote in-store loyalty program
- Send customers to a webstore or social media sites
- Protect your company from liability issues by providing information, including the following:
- Legal or compliancy notices (optional: signature required)
- Manufacture warranty messages
- Product warnings and notices
This article provides instruction and information on the following:
- How to customize receipt text and images
- How to create a product message
- How to create a signature message by class
- How to create a tax exemption message
- How to add a custom message on emailed receipts
How to customize receipt text and images
Note: Figure 1 shows where each of the values appear on the receipt.
- In Paladin, from the main menu, select File > Setup.
- Select the Forms tab.
- In the Form Information pane, the following information can be added to the receipt:
- Advance By-Line 1 (and optional Advance By-Line 2)
- Company Name
- Trailer By-Line 1 (and optional Trailer By-Line 2)
Note: This message does not appear on the big form. - Footer Line 1 (and optional additional information in the remaining numbered 2 -4 boxes)
- Logo
-
-
- In the Logo pane, click Upload, then browse to the image of the logo.
- If you want to upload a logo file, you must use one of the following image file types:
- PNG (.png) [recommended]
- GIF (.gif)
- TIF (.tif)
- BMP (.bmp) [not recommended]
- Your logo image file cannot be larger than 450 x 110 pixels and 1 MB in size.
-
- QR Code
-
- In the Invoice QR Code pane, check Enable Invoice QR Code, click Upload, then browse to the image of the logo to select it.
Multi-store note: If you run the multi-store version of Paladin, each store location can upload a distinct QR code for their location.
- QR Message 1 box, enter your message (and optional additional information in the remaining numbered 2- 4 boxes).
- Click Save.
- Select the Company tab.
-
- In the Receipt Text pane, check Enable Receipt Text.
- In the Receipt Text Class Number field, enter the Class number to trigger the message.
- In the Receipt Line field (there are 4 available), enter the text to be shown on receipts.
- Click Save, then click Close.
You can disable showing customer information and customer name on receipts by performing the following:
- In Paladin, from the main menu, select File > Setup.
- Select he Forms tab.
- In the Form Information pane, check Invoice/Receipt Hide Customer Info.
Note: Invoice/Receipt Hide Customer Info must be checked to enable Invoice/Receipt Hide Customer Name to be checked.
- Click Save, then click Close.
Note: Hiding customer information and customer name does not function for Delivery or Full Sheet receipts.
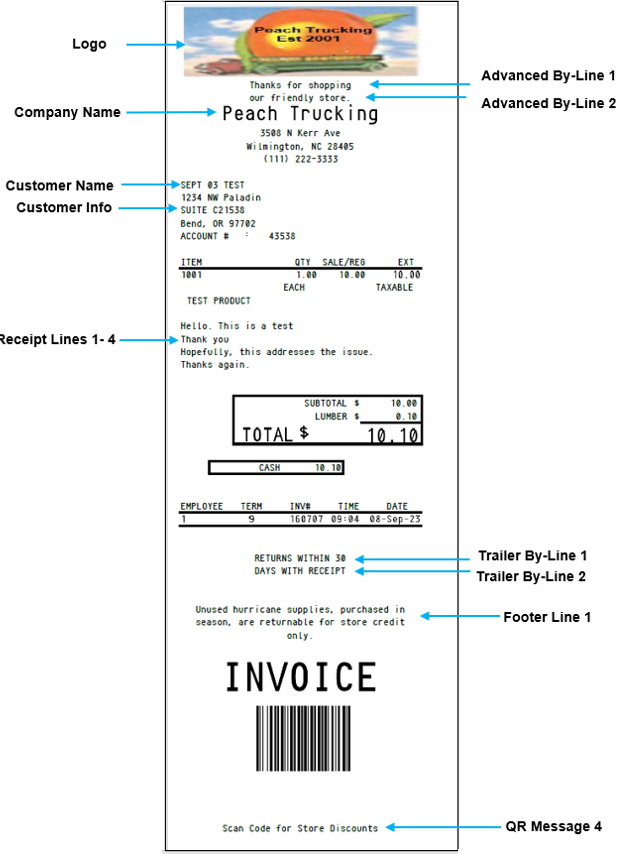
Figure 1: Customized receipt values
If you want to customize the message on emailed invoices, see How to add a custom message on emailed receipts.
How to create a product message
- In Paladin, on the top ribbon, select the Inventory module.
- Enter the part number in the Part # box.
- Press Enter.
- Open the General tab.
- In the Item Information pane, in the Autotext box, enter a message.
- Click Save.
The message will appear below the item on both the invoice and the receipt.
How to create a signature message by class
- In Paladin, from the main menu, select File > Setup.
- Select the Company tab.
- In the Signature Required pane, check Enable Signature Required.
- In the Signature Required Class Number box, enter a class ID.
- In the Signature Pad Line 1 box, enter the message.
- Optional: Enter additional information in the remaining numbered boxes.
- In the Receipt Text pane, check Enable Receipt Text.
- In the Receipt Text Class Number box, enter a class ID.
- In the Receipt Line 1 box, enter the message and the class ID.
- Optional: Enter additional information in the remaining numbered boxes.
- Click Save, then click Close.
The message will open on the signature pad and/or the receipt.
How to create a tax exemption message
- In Paladin, from the main menu, select File > Setup.
- Select the Taxes tab.
- In the Tax Exemption pane, check Require Signature for Tax Exemption.
- In the Exemption Receipt Text box, enter a message.
- Click Save, then click Close.
The message will appear on receipts.
How to add a custom message on emailed receipts
Your custom message will replace this default text:
Your invoice from <your store> is attached.
Thank you for your business.
- In Paladin, from the main menu, select File > Setup.
- Select the Forms tab.
- In the Invoice Email Message box, enter your custom text.
- Click Save, then click Close.
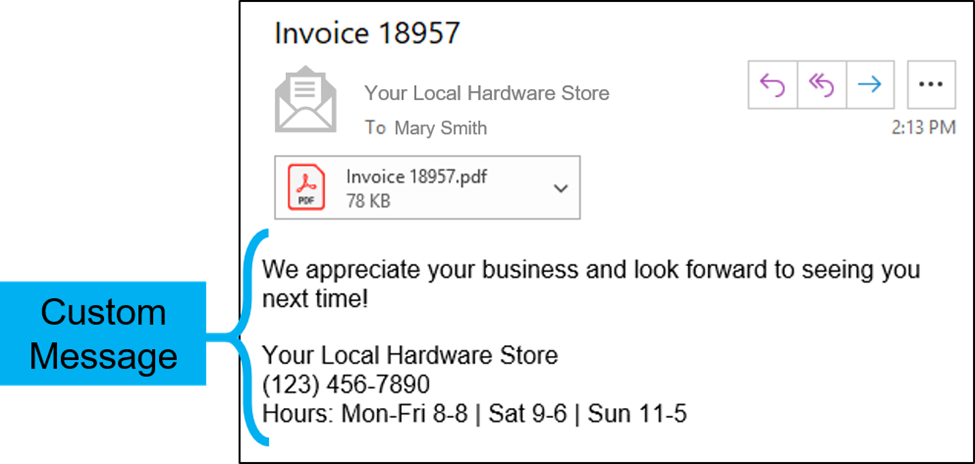
Figure 2: Custom message on email receipt
If you have questions or suggestions about this information, contact support@paladinpos.com.
