
This article provides instruction and information on the following:
- How to show store info on Rich Rewards coupons
- Rich Rewards point balance shown to cashier and on receipts
- How to set up prompts for Rich Rewards ID at checkout
- How to exclude Rich Rewards items by department or class
- How to rebrand the Rich Rewards Program ID
- How to earn a Rich Rewards coupon
- How to redeem a Rich Rewards coupon
- Rich Rewards minimum coupon amount
- How create a Rich Rewards account for a customer
- How to assign a Rich Rewards ID to a customer account
- How to create Rich Rewards single-use coupons
- How to set up Rich Rewards for single-use coupons
- How to process Rich Rewards single-use coupons
- Rich Rewards Loyalty Balance report
- How to locate Rich Rewards data in the Period Comparative Revenue report
How to show store info on Rich Rewards coupons
The purpose of a customer rewards program is to foster good will with your customers so that your store will be “top-of-mind” on their next shopping trip. Your store information, such as store name, address, and phone number, printed on the invoice receipt that contains a Rich Rewards coupon helps make a return trip easy.
However, stores using Paladin observed that customers were tearing Rich Rewards coupons from the bottom of their invoice receipts leaving this important store information behind. Therefore, you can print your store information below the Rich Rewards coupon.
To show your store information on Rich Reward coupons:
- In Paladin, from the main menu, select File > Setup.
- Select the Rewards tab.
- In the Rewards pane, select Rich Rewards from the Customer rewards program list.
- In the Rich Rewards pane, check Include Company Info on Rich Rewards Coupons.
- Click Save, then click Close.
Rich Rewards point balance shown to cashier and on receipts
A customer’s Rich Rewards point balance is displayed to the cashier during the checkout process. The displayed balance includes points awarded for the current purchase.

Figure 1: Rich Rewards Point balance at checkout
The customer points balance is also printed on the customer’s receipt.
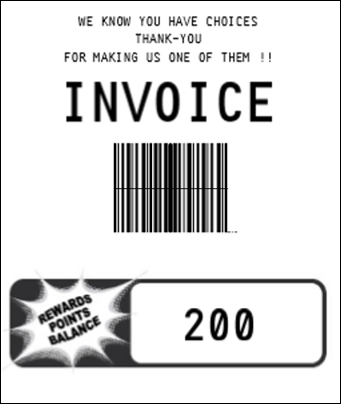
Figure 2: Rewards point balance on customer receipt
If there are enough points for an award, a coupon is printed on the receipt when the transaction is complete, and the customer’s point balance is reduced. When this happens, the adjusted rewards point balance is not included on the receipt.
You can view the Rich Rewards point balance for a customer account in Paladin’s Customers module on the Rich Rewards tab. A reward amount is not displayed in dollar amount, rather the amount is shown in points. To convert a dollar amount to points, the dollar amount is multiplied by 100.
The following table shows examples of equivalent point and dollar values:
| Reward in dollars | Reward in points (shown) |
| 1.32 | 132 |
| 2.00 | 200 |
| 10.29 | 1029 |
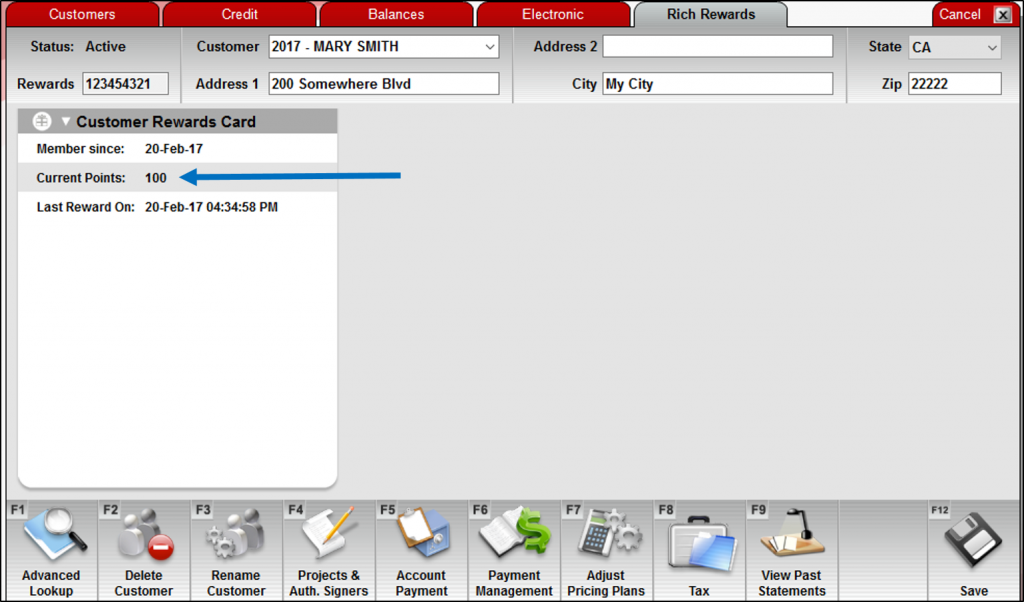
Figure 3: Current Points available
Point balances are printed on receipts by default. If you want to turn off this feature:
- In Paladin, from the main menu, select File > Setup.
- Select the Rewards tab.
- In the Rewards pane, select Rich Rewards from the Customer rewards program.
- In the Rich Rewards pane, check Disable Rewards Balance on Receipts.
- Click Save, then click Close.
How to set up prompts for Rich Rewards ID at checkout
To prompt for a customer’s Rich Rewards ID at checkout:
- In Paladin, from the main menu, File > Setup.
- Select the Rewards tab.
- In the Rewards pane, select Rich Rewards from the Customer rewards program list.
- To prompt for a rewards ID when you create a new invoice, in the Rich Rewards pane, click the Rewards # Prompt Beginning of Invoice.
- To prompt for a rewards ID when you start the checkout process, in the Rich Rewards pane, click the Rewards # Prompt End of Invoice.
- Click Save, then click Close.
How to exclude Rich Rewards items by department or class
To exclude specific departments and classes from the Rich Rewards program:
- In Paladin, from the main menu, select File > Setup.
- Select the Rewards tab.
- In the Rewards pane, select Rich Rewards from the Customer rewards program list.
- In the Rich Rewards pane, add or remove a class or department from the excluded lists.
- In the Exclude Classes from Rich Rewards pane:
- To add a class to the list of excluded classes, in the Class ID box, enter a class ID, then click Add Class.
- To remove a class from the list of excluded classes, in the list of classes, select a class, then click Remove.
- In the Exclude Departments from Rich Rewards pane:
1. To add a department to the list to the list of excluded departments, in the Dept ID box, enter a department ID, then click Add Dept.
2. To remove a department from the list of excluded departments, in the list, select a class, then click Remove.
- In the Exclude Classes from Rich Rewards pane:

Figure 4: Exclude Classes/Exclude Departments
- When selections are complete, click Save, then click Close.
How to rebrand the Rich Rewards Program ID
By default, the Rich Rewards window is titled Rich Rewards and has the Rich Rewards image. This can be changed to reflect your store’s name and logo.

Figure 5: Default Rich Rewards window
To change the Program ID to reflect your store’s name and logo:
- In Paladin, from the main menu, select File > Setup.
- Select the Rewards tab.
- In the Rewards pane, select Rich Rewards from the Customer rewards program list.
- In the Rich Rewards pane, under the Rebrand Configuration sub-pane, enter the desired store name in the Rewards Program Name box.
- Click Load Image to open your File Explorer and find the location of your image. Select the image and click Open. The image appears in the Logo box.

Figure 6: Rich Rewards Rebrand Configuration
When opening Paladin’s Invoice/Quote module, the new “Rich Rewards” window appears with the new store name and image.

Figure 7: Rich Rewards Rebranded
How to earn a Rich Rewards coupon
- In Paladin, on the top ribbon, click the Invoice/Quote module.
- In Rewards box, scan the Rewards card or enter the Rewards card number.
- Optional: On the bottom ribbon of the module, click F1 Advanced Lookup to find customer account information.
- Scan the customer’s items.
- On the bottom ribbon, click F8 Checkout.
- On the bottom ribbon click any of the following payment types:
- Cash
- Charge
- Credit Card
- Check
- Complete the transaction process.
Note: The earned reward amount appears as a barcode on the receipt. The barcode can be scanned when customers are ready to use the earned reward.
How to redeem a Rich Rewards coupon
Coupons available to a rewards customer are shown to the cashier during checkout.
To set this up:
- In Paladin, from the main menu, select File > Setup.
- Select the Rewards tab.
- In the Rewards pane, select Rich Rewards from the Customer rewards program list.
- In the Rich Rewards pane, check Display Available Coupons During Checkout.
- Click Save, then click Close.

Figure 8: Display Available Coupons During Checkout
Stores can accept multiple Rich Rewards coupons on a single invoice. If stores want to limit use of coupons to one per single invoice, Only Allow One Coupon per Invoice can be checked.
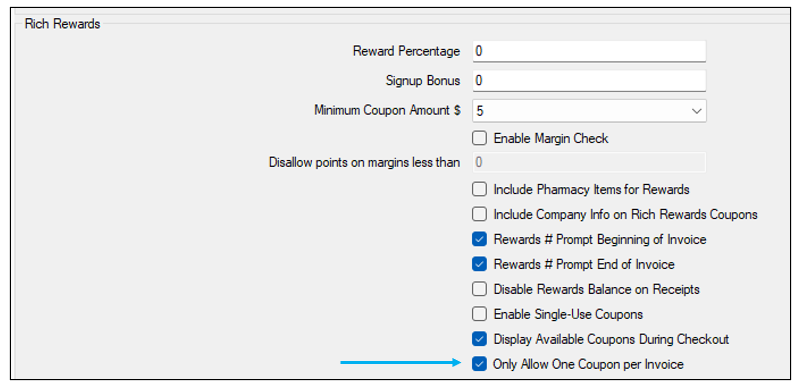
Figure 9: Only Allow One Coupon per Invoice
Viewing available coupons at time of checkout:
- In Paladin, on the top ribbon, select the Invoice/Quote module.
- In the Rewards box, scan the Rewards card or enter the Rewards card number.
- Optional: On the bottom ribbon of the module, click F1 Advanced Lookup to find customer account information.
- Scan the customer’s items.
- On the bottom ribbon, click F8 Checkout.
The Available Reward Coupons window opens.

Figure 10: Available Reward Coupons
The cashier shares this screen, or information, with the customer so that the customer can choose a coupon to use toward their overall purchase.
Note: If the cashier is unfamiliar with applying reward coupons, or needs instruction on enabling/disabling the feature, clicking the Learn More link opens and provides information on the feature.
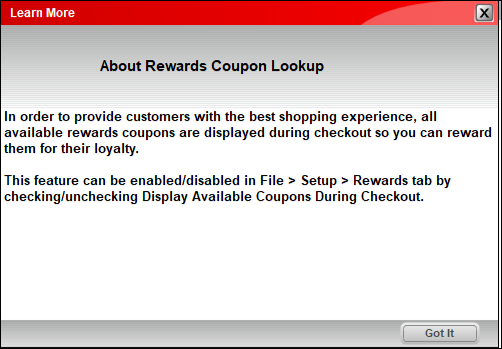
Figure 11: Learn More
If the only coupons a customer has available exceed the invoice amount, the Coupon Amount window opens informing the customer that, by using the coupon, the coupon’s value will be reduced to match the invoice total.

Figure 12: Coupon Amount
If the customer is comfortable using a coupon, the cashier clicks OK and then clicks Apply [F8] in the Available Reward Coupons window to apply the coupon to the invoice and proceeds with completing the transaction. Or, when the cashier clicks OK, then clicks Cancel in the Available Reward Coupons window, the invoice appears so that the coupon can be removed and/or additional items can be added. When the necessary changes are made, the cashier can reapply the coupon and continue the checkout process.
Rich Rewards minimum coupon amount
You can choose a minimum coupon amount for your Rich Rewards program.
Larger minimum coupons take longer to earn
Before you choose a minimum coupon amount, consider the customer’s experience. Larger minimum coupon amounts require the customer to spend more dollars before receiving a coupon. This means that a customer may have to make several trips to your store before being “rewarded” with a coupon.
Large purchases and reward management
If the maximum coupon amount is a $50, and only one coupon can be awarded for a purchase; then, if a customer makes a large purchase, and the earned reward is greater than $50, the customer is only awarded a $50 coupon with that purchase. The remaining reward balance is saved and will be awarded (up to another $50 amount) the next time the customer makes a purchase.
To choose a minimum coupon amount for your Rich Rewards program:
- In Paladin, from the main menu, select File >Setup.
- Select the Rewards tab.
- In the Rewards pane, from the Customer rewards program list, select Rich Rewards .
- In the Rich Rewards pane, from the Minimum Coupon Amount list, select a minimum coupon amount.
- Click Save, then click Close.
How create a Rich Rewards account for a customer
- In Paladin, on the top ribbon, select the Invoice/Quote module. The Rich Rewards window opens.
- In the Rich Rewards window, in the Rewards ID or Phone Number box, enter the information or scan the ID card.
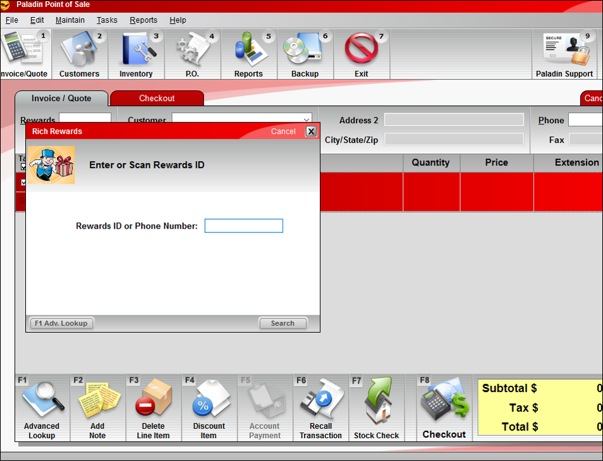
Figure 13: Rich Rewards window
- The Rich Rewards window will not appear when a customer account is selected for the invoice, even if the customer account includes a Rich Rewards ID.
- If more than one ID match is found, all the matches are displayed in the Advanced Lookup window so you can choose the correct account.
- If a manual search for a Rich Rewards ID or phone number does not find the ID in your customer accounts, you have two options:
- To search again with another ID or phone number, click Try Again.
- To create a new Rich Rewards account, click Sign Up.

Figure 14: Rich Rewards window/Enter or Scan Rewards ID options
- If you choose to create a new Rich Rewards account, a Rewards window opens. Scan or enter the new Rich Rewards number, complete the required highlighted fields, then click F12 Finish. After you complete the sign up process, the new Rich Rewards ID is added to the invoice.
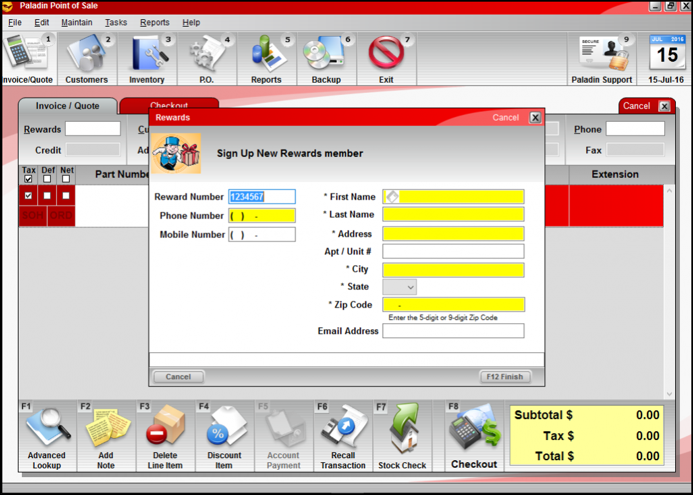
Figure 15: Rewards window/Sign Up New Rewards member
How to assign a Rich Rewards ID to a customer account
Before customers can start accumulating rewards, a Rich Rewards ID must be assigned to the customer account. You can use the number on the Rich Rewards card, the customer’s phone number, or a number that the store or pharmacy assigned to the customer.
- In Paladin, on the top ribbon, select the Customers module.
- Enter or select a customer account from the Customers list.
- Click the Electronic tab.
- In the Alternate Customer ID’s pane, click Edit ID Data.
- In the Alternate ID Manager window, in the Enter Alt ID box, enter the number that you want to use for Rich Rewards.
- Click Add.
- In the Type list, select Rich Rewards, then click F12 Finish.
- On the bottom ribbon, click F12 Save.
How to create Rich Rewards single-use coupons
To create Rich Rewards single-use coupons:
- Contact Paladin Customer Support to turn on the single-use coupon feature for Rich Rewards.
- In Paladin, on the top ribbon, select the Inventory module.
- Create inventory items for each single-use coupon amount.
- On the bottom ribbon of the module, select F2 Add Item.
- In the Add New Item window, enter the following values:
| In this field | Enter |
| Part # |
A name that you will enter as a line item for the single-use coupon. Example: Coupon5 |
| Description |
A description of the coupon Example: Single-use $5 off coupon |
| Cost | 0 |
| Sell Price | 0 |
| SOH |
0 |
| Department |
The department that was set up for the single-use coupons. Example: 10 Hand Tools |
c. Click F12 Add.
d. Click the Pricing tab.
e. In the Pricing Levels pane, in row 1, enter the following values:
| In this field | Enter |
| Sale Price | Enter the coupon dollar value as a negative number. Example: If your coupon gives a $5.00 discount, enter -5.00. |
| Ref | 100 |
f. Click the General tab.
g. In the Classes pane, in the Class list, select the single-use coupon class (for example 888 – MISC SALES) .
h. On the top of the Item Information pane, enable Non-Inventory.
i. Click F12 Save. Repeat step 3 (a-i) for each coupon amount.
- In the Invoice/Quote module, enter the Part # for the single-use coupon you created. Verify that coupon appears correctly with a negative value.
How to set up Rich Rewards for single-use coupons
- In Paladin, from the main menu, select File > Setup.
- Select the Rewards tab.
Note: In the Rewards pane, if Rich Rewards is not selected, then you must set up Rich Rewards. Contact a Paladin TSR for setup.
- Click the Class tab.
- Tell the client that they will need a class ID to create single-use coupons.
- Do one of the following:
-
- If the client has a class ID for single-use coupons, write it down for a subsequent step.
- If the client does not have a class ID for single-use coupons, follow these steps:
- In the Classes pane, click New.
- In the Name box, enter SINGLE USE COUPON.
- In the ID box, enter an unused class ID number. Write down the number for a later step.
- Click Save.
-
- Click the Dept tab.
- Ask the client which department they prefer to use for single-use coupons. Note: The department does not need to be restricted to single-use coupons.
- If the client does not have a department to use for single-use coupons, follow these steps:
-
- In the Departments pane, click New.
- In the Name box, enter SINGLE USE COUPON.
- In the ID box, enter an unused department ID number.
- Click Save.
-
- Click the Rewards tab.
- In the Rich Rewards pane, check Enable Single-Use Coupons.
- In the Single-Use Coupon Class, enter the class ID number from step 4.
- Click Save, then click Close.
- Tell the client to make a note of the single use coupon class ID and department.
How to process Rich Rewards single-use coupons
Loyalty programs, such as Rich Rewards, create new customers and encourage customer loyalty. To attract new customers, you need to get the word out. One way is to make rewards coupons as available as possible. However, there is always a risk that a few customers will abuse the system and use the coupon multiple times.
Paladin limits your exposure to fraud when you use single-use coupons because they can be redeemed only once per customer account. Single-use coupons are set up in Paladin as a special type of inventory item.
This section provides scenarios on single-use coupons and the messages that appear:
- A customer has used the coupon for a previous purchase.
- A cashier has added the coupon to the invoice more than once.
- A customer account is not selected.
- The coupon value is greater than the total purchase amount.
Scenario: A customer has used the coupon for a previous purchase
If a customer previously used a single-use coupon, a message appears during the checkout process, and the cashier has the following options:
- Click OK to return to the invoice, remove the coupon, then continue with the checkout process.
- Enter a manager password to override the single-use limitation, then continue with the checkout process.
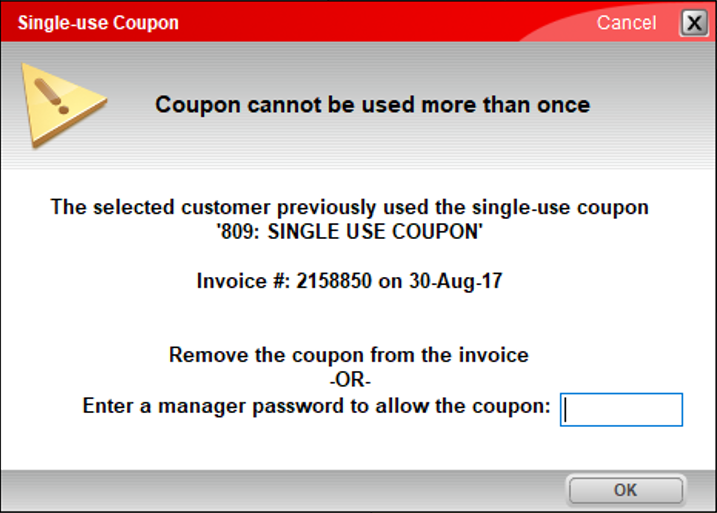
Figure 16: Single-use Coupon window/Coupon cannot be used more than once message
Scenario: A cashier has added the coupon to the invoice more than once
If a single-use coupon is added to an invoice more than once, a message appears during the checkout process, and the cashier has the following options:
- Click OK to return to the invoice, remove the duplicate coupons, then continue with the checkout process.
- Enter a manager password to override the single-use limitation, then continue with the checkout process.

Figure 17: Single-use Coupon window/Coupon cannot be used more than once message
Scenario: A customer account is not selected
A customer account must be selected to redeem a single-use coupon. If a customer account is not selected, a message appears during the checkout process, and the cashier must select a customer account to complete the transaction.
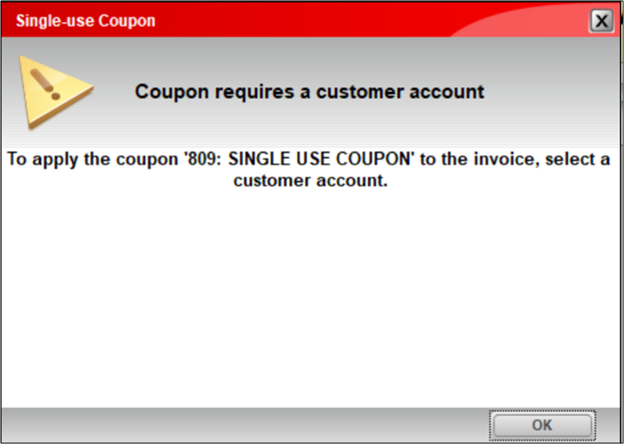
Figure 18: Single-use Coupon window/Coupon requires a customer account message
Scenario: The coupon value is greater than the total purchase amount
The cost of the sale items must be greater than the total coupon value. If the invoice amount exceeds the coupon value, the Coupon Amount window opens. When the cashier clicks OK, the invoice appears so that the coupon can be removed and/or additional items can be added. When the necessary changes are made, the cashier can reapply the coupon and continue the checkout process.
Figure 19: Single-use Coupon window/Coupon value exceeds invoice amount message
Rich Rewards Loyalty Balance report
You can view the rewards balance in an Excel spreadsheet for each of your customers.
Note: You must have Microsoft Excel 2007 or later installed on your computer to create this report.
- In Paladin, on the top ribbon, select Reports.
- In Report Area pane, select Customers > Customer List.
- In the Report List pane, click Loyalty Balance.
- In the Choose Report pane, click F12 Next.
- In the Sorting Options pane, click F12 Run Report.
On the bottom of the Reports window, the message Writing Report.. appears along with a red progress bar. When the report is complete, the message Report Complete appears at the bottom of the Reports window, and an Excel icon appears in the bottom taskbar of your computer.
Click on the Excel icon to view a report containing the following customer information:
-
- Name
- Paladin account number
- Address information
- Phone number
- Email address
- Rewards balance
How to locate Rich Rewards data in the Period Comparative Revenue report
- In Paladin, on the top ribbon, select the Reports module.
- In the Report Area pane, select Sales Analysis > Revenue.
- In the Report List pane, click Period Comparative Revenue.
- In the Choose Report pane, click F12 Next.
- In the Period Comparative Revenue window, in the Report Settings pane, enter the information that you want to sort by.
Note: There is the option to Export to Excel? Otherwise, the report will appear as a PDF file.
- Optional: In the Additional Settings pane, select an option from the Detail by list.
- In the Sorting Options pane, click F12 Run Report.
Note: The Period Comparative Revenue report appears with Customer Rewards in two places:
- As CUST RWD under Revenue Sources
- As 999 under DEPT NAME
If you have questions or suggestions about this information, contact support@paladinpos.com.
