
Many software products that store data are Open Data Base Connectivity (ODBC) compliant, allowing users to gain access to data contained in database tables. ODBC is a standard Application Programming Interface (API) for accessing disparate databases. When using ODBC, the user has the ability to access data from a number of different databases, including Firebird, SQL Server, Access, dBase, DB2, Excel, etc.
Paladin offers an Open Data Base Connectivity (ODBC) connector, Microsoft (MS) Excel ODBC Wizard, for accessing tables and columns in the Paladin database.
Accessing data in Paladin is a fairly straightforward procedure and is within reach of most users depending on their technical experience and comfort level. Being designed failsafe, the Paladin ODBC connector is READ ONLY, meaning data cannot be written to the database. It is only possible to pull data from the Paladin database when using the MS Excel ODBC Wizard.
Benefits of using the MS Excel ODBC Wizard are:
- Ability to quickly create custom reports from Paladin
- Ability to pull data from Paladin in a spreadsheet (column/row) format
- Ability to create custom reports with search criteria, such as where, if/then, contains, equals, date ranges, and more, with various sorting options
- Ability to save ODBC queries and create reports with ease
This article gives basic information and instruction on retrieving data from Paladin database tables using the MS Excel ODBC Wizard, enabling users to turn data into actionable information.
Configuration
The following required products and licenses are needed to set up the configuration:
- A computer with a Paladin license and the ODBC driver/connector installed. In most cases, the ODBC driver is installed on Terminal-1 or on a back-office terminal. When you open the Excel ODBC Wizard and don’t see the Paladin ODBC connector as per the below instructions, you will need to contact Paladin Support to install the ODBC drivers.
- An active Microsoft Excel license installed on the computer or running from the cloud.
Accessing the MS Excel ODBC Wizard
Depending on the version of Excel used, there are two different methods to gain access to the MS Excel ODBC Wizard.
- The first method is required if you are on an earlier version of Excel (older than version 2403).
- The second method is required if you are on Excel Version 2403, Paladin Build 16.0.1745.20176 or later.
First method (versions older than 2403)
- Open the MS Excel application and click on the DATA tab on the top ribbon.
- Select the From Other Sources drop down menu.
- Select From Microsoft Query.
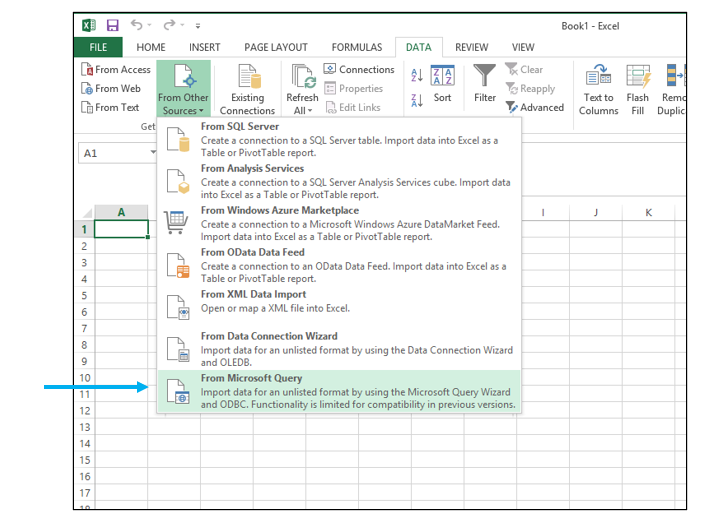
Figure 1: MS Excel/From Microsoft Query
The Choose Data Sources window opens.
Note: If you have a particularly large database, it may take a minute or two to open.
- From the Choose Data Source window, select the Paladin* database.

Figure 2: Choose Data Source window/Paladin* database
This completes the first method of accessing the MS Excel ODBC Wizard.
Second method (version 2043 or later)
The first (onetime) step in this process is to activate the Legacy Data Import Query in the Excel Data Options, if not already configured.
- Open Excel and select Home > Options.
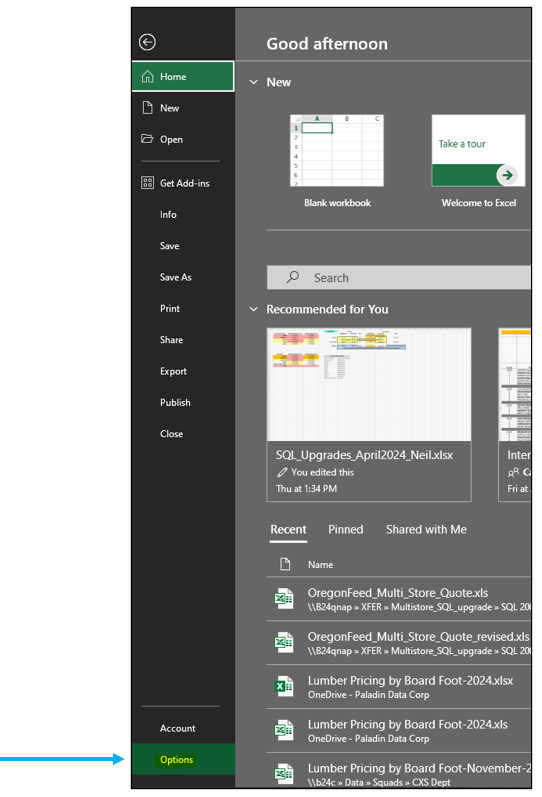
Figure 3: Excel/Home/Options
- Under Excel Options, select the Data configuration tab.
- In the Data options section, under the Show Legacy Data Import Wizard pane, check From Microsoft Query (Legacy).
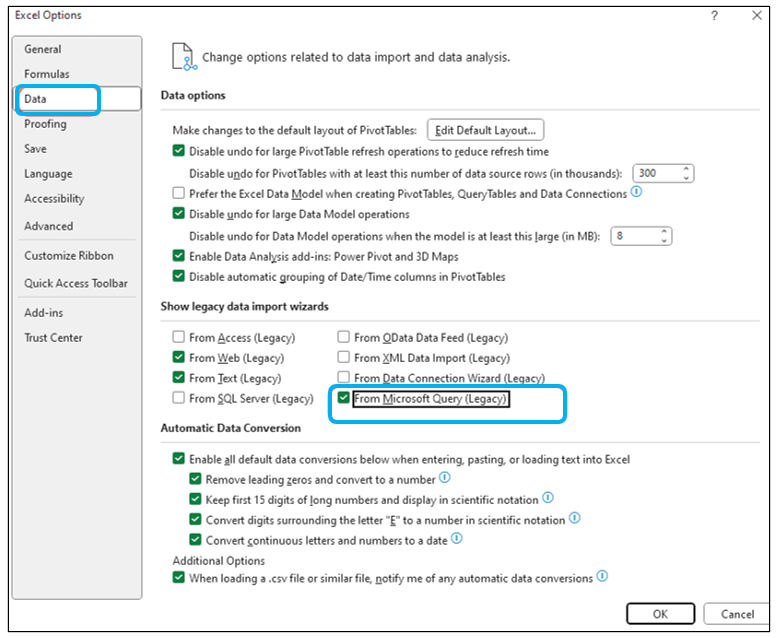
Figure 4: Show Legacy Data Import Wizard/From Microsoft Query (Legacy)
- Restart Microsoft Excel and open a workbook.
- On the top ribbon of the workbook, click on the DATA tab.
- Open the Get Data list, then select Legacy Wizards > From Microsoft Query (Legacy).
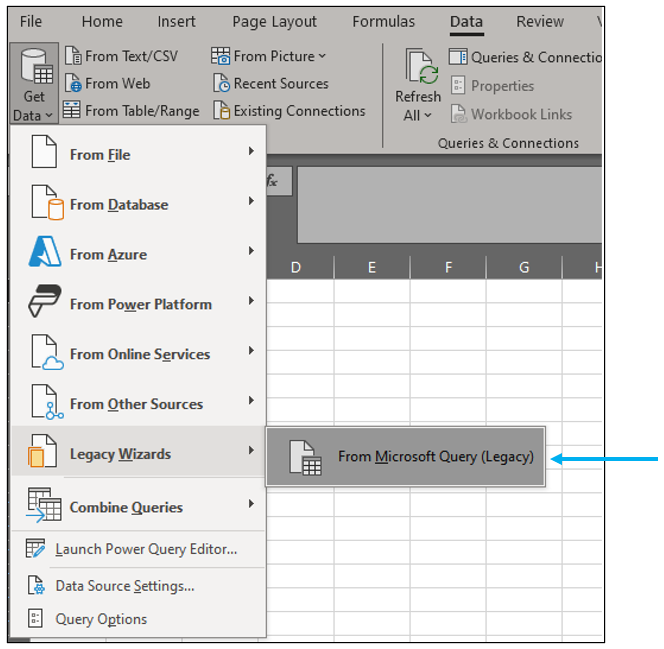
Figure 5: Legacy Wizards > From Microsoft Query (Legacy)
The Choose Data Sources window opens.
Note: If you have a particularly large database, it may take a minute or two to open.
- From the Choose Data Source window, select the Paladin* database.
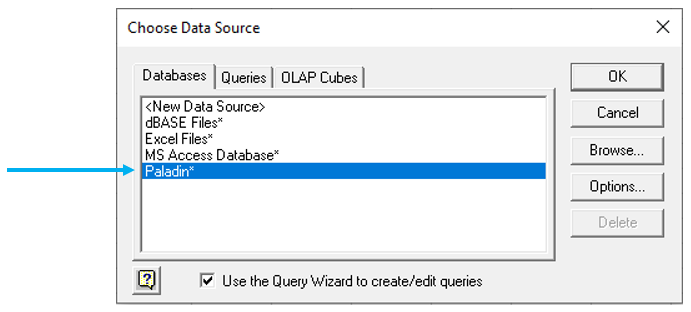
Figure 6: Choose Data Source window/Paladin* database
This completes the second method of accessing the MS Excel ODBC Wizard.
Building custom reports
Regardless of the previous methods used, the Paladin* database was chosen from the Choose Data Source window.
Note: If you do not see the Paladin database, this means the ODBC driver is not installed, and you must contact Paladin Support to install and configure it.
- From the Choose Data Source window, click OK.
The Query Wizard – Choose Columns window opens, and all available tables are listed under the Available tables and columns pane.
- From the Available tables and columns pane, highlight the desired Paladin table name.
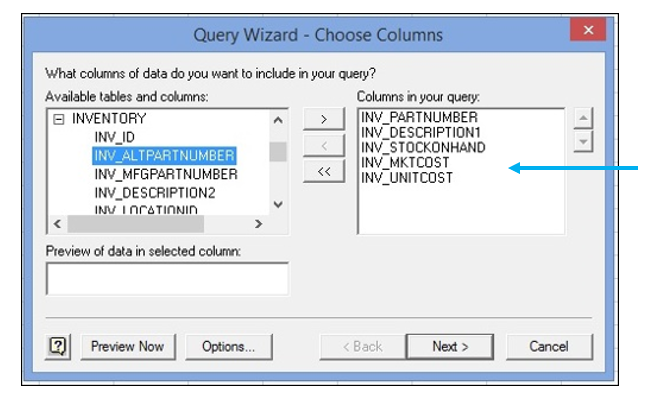
Figure 7: Query Wizard – Choose Columns
- Press the right arrow > or double-click a column name to move it under Columns in your query.
- Press Next when done adding columns.
Note: If you want to select columns from more than one table, go directly to the Microsoft Query application after selecting the columns to associate the two tables by joining (or linking) the tables. This is an advanced feature but is easily accomplished. The Microsoft Query Help menu is an excellent resource to learn more about table “joins.”
The Query Wizard – Filter Data window opens.
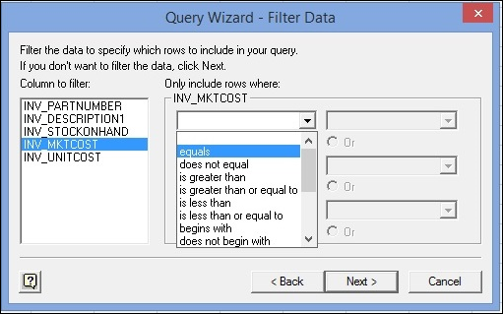
Figure 8: Query Wizard – Filter Data window
- Select which filter(s) to apply.
Note: If you don’t want to filter the data, click Next.
- When done, press Next.
The Query Wizard – Sort Order window opens.
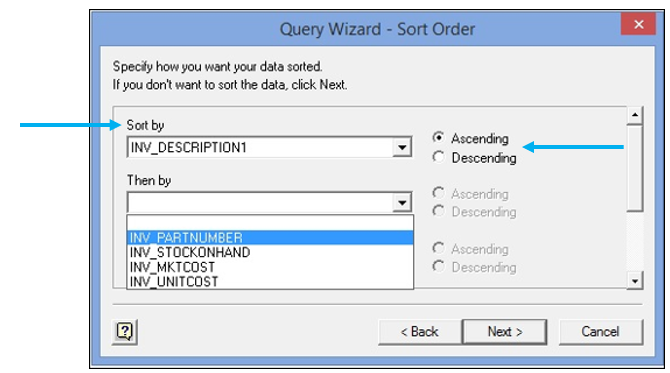
Figure 9: Query Wizard – Sort Order window
- Select the column(s) to sort by and enable either Ascending or Descending.
Note: If you don’t want to sort the data, click Next.
- When done, press Next.
The Query Wizard – Finish window opens.
- To populate the results of the data in an Excel spreadsheet, enable the Return Data to Microsoft Excel option.
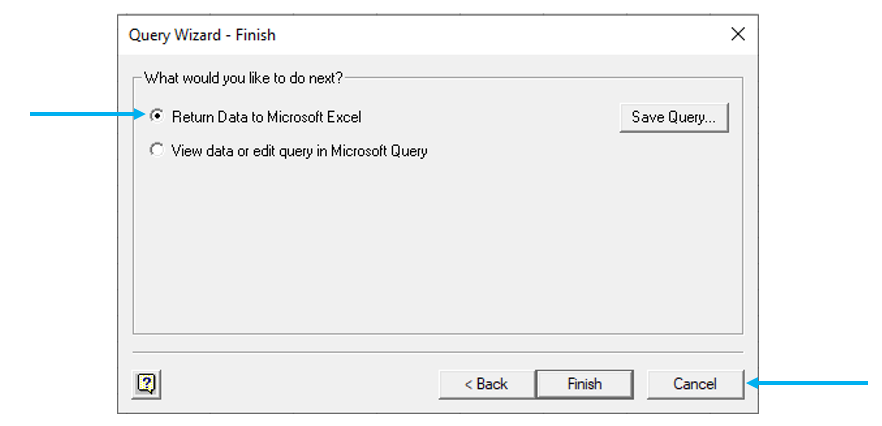
Figure 10: Query Wizard – Finish window/Return Data to Microsoft Excel option
Note: To go directly to the Microsoft Query application, enable the View data or edit query in Microsoft Query option. In addition to having the editing and viewing capabilities, this option will also allow you to join (or link) multiple tables together.
To save this query to run it at a later date, select Save Query…
If the Return Data to Microsoft Excel option is enabled, the Import Data window opens.
Note: Typically, you will simply select OK here. But first, select the starting position to begin populating the spreadsheet. That is normally the cell: A:1 (top left hand corner of the spreadsheet), but the choice is yours.
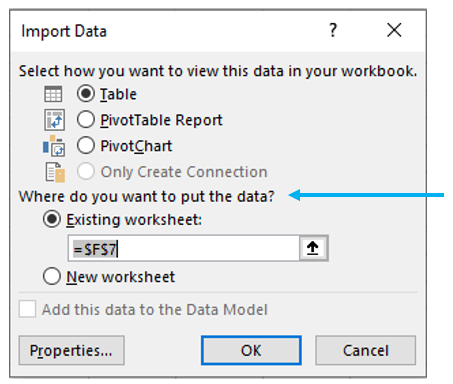
Figure 11: Import Data window
The spreadsheet will immediately display the data results from the query.
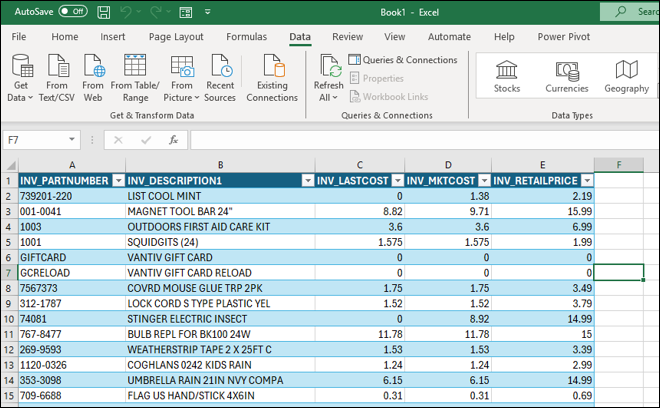
Figure 12: Spreadsheet with data results
If you have questions or suggestions about this information, contact support@paladinpos.com.
