
Note: Returns to Flexible Spending Accounts (FSA), i.e.. FLEX cards, are not supported in Paladin.
When a customer returns an item, Paladin can verify the purchase and add the original invoice number to the return invoice.
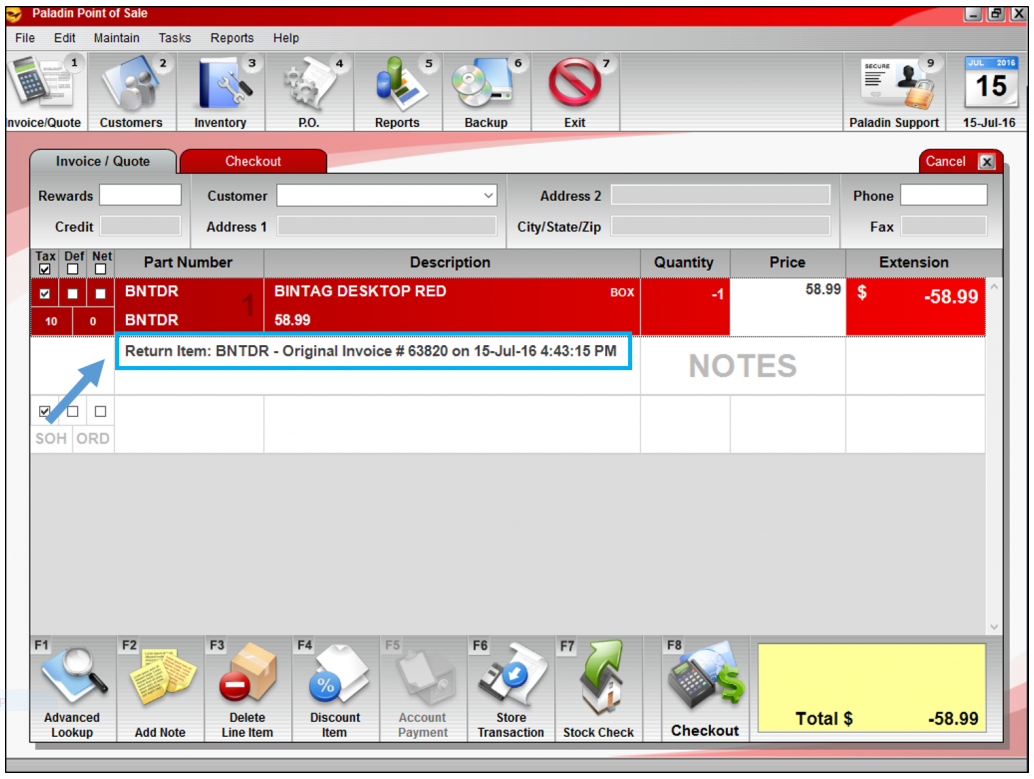
Figure 1: Original invoice number on the return invoice
This article provides instruction and information on the following:
- How to set up for return items
- Signatures and Customer Info on Returns
- How to set manager approval for returns
- How return items function works
- Customer not in database
- Customer in database
- How to view return items
- How to use Advanced Lookup to process returns
- How to process a return by using a barcode on a receipt
- How to issue a gift card for a returned item
- How to mark a returned item as defective
How to set up for return items
To set up Paladin to verify the purchase of a returned item and add the original purchase invoice number to the return invoice:
- In Paladin, from the main menu, select File > Setup.
- Select the Invoice (Store) tab.
- In the Invoice pane, check Capture Return Item Invoice Number.
- Click Save, then click Close.
Signatures and Customer Info on Returns
Lightly documented customer returns are a risky item for any store. Customer returns are a common mechanism used in employee theft of your cash, but an increasing risk is from your State’s sales tax collection department. We have seen several attempts by state government to disallow the sales tax credit from returned sales. The State’s arguments have centered on lack of adequate proof that the return is “real.” This is an issue if you don’t have any customer data or a signature.
Paladin offers protection from both of the above risks. You may enable a feature that collects not only customer data on returns, but a signature as well. If a return sale customer doesn’t have an account with you, the Additional Customer Info Required window opens in the payment wizard process. Here you may collect customer name and further ID as may be required.
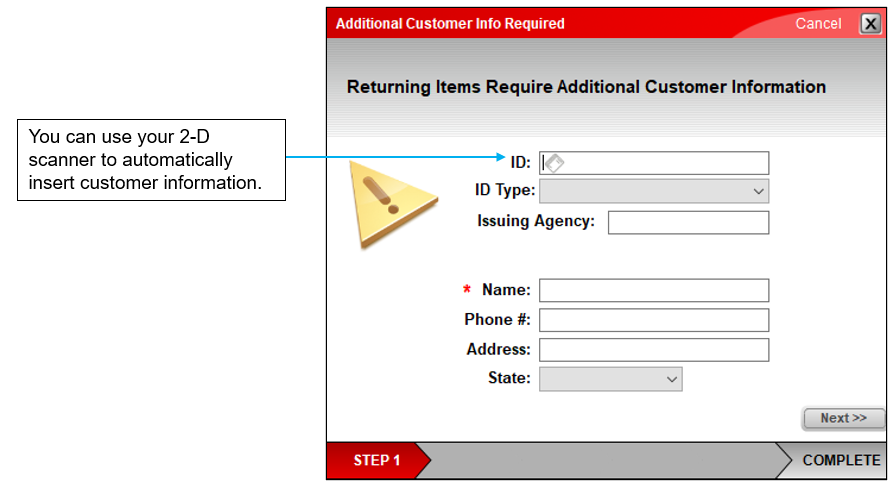
Figure 2: Additional Customer Info Required window
To set the requirement for signatures and customer information on returns:
- In Paladin, from the main menu, select File > Setup.
- Select the Invoice (Store) tab.
- In the Invoice pane, check Require Signature for Returns.
- Click Save, then click Close.
How to set manager approval for returns
This store specific control allows you to add real-time oversight to product returns. You can require that cashiers get manager approval when a product is returned. A note indicating which manager approved the return will be added to the invoice.
To enable this feature:
- In Paladin, from the main menu, select File > Setup.
- Select the Company tab.
- In the Manager Approval Required pane, check Returns Require Manager Approval.
- In the Require Manager Approval for Returns Over $ field, enter a dollar threshold to exclude small returns from requiring a manager’s approval.
- Click Save, then click Close.
This feature is presented to the cashier at the beginning of the payment wizard screens at checkout. To conclude the sale, a manager must enter their four digit password in the request box. The sale is concluded noting that manager ID # YYY approved the return.
How return items function works
In many stores, a cashier scans the return item and types a quantity of -1. This process does not guarantee that the item was purchased at your store or that the refund price is equivalent to the paid price. To prevent loss from occurring, you can recall all transactions.
Important: Expected behavior on rounding on returns:
- If a customer purchases 3 items for $10, then returns all 3 items, $10 will be refunded.
- If the customer returns 2 of the items, $6.66 will be refunded. If the last (third) item is returned on the following day, $3.33 will be refunded.
- Because of the way Paladin handles rounding, the discrepancy of $0.01 is expected.
- To receive the full amount, all items purchased must be returned together.
When you turn this feature on, each time you accept a return-to-stock item, Paladin attempts to verify that the invoice number referenced with this return exists and that it includes the item. Once the purchase is verified, a note with the original invoice number is added below the returned item on the invoice. How Paladin obtains the original invoice number depends on how you add the returned item to the invoice:
- Purchase verification when you add an item to an invoice directly or from Advanced Lookup inventory search results
- Purchase verification when you add a returned item to an invoice from Advanced Lookup sale history search results
Purchase verification when you add an item to an invoice directly or from Advanced Lookup inventory search results
In the Invoice/Quote module, when you add a return either directly to an invoice or from Advanced Lookup search results, a Return Item Invoice Number window opens and asks you for the original purchase invoice number.
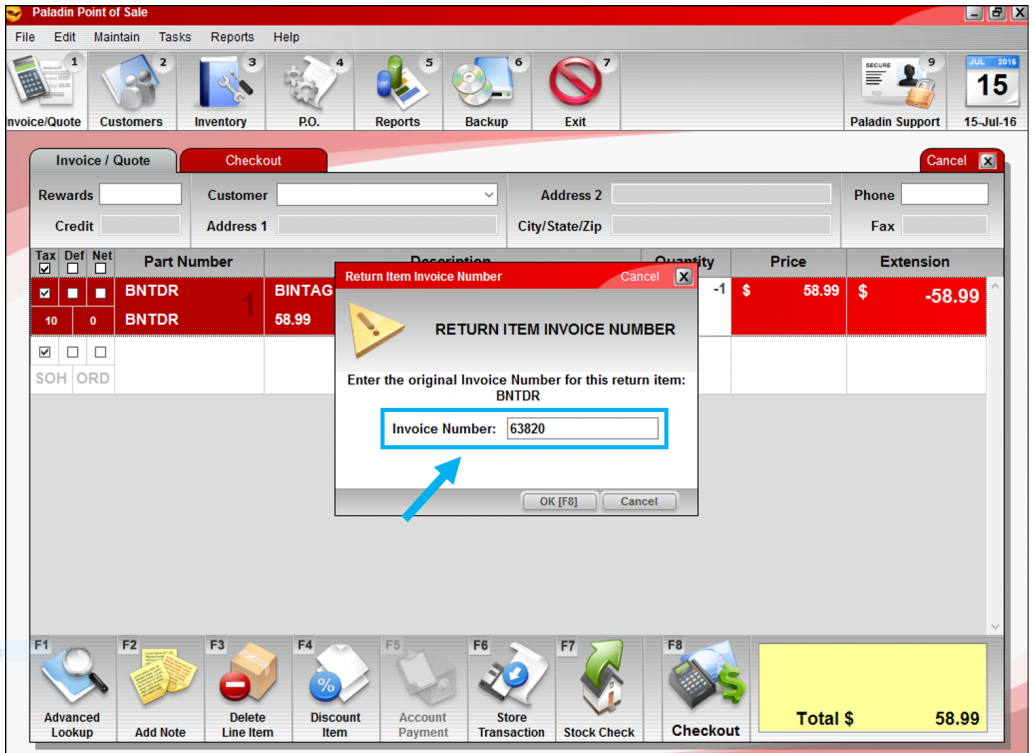
Figure 3: Return Item Invoice Number request window
When you scan the barcode on the bottom of the original invoice or manually enter the invoice number, Paladin verifies that the invoice exists and that it includes the returned item. If the purchase is confirmed, the original invoice number is added to the new invoice.
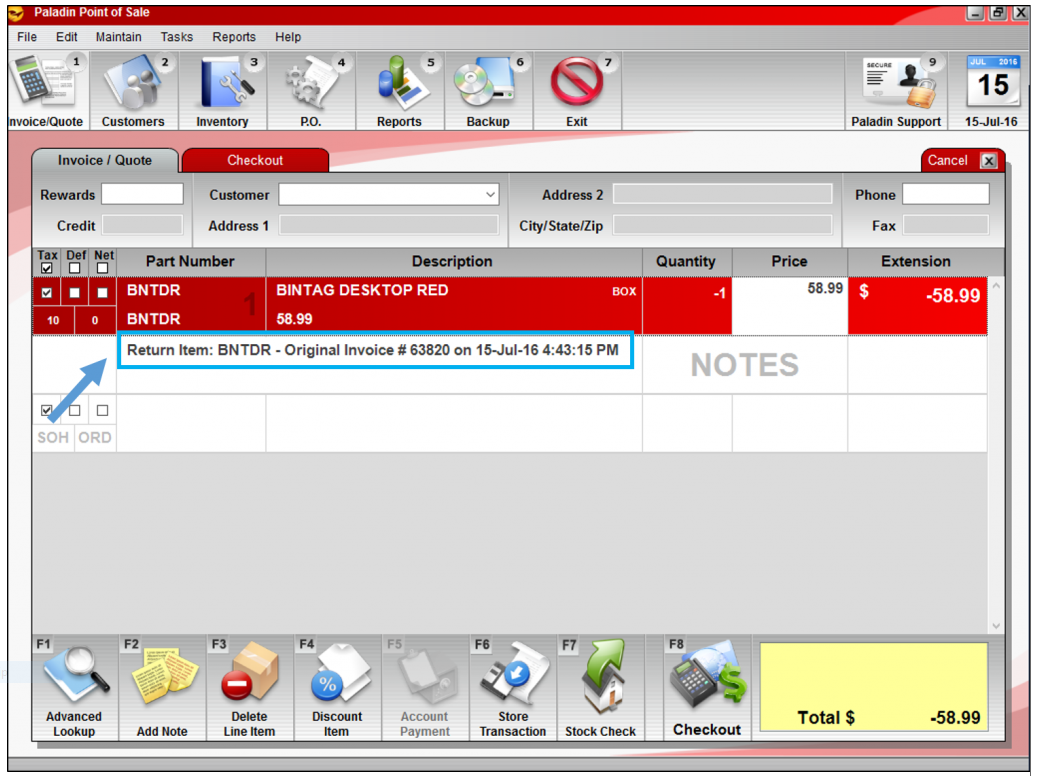
Figure 4: Original invoice number added to the new invoice
Similarly, if you use the Advanced Lookup inventory search to find and add returned items to an invoice, a Return Item Invoice Number window opens for each returned item.
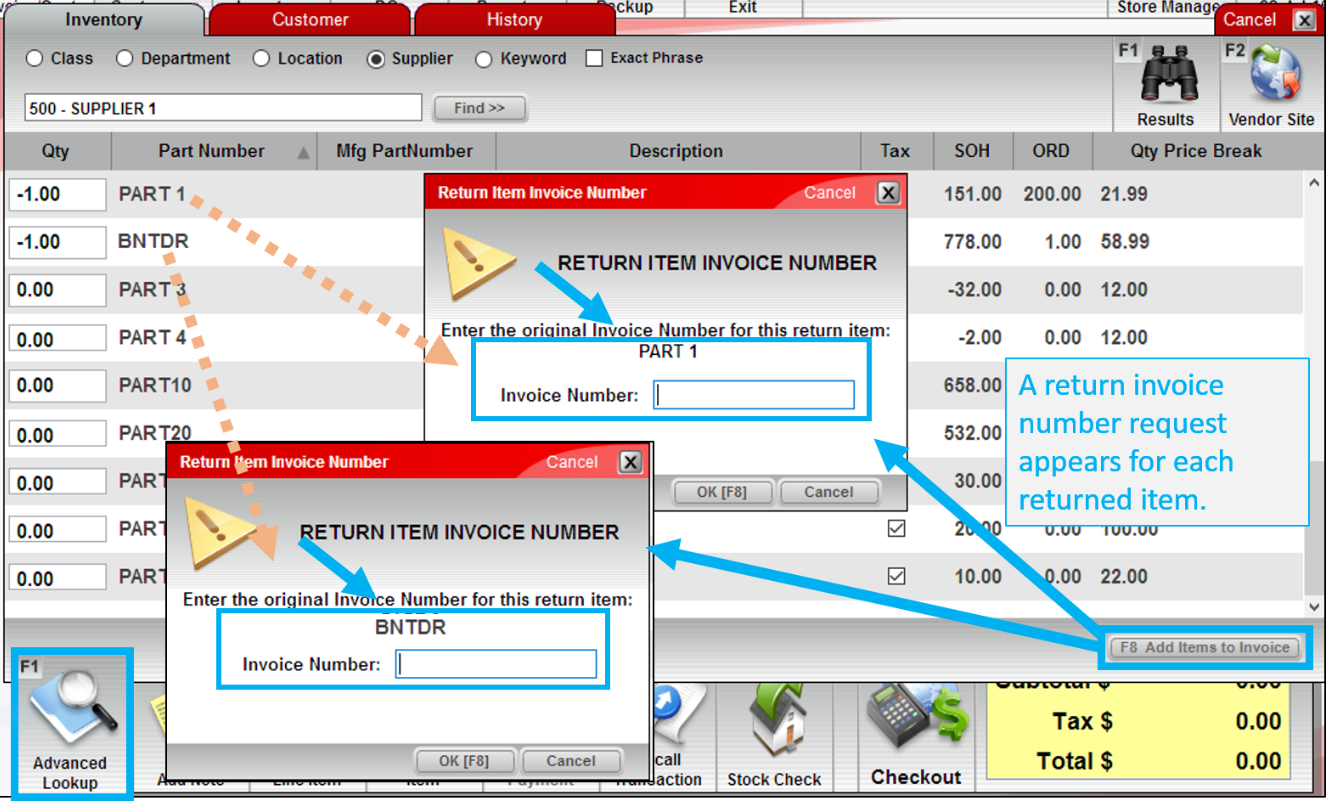
Figure 5: Return Item Invoice Number window in Advanced Lookup
After the invoice and purchase for each returned item is verified, the original invoice number is added to the new invoice.
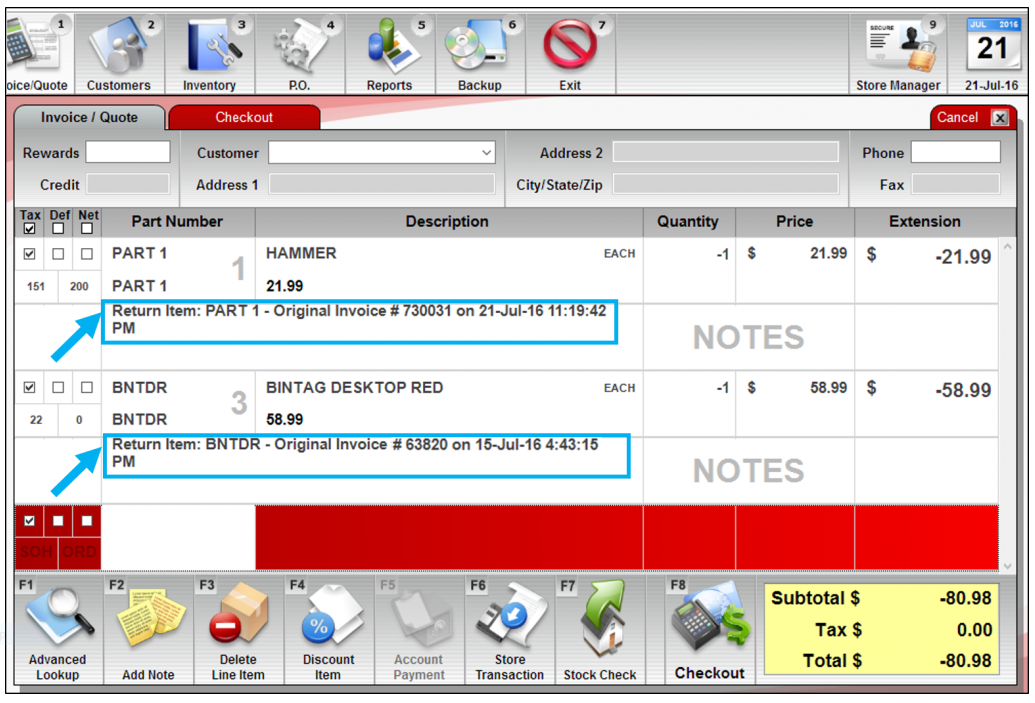
Figure 6: Original invoice number added to the new invoice
When purchase verification fails because the invoice number you entered in the Return Item Invoice Number window is not found, or if the part number is not on the original invoice, a *Invoice Number Not Found message is displayed.
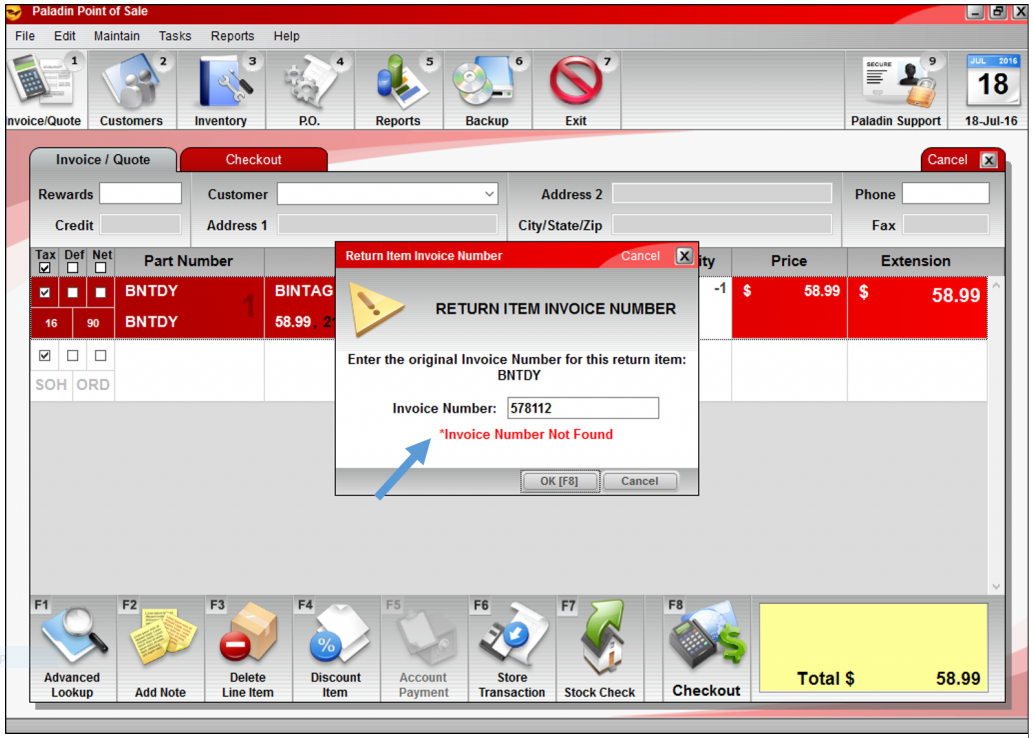
Figure 7: Invoice Number Not Found alert
If you click Cancel in the Return Item Invoice Number window, and proceed with the return, a note that this step was skipped is added to the return invoice.
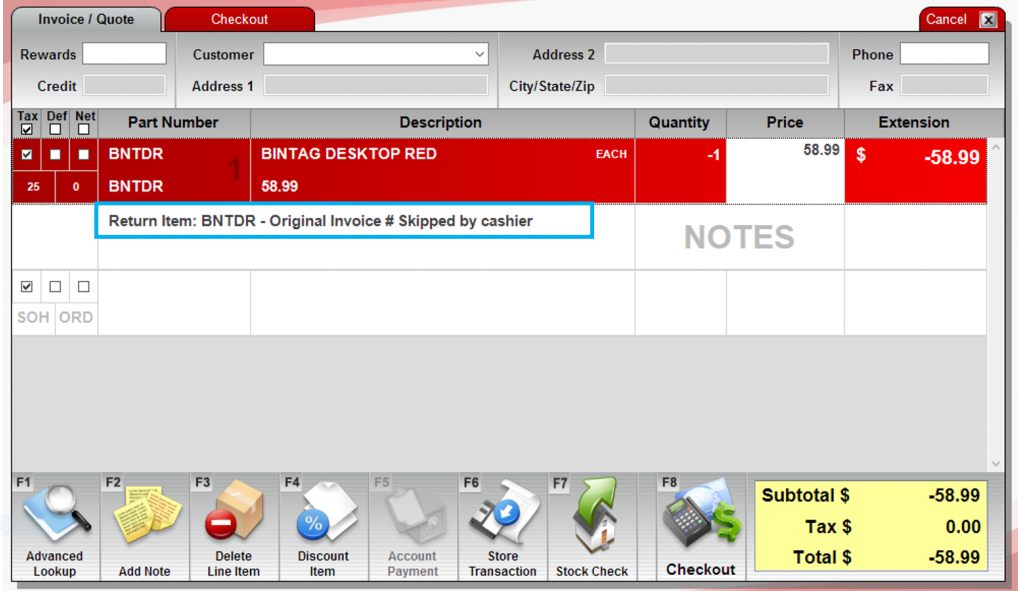
Figure 8: Note that Original Invoice step was skipped added to the return invoice
If there are good reasons to continue without purchase verification, you can include additional details on a separate Notes line.
Purchase verification when you add a returned item to an invoice from Advanced Lookup sale history search results
In the Advanced Lookup search window, on the History tab, you can use the Invoice option to search for an invoice and display the items from that sale. If you return an item from this view, the original invoice number is automatically included on the new invoice.
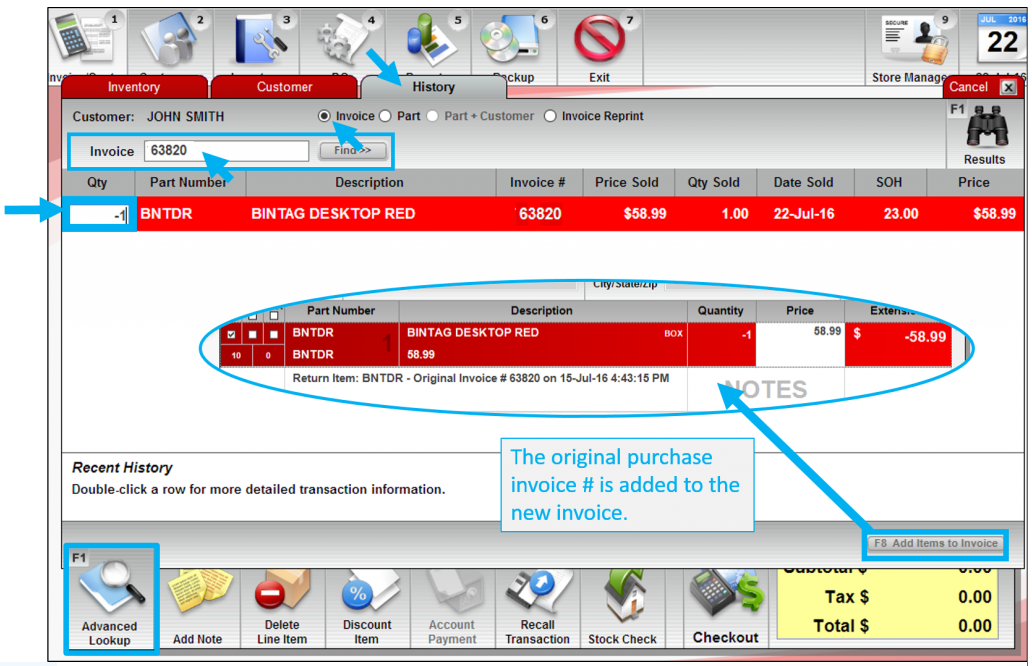
Figure 9: Original invoice number included on the new invoice
Similarly, you can use the Part or Part+Customer options to display an item’s sale history that includes invoice numbers. When you start the return process for a specific purchase, the original invoice number is also included. If you do not have the original invoice or invoice number, you can use this method to find and verify the purchase.
When the return is complete, the receipt displays the original invoice number.
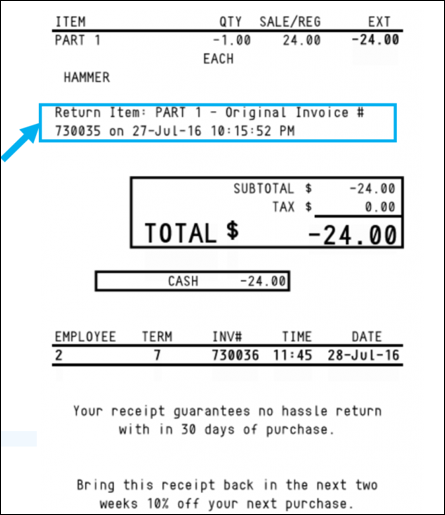
Figure 10: Receipt displays the original invoice number
Customer not in database
If the customer is not in your database, follow one of these procedures:
| No Receipt | Receipt |
|
|
Customer in database
If the customer is in your database, follow one of these procedures:
| No Receipt | Receipt |
|
|
How to view return items
In Paladin, you can research return functions on:
- All items on a particular invoice
- All items purchased by a specific customer
- All sales of a single part number for this customer
- All sales for all customers
To use this function:
- In Paladin, from the top ribbon, select the Invoice/Quote module.
- On the bottom ribbon of the module, press F1 Advanced Lookup.
- Select the History tab.
- On the top of the window there are radio buttons that can be enabled to define your search parameters:
-
-
- Invoice
- Part
- Part + Customer
- Invoice Reprint
-
When any of the part number lookup options is chosen, the part number, description, SOH, and current retail price of this part number are displayed in the search box header.
The function of the Quantity field remains unchanged. A negative quantity returns the product to the store (all four radio button modes). A positive quantity buys product from the store (Invoice mode only).
How to use Advanced Lookup to process returns
You can use Advanced Lookup to process a return for a customer.
Note: This process requires the invoice number from the original sale. For instructions on how to find an invoice in Paladin, refer to the Advanced Lookup KBA.
1. In Paladin, on the top ribbon, select the Invoice/Quote module.
2. On the bottom ribbon of the module, select F1 Advanced Lookup.
3. Select the History tab.
4. Enter the invoice number in the Invoice box, then click Find >>. The window opens displaying a line-by-line detail of all items purchased on the invoice.
5. Type a negative quantity into the box for each item that the customer wants to return.
6. Select F8 Add Items to Invoice.
7. In the Invoice/Quote tab, select F8 Checkout.
8. Select the appropriate payment type to complete the return.
Note: For instruction on processing defective returns, refer to the Defective items KBA.
How to process a return by using a barcode on a receipt
You can scan the barcode on a receipt for the following purposes:
-
- Create a new invoice based on the original receipt
- Return a product
- Sell an item at the original price
- Sell more quantities at the original price
To process a return using a barcode on a receipt:
- In Paladin, on the top ribbon, select the Invoice/Quote module.
- On the bottom ribbon of the module, click F1 Advanced Lookup.
- Click the History tab.
- Scan the barcode or enter the invoice number, then click Find.
- In the Qty column, enter an amount for each item that you want to add or subtract.
- To add items to an invoice, enter positive quantities.
- To subtract items from an invoice, enter negative quantities.
- Click F8 Add Items to Invoice.
- Complete the transaction.
How to issue a gift card for a returned item
- In Paladin, on the top ribbon, select the Invoice/Quote module.
- Scan the returned item.
- Under Quantity, enter -1 for each returned item.
- Scan a gift card.
- Under Price for the gift card, enter the total dollar amount of the returned item(s).
- Click Checkout.
- Click Cash, then press Enter.
- Swipe the gift card to activate it.
How to mark a returned item as defective
Note: If you or a customer find a defective item before it has been purchased, you must sell the item before you can follow this procedure.
- In Paladin, on the top ribbon, select the Invoice/Quote module.
- On the top left of the line item, check Def.
- Scan the defective item. In the Quantity box, -1 will appear.
Note: If more than one of the same item is being returned, change the amount in the Quantity box. To search with Advanced Lookup, select the Def check box first.
- On the bottom ribbon, click Checkout.
- Complete the transaction process.
If you have questions or suggestions about this information, contact support@paladinpos.com.
