
Note: This article applies to single stores only. For information on multi-store, refer to Multi-store: Import obscure inventory into a database.
This article provides instruction and information on the following:
- How to open an Excel document and retain the leading zeros
- How to correctly format column headers for importing
- How to save a document as a tab delimited file using Excel
- How to import inventory into Paladin
Important
- Before you start this process, you must create a backup of your data and read through this entire article.
- This procedure does not apply to multi-stores.
- This procedure must be done on the computer designated as the store server.
- Paladin offers data import services. If you need help, call Paladin for a quote.
- Do not import inventory data into Paladin until after store hours.
- Microsoft Excel 2007 or later is required for creating and editing files for importing. Note: The instructions for Microsoft Excel vary depending on the version you are running.
- You must import either a tab delimited file or an Excel file.
- Column headers must contain case sensitive, accurate spelling.
- Importing will fail if you have columns with data but you do not have column headers.
- Each row can only include one inventory item.
How to open an Excel document and retain the leading zeros
When importing part numbers or UPC codes (typically in the ALTPARTNUMBER field), using a tab-delimited format is essential for retaining leading zeros. To ensure these leading zeros are preserved, you’ll need to format the relevant cells as text in Excel. This is necessary because Excel automatically drops leading zeros when it interprets the data as a number, assuming the zeros are unnecessary.
By formatting any column that contains a leading zero as text, Excel will recognize the values correctly. This is especially important when dealing with fields, such as ALTPARTNUMBER, where the leading zeros are critical for accuracy.
To set this in Excel:
- Highlight the column you would like to retain the leading zeros.
- Right click on the highlighted column.
- Select Format Cells.
- In the Format Cells window, select Text .
- Press OK.
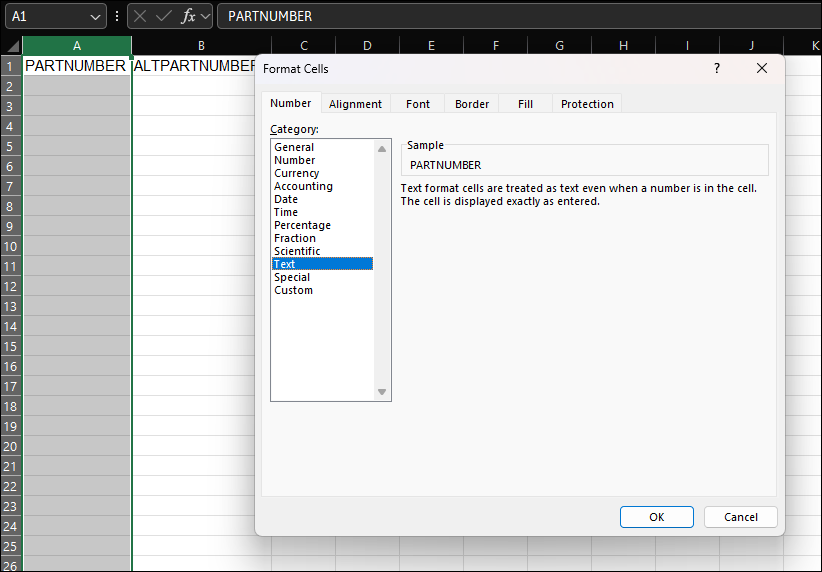
Figure 1: Excel/Format Cells
How to correctly format column headers for importing
- For instruction on how to retrieve all column headers, refer to the Export inventory data KBA.
- Once you have exported the file, remove any columns that are not a part of the required column headers (see below).
- Remove any additional columns that you are not updating. This step helps ensure that you don’t make unintended changes to your database.
- If you are importing a tab delimited file, refer to the How to save a document as a tab delimited file using Excel section in this article.
- If you are importing an Excel file, refer to the How to import inventory into Paladin section in this article.
| To do this | Recommended (Best Practice) column headers | Notes |
| Update existing records |
PARTNUMBER Other headers that you want to update:
|
Important: If supplier ID is imported in the file being used to update items, even if it is the same as what is currently assigned, Paladin will see this as an update and will appropriately change related fields, such as Order number. This could cause a loss of data; therefore, include all relevant supplier information in the correct columns if including supplier number. |
| Create new items |
|
Advisory: It is best to include all recommended column headers when adding new part numbers to ensure accuracy. Paladin recommends following this for smooth operation. |
Important: Blank columns will not be processed. The ID/Value pairs must exist and be set up in Paladin prior to running the importer. Many columns only hold the reference ID to its corresponding value. For example, if supplier 55 is ACME, then the value of SUPPLIER_NUMBER1 would have a value of 55, not the name ACME.
How to save a document as a tab delimited file using Excel
Important: Only perform this step if you are importing a tab delimited file. Each row in the file must refer to a single inventory item.
- Open the Excel worksheet that you want to import.
- On the File menu, click Save As, select Tab Delimited, rename the file, then click Save.
- Verify that the tab-delimited file that you just created is accurate.
How to import inventory into Paladin
Important: To make sure the import will function as expected, create a test import file with only a few items. If you make a mistake, you can restore the backup.
- In Paladin, on the top ribbon, select the Backup module.
- In the Backup window, click Yes.
- When the backup is finished, go to the shortcut for Backups, then verify the following information.
- Date of backup
- Time of backup
- Size of backup (Note: The size of the new backup should be higher than the previous one.)
- In Paladin, on the top menu, select Maintain > Data Viewer.
- Select the Inventory tab, then click the Import tab.
- Select either Tab Delimited or Excel from the list adjacent to the Load File button.
- Click Load File.
- Browse to the file you want to import, select the file, then click Open.
- In the Import Options pane, in the Inventory Type list, select Active Inventory or Obscure Catalog.
- Active Inventory: Inventory that is carried in your store.
- Obscure Catalog: Inventory that is available through your supplier.
- Check Add New Items or check Update Existing Items.
Important: If you have not already done so, you must create a backup before you click Import.
- Click Import.
- When the importing process is completed, click Close.
- In Paladin, on the top ribbon, select the Inventory module.
- Enter a part number from the import file, then check all fields for accuracy.
If you have questions or suggestions about this information, contact support@paladinpos.com.
