Report presets are useful for reports that you run frequently. You can set up a report to run automatically on daily, weekly, or monthly intervals and/or set up a button on the bottom ribbon of the Report module, that when pressed, runs the report with predefined settings.
In the Reports module, you can create nine Report Presets by defining the F1 through F9 keys as shortcut buttons.

Figure 1: Nine Report Presets
This article provides instruction and information on the following:
- How to create a Report Preset
- How to edit a Report Preset
- How to delete a Report Preset
- How to set up a scheduled report start time
- How to change a location for scheduled reports
- How to view auto-generated reports
How to create a Report Preset
- In Paladin, on the top ribbon, select the Reports module.
- In the Report Area pane, select a report area.
- In the Report List pane, select a report you want to schedule
- On the bottom ribbon, click F11 Create Preset.
- In the Create Report Preset window, in the Report Preset Settings pane, select an unused Report Preset number.
- In the Additional Settings pane, in the Button name box, enter a name for the report preset.
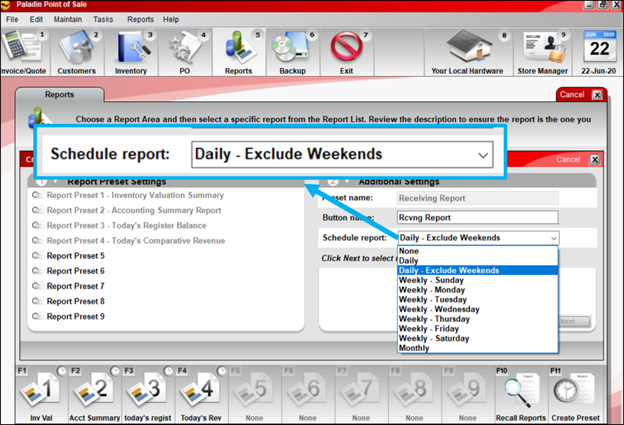
- From the Schedule Report list, select the automatic report interval. If you don’t want the report to run automatically, select None. In both cases, the report will appear on the bottom ribbon. You can run it at any time by clicking the report button on the bottom ribbon or by pressing the corresponding function key.

Figure 2: Schedule report
- Click F12 Next.
- For reports with a date range involved, a list of date range options appears in the Report Settings pane and provides the following options:
-
- Default Range for Report
- Current Day
- Prior Day
- Month To Date
- Prior Month
- Year To Date

Figure 3: Date range options list
- Specify the report settings, and in the Sorting Options pane, click F12 Save Preset.
How to edit a Report Preset
You can change the reports assigned to each button or change settings within the report preset.
- In Paladin, on the top ribbon, select the Reports module.
- On the bottom ribbon, click F11 Edit Preset.
- In the Edit Report Preset window, in the Report Preset Settings pane, highlight a report preset.
- In the Additional Settings pane, in the Button Name box, enter a name.
- In the Schedule Report list, select a time frame for creating the report, then click F12 Next.
- In the preset report’s window, enter or select information in the Report Settings pane, Additional Settings pane, and Sorting Options pane, then click F12 Save Preset.
How to delete a Report Preset
You can delete a Report Preset if it is no longer needed as an automatic report.
- In Paladin, on the top ribbon, select the Reports module.
- On the bottom ribbon, click F11 Edit Preset.
- In the Edit Report Preset window, in the Report Preset Settings pane, highlight a report preset.
- In the Additional Settings pane, click F10 Delete. The report preset and scheduled events will be deleted.
- Click F11 Exit.
How to set up a Scheduled report start time
You can schedule when to run a report, including just before opening or closing your store.
- In Paladin, from the main menu, select File > Setup.
- Select the Company tab.
- In the Report Options pane, in the Scheduled Reports Start Time box, enter the start time.
Note: You must use the 24-hour timeframe.
- Click Save, then click Close.
The Scheduled Reports feature includes automatic cleanup functionality.
Note: This functionality is the default and cannot be disabled.
Automatic cleanup functionality performs as follows:
- Daily scheduled reports will be deleted after 1 month and 5 days.
- Weekly Scheduled reports will be deleted after 2 months and 5 days.
- Monthly Scheduled reports will be deleted after 1 year and two months.
Note: Alternating files or file names could affect this functionality.
To archive these time-sensitive reports, contact your store’s network administrator.
How to change a location for scheduled reports
You can change the location of stored scheduled reports from the default location in the Paladin POS Reports folder.
- In Paladin, from the main menu, select File > Setup.
- Select the Company tab.
- In the Report Options pane, in the Scheduled Reports Network Share box, enter the new location.
- Click Create to share the scheduled reports on the network.
Note: If you cannot create the share folder, contact Paladin Customer Support.
- Click Save, then click Close.
How to view auto-generated reports
You can find copies of any report that is automatically generated.
- In Paladin, on the top ribbon, select the Reports module.
- On the bottom ribbon, click F10 Recall Reports.
- In the Recall Reports window, highlight the report, then click F12 Recall.
- To remove a stored report, highlight the report, then click Delete.
If you have questions or suggestions about this information, contact support@paladinpos.com.

