IMPORTANT: You must set up the tax definition before you can follow any other procedures listed in this article.
The following provide instruction and information on the following:
- How to set up a tax definition
- How to set up Tax Free definition
- How to assign a tax definition
- How to create a tax exemption message
- How to create an Itemized Tax Exempt Transaction report
- How to create a non-taxable department
- How to charge tax to a non-taxable customer at checkout
- How to change the tax definition on an entire order at checkout
- How to document a sales tax exemption at checkout
- How to change an item to non-taxable at checkout
- How to set tax detail on invoices
- Sales tax control for sales
- How to view and set customer tax details
- How to change the default tax information on a Customer account
- Paladin sales tax calculations and itemized taxes on invoices/receipts
- How to create a Sales Tax Details report
- How to generate historical invoice item tax data for the Sales Tax Details report
How to set up a tax definition
- In Paladin, from the main menu, select File > Setup.
- Select the Taxes tab.
- In the Tax Settings pane, in the Min taxable sale column, enter the minimal taxable amount.
- In the Tax Definitions pane, select the State, County, or City, then click New.
- In the Name box, enter a name for the tax definition (for example: Idaho, Wholesale, Non-profit, Government).
- In the Tax % box, enter the tax rate.
- Click Save.
- Repeat steps 4 – 7 for each new tax definition.
- In the Tax Settings pane, in the table, select the Default state tax, Default county Tax and Default city tax from their lists.
- Click Save, then click Close.
Tip: You can assign a tax rate definition to an individual customer in Paladin’s Customers module.
How to set up Tax Free definition
To set up a Tax Free definition that can be applied to ALL items (not just individual items, such as in Tax holiday settings), perform the following:
Configure Paladin
- In Paladin, from the main menu, select File > Setup.
- Select the Taxes tab.
- In the Tax Definitions pane, enable one of the following:
-
- State
- County
- City
- Click New.
- Add the name of the tax definition with associated date (the new name will appear in the Name field).
- Repeat steps 3 – 5 if more than one tax is applicable.
- Click Save, then click Close.

Figure 1: Paladin configuration Taxes tab
Process the tax free transaction
To process a tax free transaction:
- In Paladin, on the top ribbon, select the Invoice/Quote module.
- Enter or select a customer account from the Customer list.
- Add items to the transaction.
- Press F8 Checkout.
- In the Checkout tab, select F8 Tax.
- In the Tax Window, enable the tax definition you set up (this example is TAX HOLIDAY).
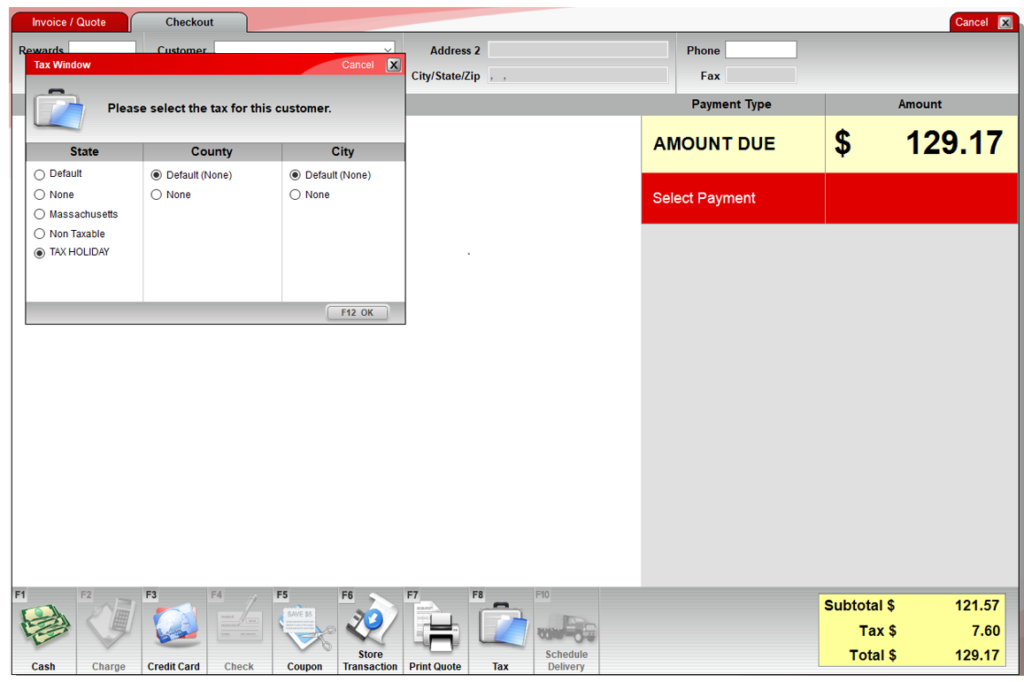
Figure 2: TAX HOLIDAY enabled in Tax window
- Click F12 OK. The taxes are removed from the transaction.
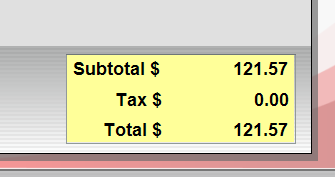
Figure 3: Tax is removed from transaction
- Complete the payment process.
Figures 4 and 5 show how this tax free transaction appears on receipts and the Comparative Revenue report.
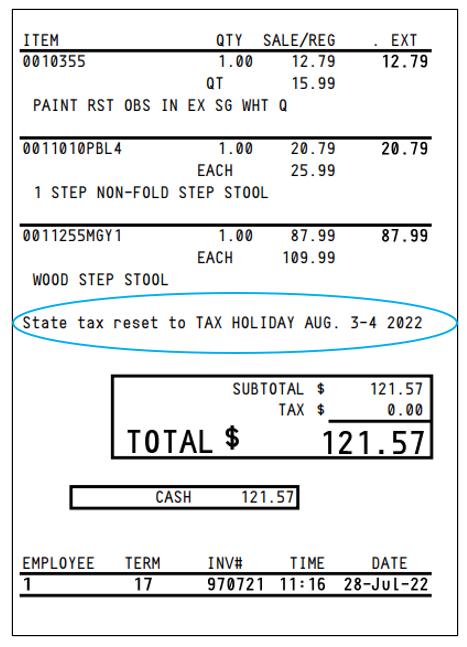
Figure 4: Tax Holiday show on receipt

Figure 5: Tax Holiday shown on Comparative Revenue report
How to assign a tax definition
- In Paladin, on the top ribbon, select the Customers module.
- Enter or select a customer account from the Customer list.
- In the Tax Information pane, view the current tax definitions for state, county, and city
- On the bottom ribbon, click F8 Tax.
- In the Tax Window, verify the tax information for State, County, and City.
- Click F2 Finish to close the Tax Window.
- In the Customers tab, click F12 Save.
How to create a tax exemption message
- In Paladin, from the main menu, select File > Setup.
- Select the Taxes tab.
- In the Tax Exemption pane, check Require Signature for Tax Exemption.
- In the Exemption Receipt Text box, enter a message.
- Click Save, then click Close.
The message appears on invoices/receipts.
How to create an Itemized Tax Exempt Transaction report
In Paladin, you can identify transactions that include some tax-exempt items.
- In Paladin, on the top ribbon, select the Reports module.
- In the Report Area pane, select Sales Analysis > What I Need to Know.
- In the Report List pane, select Transaction Report.
- In the Choose Report pane, click F12 Next.
- In the Transaction Report window, in the Report Settings pane, enter the data that you want.
- In the Additional Settings pane, in the Customer Name box, enter TaxExempt, then enter other optional data.
- In the Sorting Options pane, enter sorting data.
- Click F12 Run Report.
A PDF file of the report opens.
How to create a non-taxable department
- In Paladin, from the main menu, select File > Setup.
- Click the Dept tab.
- In the Departments section, in the ID-Name list, select a department that you want to make non-taxable for every item. The department appears in the Name box.
- Select the check boxes that apply:
-
- Dept non-taxable
- State non-taxable
- County non-taxable
- City non-taxable
- Click Save, then click Close.
How to charge tax to a non-taxable customer at checkout
- In Paladin, on the top ribbon, select the Invoice/Quote module.
- Enter or select a non-taxable customer account from the Customer list.
- Enter or scan a part number in the Part Number box.
- Press Enter.
- On the bottom ribbon of the module, click F8 Checkout.
- On the bottom ribbon of the Checkout tab, click F8 Tax.
- In the Tax Window, select the defined State, County or City tax that you need to apply to this transaction.
- Click F12 OK. The Tax $ will increases when the taxable amount is applied.
- On the bottom ribbon of the Checkout tab, select the appropriate tender type, then press Enter to complete your transaction.
- In the Transaction Complete window, select one of five options to answer Print another copy?, then click Done.
- View the receipt for the following data:
- Taxable and non-taxable items
- Line items that indicate reset tax items
- Amount of tax paid
Note: The default settings revert back on all subsequent invoices/receipts.
How to change the tax definition on an entire order at checkout
- In Paladin, on the top ribbon, select the Invoice/Quote module.
- Enter or select a customer account from the Customer list.
- Enter or scan a part number in the Part Number box.
- Press Enter.
- On the bottom ribbon of the module, click F8 Checkout.
- In the Checkout tab, on the bottom ribbon, click F8 Tax.
- In the Tax Window, select the State, County, and City options, then click F12 OK.
- Proceed to checkout. A note appears on the receipt stating that the default tax definitions were applied to this transaction.
Note: The default settings revert back on all subsequent invoices/receipts.
How to document a sales tax exemption at checkout
If an Internal Revenue Service (IRS) agent requests information on sales tax on tax-exempt sales, you will need to provide detailed customer information.
You can choose one of the following settings for documentation:
-
- Default setting: At checkout, when a customer account is not specified, and tax is removed from an item, a message opens requesting the customer’s name, address, and ID (driver’s license number or tax certification number).This information is stored and printed on all receipts and invoices.
- Optional setting: At checkout, you can also print the terms and conditions of your sales tax-exemption policy and require the customer’s signature as proof of agreement with the policy.
- In Paladin, from the main menu, select File > Setup.
- Select the Taxes tab.
- In the Tax Exemption section, check Require Signature for Tax Exemption.
- In the Exemption Receipt Text box, enter your tax exemption policy and requirements. You can enter up to 510 characters.
- Click Close, then click Save.
Notes:
- The tax exemption will appear on all subsequent invoices and sales receipts.
- Inventory items and non-taxable departments will not be affected.
How to change an item to non-taxable at checkout
Important:
-
- The change is only effective per individual transaction.
- Consult an accountant or tax attorney for the correct tax configuration.
- In Paladin, on the top ribbon, select the Invoice/Quote module.
- Enter or select a customer account from the Customer list.
- Enter or scan a part number in the Part Number box.
- Press Enter.
- In the Invoice/Quote tab, highlight the item that you want to make non-taxable.
- In the Tax column, click to remove the check mark from the Tax check box.

Figure 6: Tax checkbox
- The Manager Approval window opens, and a manager password is required. Enter the password and click OK.
Optional: Paladin provides Remote Manager Approval, that when set up in Paladin, sends text messages to the manager’s mobile phone describing the need for approval along with a link to the Paladin Remote Manager Approval website where they can either accept or deny the approval request. For more information, refer to the Remote Manager Approval KBA. If Remote Manager Approval is not set, just the manager password is required.
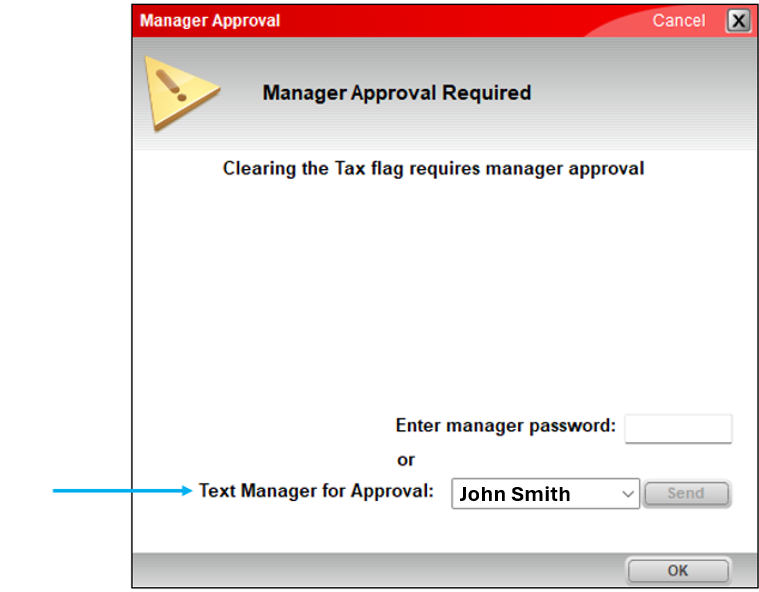
Figure 7: Manager Approval window
- On the bottom ribbon of the module, click Checkout.
- Complete the transaction process.
How to set tax detail on invoices
Stores have legislation and administrative rules enacted that require collection of new taxes and fees from their customers. Along with the new taxes come new and different requirements for detailing these events.
Paladin recommends you review the names given to your tax structures as they will be visible to all customers (if this feature is enabled).
Paladin can detail all taxes on your documents.
- In Paladin, from the main menu, select File > Setup.
- Select the Taxes tab.
- In the Tax Settings pane, check Separate Tax Levels on Invoices.
- Click Save, then click Close.
The Confirm Tax Changes window opens.

Figure 8: Confirm Tax Changes window
You can also change the level of detail from six decimals to two decimals.
To add this level of detail, check Round Taxes to 2 decimals on Invoices.
Note: This checkbox is only active when Separate Tax Levels on Invoices is checked.

Figure 9: Round Taxes to 2 decimals on Invoices
Taxes rounded to 2 decimals are displayed in the Tax field of Full Sheet Invoices, Quotes, and Receipts.
Note: This configuration is disabled by default.
Sales tax control for sales
As new sales and promotions escalate in complexity, and sales tax rules become even more unique (and difficult to manage), Paladin provides enhanced controls for the management of sales tax in your store. These controls focus on a sale-by-sale management of sales tax calculation.
You can select the correct ‘mode’ with every sale list in your Sale List management system.
- In Paladin, from the main menu, select File > Setup.
- Select the Sale List tab.
- Click the Type column header to sort sales by their type.
- Click Save, then click Close.
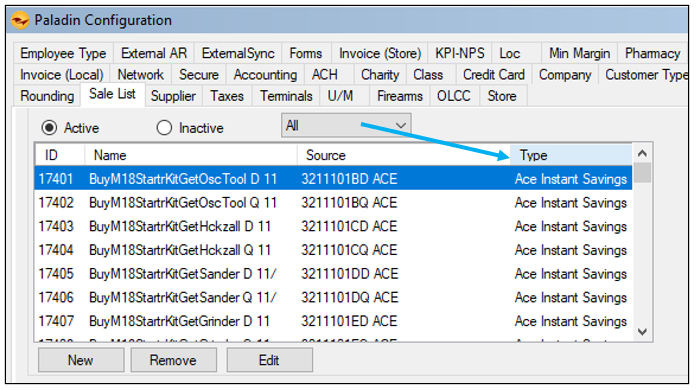
Figure 10: Sales type
As you click on different Sale Lists, notice the checkbox beside “Sale Reduces Taxable Amount” may be different. It is common to set Normal type Sale Lists to allow the sale to reduce the taxable amount due. It is also common for Special Promo and Ace Instant Savings to NOT reduce the taxable amount. Each store is ultimately responsible for setting this value to meet the requirements of their state for every active sale list.
How to view and set customer tax details
Paladin’s Tax Definitions Customers with this tax detail allows you to add every active State, County, and City tax defined to all, or just, particular customers.
To set this up:
- In Paladin, from the main menu, select File > Setup.
- Select the Taxes tab.
- In the Tax Definitions pane, enable which tax definition you want to see customers associated with. The choices are State, County, City.
- Click Save, then click Close.
After enabling a tax definition, the Customers with this tax field displays a list of customers using that tax definition.
As shown in Figure 9, the State tax definition was enabled, and the Customers with this tax field is populated accordingly.
Note: If you want to remove a Tax definition from a customer, select the tax definition from the Tax Definitions table, select the customer from the Customers with this tax table, then click Remove.
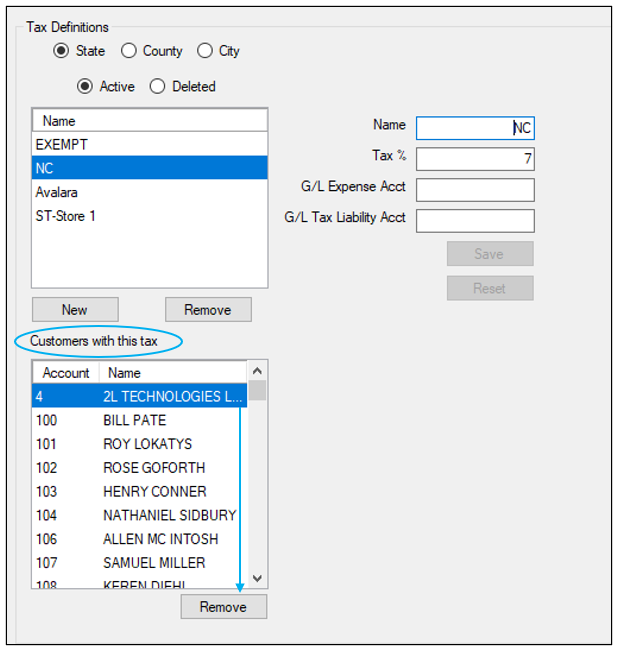
Figure 11: Tax tab/Remove Customer with this tax option
How to change the default tax information on a Customer account
Note: Before you begin this procedure, the correct tax definitions must be set up; therefore, it is recommended to consult an accountant or tax attorney. When you change the default tax definition, it will be applied to the current transaction and subsequent transactions.
- In Paladin, on the top ribbon, open the Customers module.
- Enter or select a customer account from the Customer list.
- On the bottom ribbon, click F8 Tax.
- In the Tax Window, select the correct tax brackets needed for the account.
- Click F12 Finish.
- In the Customers tab, click F12 Save.
Paladin sales tax calculations and itemized taxes on invoices/receipts
Paladin tax settings let you define multiple tax definitions (rates) within three tax categories. The categories are labeled State, County and City in Paladin, but you can use them for any tax type.
You can apply up to three tax definitions (rates) per purchase, but no more than one from each tax category.
Tip: If you require more than three tax categories, or are interested sales tax automation, you can use Paladin’s integration with Avalara Avatax. Learn more
When you finalize a purchase, Paladin calculates each individual tax rate. The combined tax total will always sum to an exact penny (two decimal) amount.
If you choose to show individual tax amounts on the invoices/receipts instead of the tax total, the individual taxes will appear to six decimal places designated with a tilde (~). The tilde indicates that the displayed amounts are approximate, and any additional non-zero decimal places are not shown.
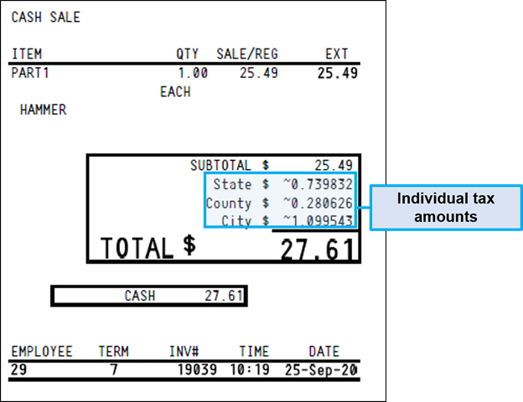
Figure 12: Tax amounts on receipt
Paladin has determined that this is the best and most accurate way to display itemized taxes on invoices/receipts. It is not a good solution to round the individual taxes to the penny (two decimal places) because the rounded numbers do not always add up to the total tax amount. This can make your invoice/receipt purchase total appear incorrect when it’s not.
To show individual taxes on invoices/receipts:
- In Paladin, from the main menu, select File > Setup.
- Select the Taxes tab.
- In the Tax Settings pane, check Separate Tax Levels on Invoices.
- Click Save, then click Close.
How to create a Sales Tax Details report
The Sales Tax Details report provides state, county, and city tax details by invoice line item and includes a tax summary with taxable and non-taxable sales totals. The report opens as an Excel worksheet and can be created for a period of up to 31 days.
To create the Sales Tax Details report:
- In Paladin, on the top ribbon, select the Reports module.
- In the Report Area pane, select Sales Analysis > What I Need To Know.
- In the Report List, click Sales Tax Details.
Note: The following is displayed in the Report Description pane:

Figure 13: Reports module/Report Description pane
- In the Choose Report pane, click F12 Next.
- In the Sales Tax Details window, in the Report Settings pane, in the Invoice Date row, specify a date range for 31 days or less.
- Optional: In the Additional Settings pane, if you want to include line items that are notes, check Show invoice notes.
- In the Sorting Options pane, click F12 Run Report.
- An Excel icon will appear on the bottom taskbar of your computer.
- Click the Excel icon to open the report.
Note: If you need tax details to support an audit, contact Paladin Support (800-725-2346 or support@paladinpos.com).
Figure 14 shows Line item details in the Sales Tax Details report:
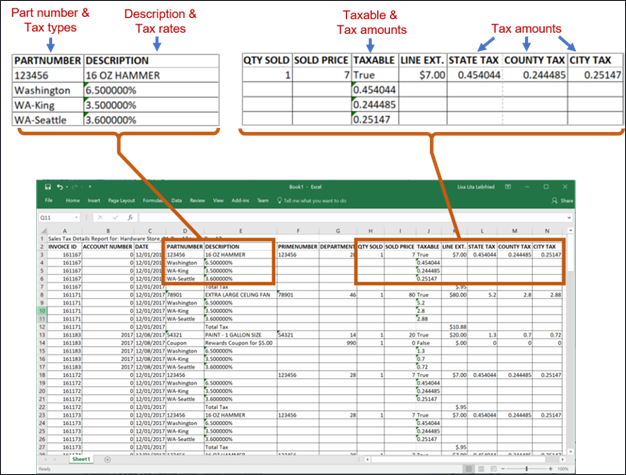
Figure 14: Sales Tax Details report
Figure 15 shows a Tax summary with taxable and non-taxable totals included at the bottom of the worksheet:
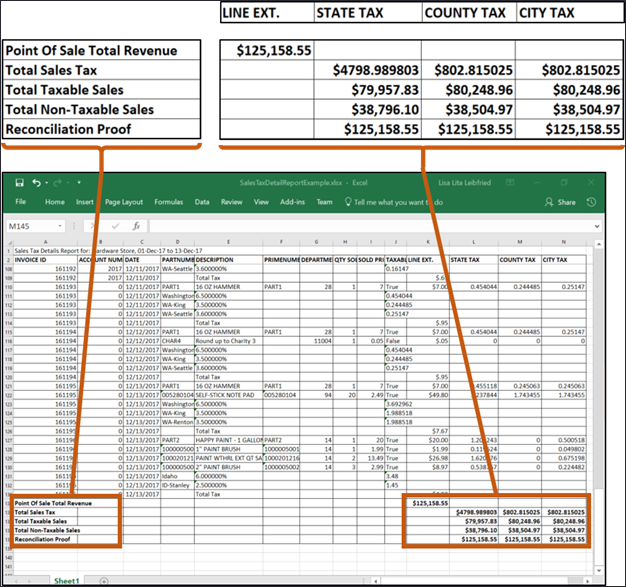
Figure 15: Tax Summaries
The following information will help you understand the tax summary values:
- The Totals values match the Comparative Revenue report revenue and tax totals.
- The Total Taxable Sales and Non-Taxable Sales values break down the taxable and non-taxable sale totals for each tax type and are the sum of individual line items.
- Each value in the last row is the sum of all taxes collected (State Tax, County Tax, and City Tax) and the column’s Total Taxable Sales and Non-Taxable Sales values.
The Sales Tax Details report complements the Comparative Revenue report, which calculates taxable and non-taxable values by line item instead of by invoice.
Example: Sales tax details for each tax type (state, city, etc.) with the following conditions:
- The taxable sales total is the sum of the line items that were taxed.
- The non-taxable sales total is the sum of the line items that were not taxed.
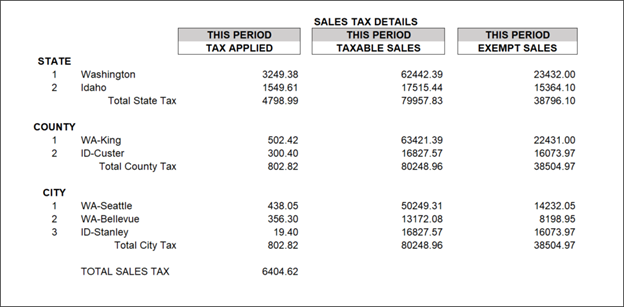
Figure 16: Tax shown in Comparative Revenue report
Note: When you run the Sales Tax Details report, the following message may open:
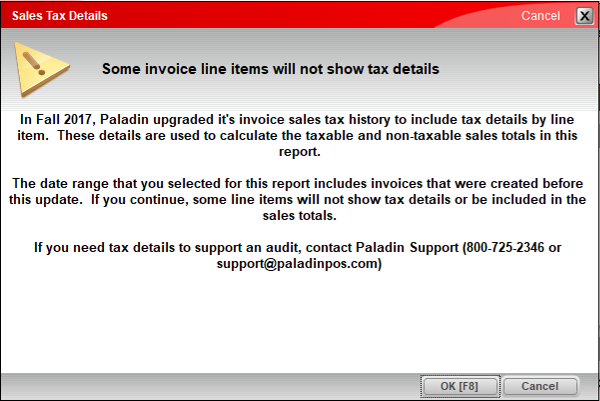
Figure 17: Sales Tax Details message window
If you click OK to continue with the report, a note opens at the bottom of the spreadsheet, and State, County, and City Tax totals will not reflect all sales and may be zero (0).
Note: When you run the Comparative Revenue Report, a message opens below the SALES TAX DETAILS table. Paladin also estimates and itemizes sales tax amounts. These estimates appear with a tilde (~).
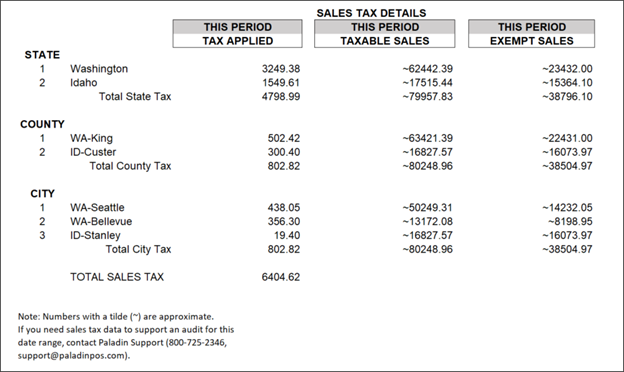
Figure 18: Sales Tax Details shown in Comparative Revenue report
How to generate historical invoice item tax data for the Sales Tax Details report
- In Paladin, from the top menu, select Maintain > Data Viewer.
- Select the InvoiceItem Taxes tab.
- In the Generate Historical Invoice Item Taxes pane, select the From date. The To date will automatically appear as 31 days later.
- Click Generate Historical Invoice Item Taxes. The Errors pane appears.
- Optional: Create the Sales Tax Details Report. To learn more, refer to: How to create the Sales Tax Details Report
Note: If you changed the taxable status for a department during this date rate range, those items will not calculate correctly and will appear as errors.
If you have questions or suggestions about this information, contact support@paladinpos.com.

