
The process of creating and printing month-end statements has evolved in Paladin. With build 5119 and higher, a new month-end statements process has been implemented. Month-end statements now process automatically overnight on the day of the month the previous statement run was performed (Note: A different date can be set). The statement generation process is completely separated from the printing process, and printing and/or emailing statements can occur at different times, anytime you choose.
But, month-end statements can still be printed manually (follow the instructions in this article).
If a store wants to move to the automatic printing of month-end statements, refer to: Automatic Month-End Statement process in the Month-end statements KBA.
Note: Paladin now protects from emailing duplicate month-end statements by requiring a two-week period (14 days) between statement runs. If a client needs to generate statements within 14 days of the previous statement run, they need to contact Paladin Customer Support (1-800-725-2346, option 2 or support@paladinpos.com).
Before printing, there are settings needed. These are covered in the following sections:
- Setting up Receivables
- Setting up Network
- Setting up Store email
- Set Email delay
- Setting up Customer accounts
- How to print month-end statements
The final section of this document gives instruction on printing the month-end statements.
Setting up Receivables
- In Paladin, from the main menu, select File > Setup.
- Select the Receivables tab.
- In the Statements pane, check Enable Statement Generation.
- Set up settings/preferences. For detail of the settings, see the Receivables tab KBA.
Note: The following four options do not directly apply to running/printing statements:
|
Settings/Preferences |
|
|
Display Prompt Payment Discount After Balance is 0 |
Once the account balance is 0, it will show the Prompt Payment Discount. |
|
Disable Credit Balance Checkout Message |
Will not displays the customer’s credit balance in the checkout screen of the Invoice/Quote module. (Store employees would otherwise see this while a customer is checking out.) |
|
Print Balances on ROA Receipts |
The remaining account balance will show on the bottom of an account payment receipt. |
|
Account Payment Reverse Discount/Payment Fields |
By having this selected, the Payment field will be on top. If not selected, the Discount field will be on top. This applies to all account payment windows. |
- Click Save, then click Close.
Setting up Network
- In Paladin, from the main menu, select File > Setup.
- Select the Network tab.
- In the Network pane, click the ellipses […] next to the Report Printer box.
- In the Print window, select the printer you want to set from the Name box and click OK.
- Click Save, then click Close.
Setting up Store email
- In Paladin, from the main menu, select File > Setup.
- Select the Forms tab.
- In the Email Options pane, enter your email settings, which you can find on your email provider’s website.
- Enter in another email in the Send Test Email To -> text box and click Send Test Email To -> to verify that your email is set up correctly.
- Click Save, then click Close.
Note: Your store needs an email address set up in Paladin for you to email statements. If you do not have this set up, Paladin will not know where to send the email statements from. This is also beneficial for emailing invoices as well.
Set Email delay
To set email delay:
- In Paladin, from the top menu, select Maintain > Data Viewer > Settings.
- In the Reports/Statements pane, there are two options:
- Email Statements – Pause 60s After Each Email Failure. Check this to have a 60 second delay after an error sending email.
- Pause After Each Statement Email. Enter the time in the box up to 60 seconds. As noted, the time is in seconds and decimals allowed.
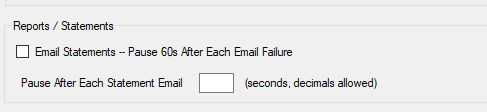
Figure 1: Reports / Statements/Email options
Setting up Customer accounts
Customer email set up
Follow these steps for each customer you would like statements emailed to.
- In Paladin, on the top ribbon, select the Customers module.
- Enter or select a customer account from the Customer list.
- In the Contact Information pane, click in the E-mail box.
- In the Email manager window, type the customer’s email in the Enter email: box.
- Click Add, then click F12 Finish.
- In the Form Control pane, check E-mail statement copies? and Create month-end statement?
- Click F12 Save.
Customer specific settings
For Balance Forward and Open Items:
- In Paladin, on the top ribbon, select the Customers module.
- Enter or select a customer account from the Customer list.
- Open the Credit tab, and in the Credit pane, enable either Balance Forward Stm. or Open Item Stm..
- Click F12 Save.
Note: Balance Forward Stm. is the standard balance/credit structure. That is, pay and the balance goes down (automatically paying the earliest invoice first). Open Item Stm. is for customers who pay full invoices off at a time, meaning you need to specifically apply payments to the corresponding invoice. This is done by:
- On the bottom ribbon of the Customer module, click F6 Payment Management.
- In the Payment Management window, select the invoice the customer wants to pay from either the Charge Invoices pane or Credit Invoices pane.
For Prompt Payment Discount:
- In Paladin, on the top ribbon, select the Customers.
- Open the Credit tab, and in the Credit pane, select between the following:
- Trade Discounts. This selection will cause all the customer’s transactions to never show discounted prices when charged to their account. However, the discounts are still applied and will only show in their month-end statement.
- Percentage. This tells Paladin that the customer gets a prompt payment discount. In the text box to the right, enter a number that will be recognized as the percentage amount of the discount. If Respect Min Margin is checked, you are telling Paladin not to allow any item to be discounted to a price lower than your minimum profit margin.
- Click F12 Save.
For Service Charge and Past Due Hold:
- In Paladin, on the top ribbon, select the Customers module.
- Open the Credit tab, and in the Credit pane, select between the following:
- Apply Service Charge? This lets Paladin know that you want this customer to receive a service charge when their account becomes past due.
- Ignore Past Due Hold? This tells Paladin to ignore the invoice hold rule if Invoice Hold When was set in Receivables from Paladin Configuration.
- Click F12 Save.
How to print month-end statements
When you produce a month-end statement, service charges and discounts are calculated, account reports are developed, and account statements are printed/emailed automatically.
- In Paladin, on the top ribbon, select the Reports module.
- In the Report Area pane, select Accounts Receivable > Statements.
- In the Report List pane, select Month-End Statements.
- Under Choose Report, click F12 Next.
- In the Month-End Statement Generation window, read the information provided under Report Settings to understand what tasks are performed automatically.
- Enter the correct date In the Statements include all activity prior to list. You have the option to change the date, specifically back dating if needed.
- In the Type the word YES to proceed box, type Yes.
- Under Sorting Options, click F12 Run Report.
- In the Test Print window, click Yes if a test page printed.
- On the lower right hand corner of the Month-End Statement Generation window, a Gathering Data… field appears with a red loading bar showing the status of the gathering. Once the data has been gathered, the loading bar will restart and show several different titles to indicate what Paladin is doing and showing in red the status of the loading. When reports have been generated, the Account Summary Report opens and statements will start printing. Any customer accounts that have been set up with an email address will have statements emailed automatically.
- When printing is done, the Statement Generation window opens with the options to:
-
- Reprint Statements. You can choose the Starting Customer and the Ending Customer, then click Reprint.
- If you do not want to reprint any statements, next to Was printing successful?, click Complete.
If you have questions or suggestions about this information, contact support@paladinpos.com.
