
This article provides instruction and information on the following:
- Automatic Month-end Statement process
- Benefits and changes
- Enhanced Month-end statements functionality
- Multi-store setup and requirements
- How to run Month-end statements
- Manual statement run
- Account Summary Report
- How to reverse a Month-end statement
- How to save Month-end statements for bulk mailing
Automatic Month-end Statement process
Paladin is in the process of rolling out the automatic Month-end statement process. To see if it has rolled out to your store(s):
- In Paladin, from the main menu, select File > Setup.
- Select the Receivables tab.
- In the Statements pane, ensure Enable Statement Generation and Enable Automatic Statement Generation are checked.

Figure 1: Enable Automatic Statement Generation
With this, Month-end statements will process automatically overnight on the day of the month the previous statement run was performed. (Note: A different date can be set). The statement generation process is completely separated from the printing process, and printing and/or emailing statements can occur at different times, anytime you choose.
Benefits and changes
Benefits:
- Statements are ready to print or email immediately after overnight processing.
- Reprinting and re-emailing statements is easy and fast.
- Specific ranges of customer name or ID can be set to restart printing or emailing.
- Statements can be printed or emailed in alphabetic or numeric order.
- If any email fails, there is the option to resend only the failed email. This means you will not have to start all over and send email to all customers, just to the ones that failed to be sent. The same goes for printing statements.
Changes:
- The Account Summary Report will no longer open automatically when printing statements. This report is now stored and accessible by selecting F10 Recall Reports in the Reports module. For information and instruction, refer to the Account Summary Report section in this article.
Before printing and emailing, there are settings needed. These are covered in this article in the following sections:
Setting up Network
- In Paladin, from the main menu, select File > Setup.
- Select the Network tab.
- In the Network pane, click the ellipses […] next to the Report Printer box.
- In the Print window, select the printer from the Name box you want to set, then click OK.
- Click Save, then click Close.
Setting up Store email
- In Paladin, from the main menu, select File > Setup.
- Select the Forms tab.
- In the Email Options pane, enter your email settings, which you can find on your email provider’s website.
- Enter in another email in the Send Test Email To -> box and click Send Test Email To -> to verify that your email is set up correctly.
- Click Save, then click Close.
Note: Your store needs an email address set up in Paladin for you to email statements. If you do not have this set up, Paladin will not know where to send the email statements from. This is also beneficial for emailing invoices as well.
Setting up Customer accounts
Customer email set up
Follow these steps for each customer you would like statements emailed to.
- In Paladin, on the top ribbon, select the Customers module.
- From the Customer list, enter or select a customer account you would like to email statements to.
- In the Contact Information pane, click in the E-mail box.
- In the Email manager window, type the customer’s email in the Enter email: box.
- Click Add, then click F12 Finish.
- In the Form Control pane, select E-mail statement copies? and Create month-end statement?
- Click F12 Save.
Customer specific settings
Balance Forward Statement and Open Item Statement:
- In Paladin, on the top ribbon, select the Customers module.
- Open the Credit tab, and in the Credit pane, decide the customer type and select either Balance Forward Stm. or Open Item Stm..
- Click F12 Save.
Note: Balance Forward Stm is the standard balance/credit structure. That is, pay and the balance goes down (automatically paying the earliest invoice first). Open Item Stm is for customers who pay full invoices off at a time, meaning you need to specifically apply payments to the corresponding invoice. This is done by:
-
-
- On the bottom ribbon of the Customers module, click F6 Payment Management.
- In the Payment Management window, select the invoice the customer wants to pay from either Charge Invoices or Credit Invoices.
-
Prompt Payment Discount:
- In Paladin, on the top ribbon, select the Customers module.
- Open the Credit tab, and in the Credit pane, select between the following:
- Trade Discounts. This selection will cause all the customer’s transactions to never show discounted prices when charged to their account. However, the discounts are still applied and will only show in their month-end statement.
- Percentage. This tells Paladin that the customer gets a prompt payment discount. In the text box to the right, enter a number that will be recognized as the percentage amount of the discount. If Respect Min Margin is selected, this lets Paladin know to not allow any item to be discounted to a price lower than your minimum profit margin.
- Click F12 Save.
Service Charge and Past Due Hold:
- In Paladin, on the top ribbon, select the Customers module.
- Open the Credit tab, and in the Credit pane, select between the following:
- Apply Service Charge? This lets Paladin know that you want this customer to receive a service charge when their account becomes past due.
- Ignore Past Due Hold? This tells Paladin to ignore the invoice hold rule if Invoice Hold When was set in Receivables from Paladin Configuration.
- Click F12 Save.
Enhanced Month-end statements functionality
This functionality has been enhanced, and:
- Printing statements is faster since the statement processing occurs automatically overnight.
- The statement run is more reliable and stable by removing the printing function from the process; generation and printing are two separate processes.
- No more potential printer problems that can compromise the statement run (the printing process can be paused for paper jams, low ink, and so on).
- The ability to choose between printing or emailing statements.
- The ability to view and run individual statements that failed in initial batch run.
- The ability to print statements in alphabetical order or by account number order.
Multi-store setup and requirements
With the exception of the following requirements and setup, all Month-end statement enhancements apply to multi-stores:
Requirements:
- Schema 4.69 must be set for the multi-store.
- Do not use per-store accounting.
- In Paladin, from the main menu, select File > Setup.
- Select the Company tab.
- Under the Customers pane, uncheck Maintain Separate Customer Accounts Per Store.
- Click Save, then click Close.

Figure 2: Uncheck Maintain Separate Customer Accounts Per Store
Setup:
- In Paladin, from the main menu, select File > Setup.
- Select the Receivables tab.
- In the Statements pane, select a store from the Run Statements at Store list.
Note: Paladin defaults to the lowest numbered active store greater than (0) zero.
- Click Save, then Close.
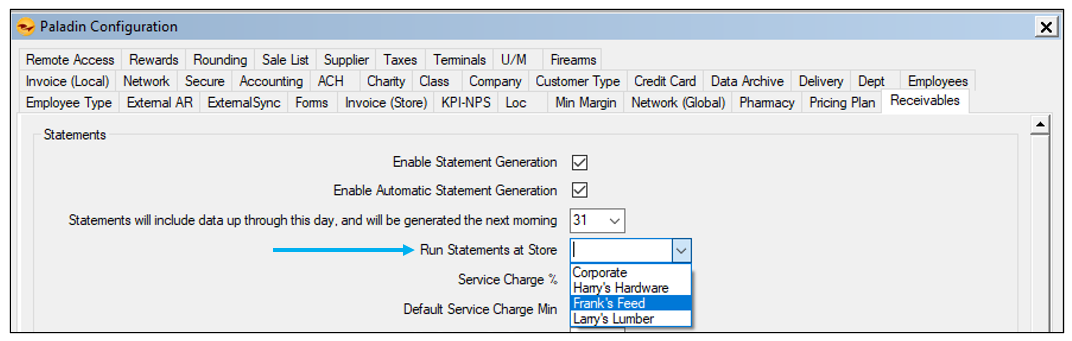
Figure 3: Run Statements at Store list
How to run Month-end statements
Month-end statements process automatically overnight on the day of the month the previous statement run was performed (unless you select a different date—instructions below). Enable Automatic Statement Generation is automatically set. The run date defaults to the client’s last statement run date, but clients can choose a statement run date from the Create monthly statements on the evening of this day list. Changes are done through the Receivables tab in Paladin Configuration.
To change the statement run date:
- In Paladin, from the main menu, select File > Setup.
- Select the Receivables tab.
- In the Statements pane, select a numerical date from the Statements will include data up through this day, and will be generated the next morning list.
- Click Save, then click Close.

Figure 4: Enable statement generation options
When you produce a Month-end statement, service charges and discounts are calculated, account reports are developed, and account statements are printed/emailed automatically.
- In Paladin, from the top ribbon, select the Reports module.
- In the Report Area pane, select Accounts Receivable > Statements.
- Under Report List, click Month-End Statements.
Note: If it has been more than two weeks since the last statement run, the Statements have not run recently warning message opens (Figure 5).
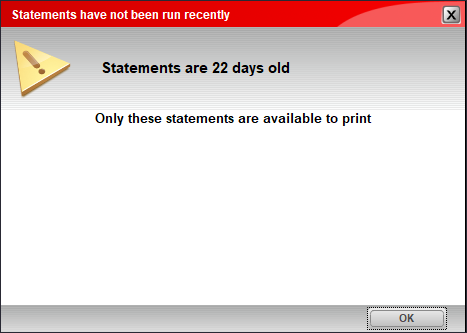
Figure 5: Statements have not run recently warning message
- Click OK.
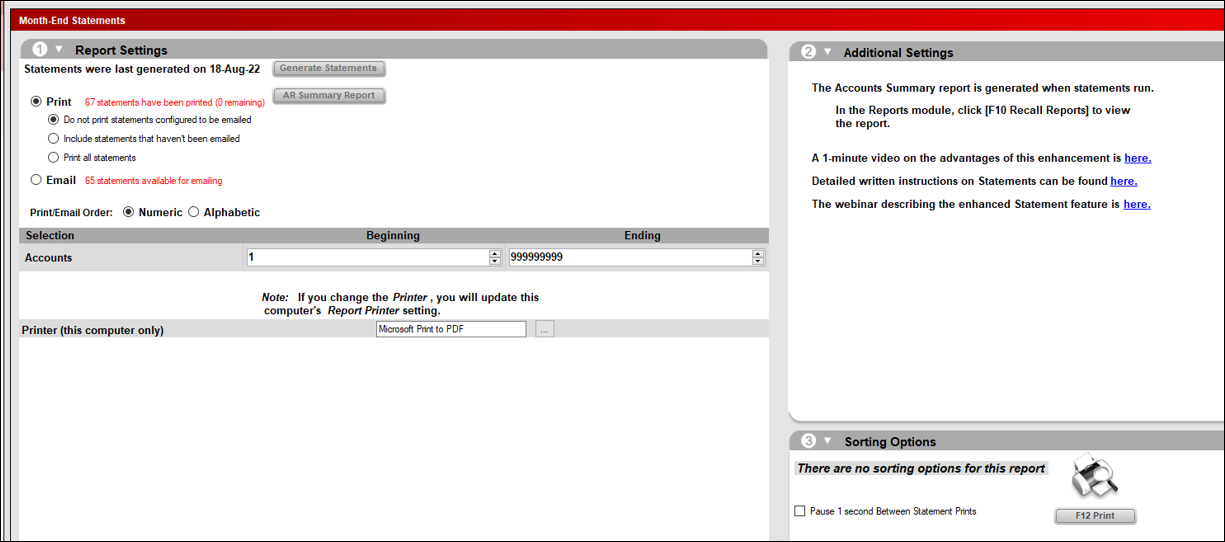
Figure 6: Month-End Statements report window
- In the Month-End Statements window, in the Report Settings pane, there is the option to Print or Email. Next to either option is text giving the status of each.
- Print: When Print is enabled, there are three options:
a.) Do not print statements configured to be emailed. Statements will print, and email that has been set for accounts will print when the Email option is used.
b.) Include statements that haven’t been emailed. With this, either you decide certain accounts require printed statements, or the Email option was used, and email failed to be sent.
c.) Print all statements. No statements will be emailed. - Email: When this option is enabled, statements will be emailed. Again, next to this option is text giving status.
Important: Due to constraints of special characters/numbers used at the beginning of customer names, when printing statements alphabetically, the following must be applied:
- In the Report Settings pane, in the Print/Email Order field, enable Alphabetic.
- In the Selection pane, in the Accounts fields:
-
- By default, both the Beginning and Ending boxes are blank. To print all your customers, leave the boxes blank.
- To include a range starting at the beginning of your customer list and ending further alphabetically, leave the Beginning box blank and enter the desired end alphabetic value plus “zzz” in the Ending box. For example:
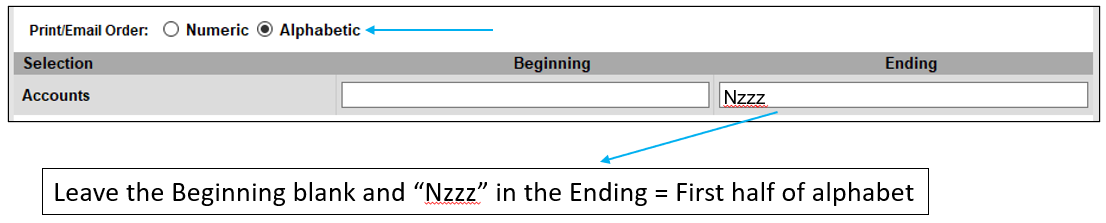
Figure 7: Range starting at the beginning of your customer list and ending further alphabetically
-
- To include a range starting further alphabetically and ending at the end of the alphabet, enter a letter value in the Beginning box, and leave the Ending box blank. For example:
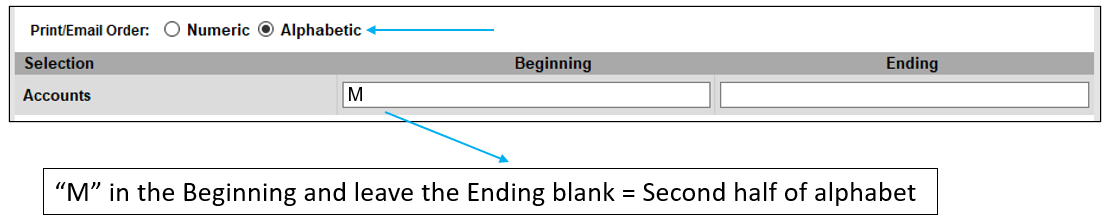
Figure 8: Range starting further alphabetically and ending at the end of the alphabet
-
- To include a specific range, enter an alphabetic value in the Beginning box, then enter an alphabetic value plus “zzz” in the Ending box. For example:
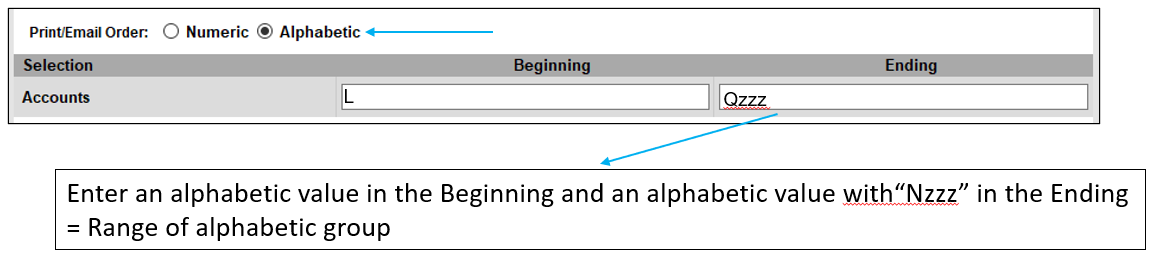
Figure 9: Specific range
Note: If any email failed to send, a message opens in the Report Settings pane stating There were exceptions to email send. Click View to see a list of which email failed.
The Unsent Statement Emails window opens. You have the option to repair/update the email so that it sends, or you can take note of the account and use option b.) of the Print option.
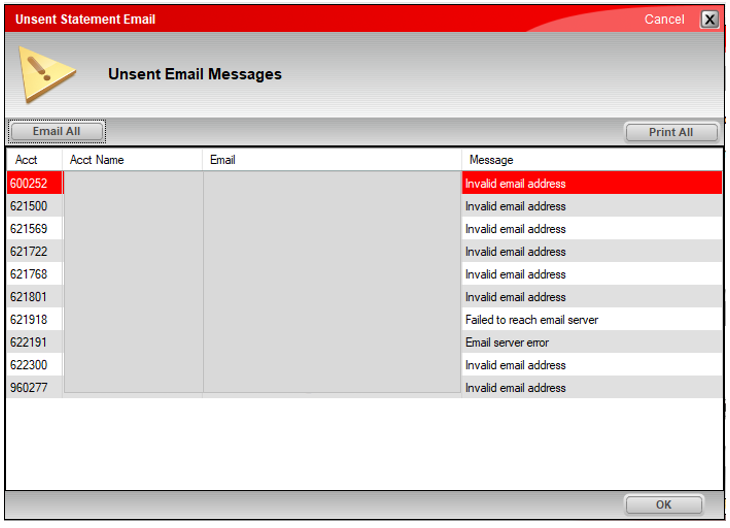
Figure 10: Unsent Statement Email warning message
- Select your Print Order (Numeric or Alphabetic).
- In the Accounts selection, set the Beginning and Ending account numbers.
- The Printer (this computer only) setting defaults to the printer you have set for that particular terminal. As the Note states, if you change the printer, you have to make this update in the terminal’s Report Printer setting in Paladin Configuration.
- In the Additional Settings pane, there is instruction on how to view the Account Summary report and links to the following:
-
-
- A link to a quick 1-minute video on the advantages to the enhancement
- A link to instructions on statements
- A link to an informational webinar
-
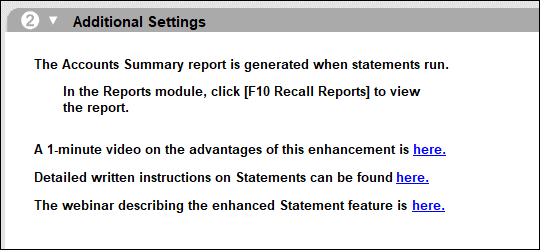
Figure 11: Additional Settings pane
- In the Sorting Options pane, press either F12 Print or F12 Email. Note: Depending on which option you chose in the Report Settings pane, the button in the Sorting Options pane will change to reflect the choice.

Figure 12: Sorting options
Note: If you are using the Print option, the Statement Printing window opens asking if the test statement printed correctly. Choose from the three button options to continue.
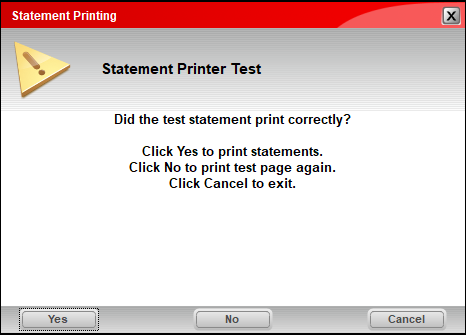
Figure 13: Statement Printing Test window
Important: On the off chance there is an interruption in the statement run, the Statement Processing window opens with the message shown in Figure 14. To reverse the statement run and run the process again, click Yes.
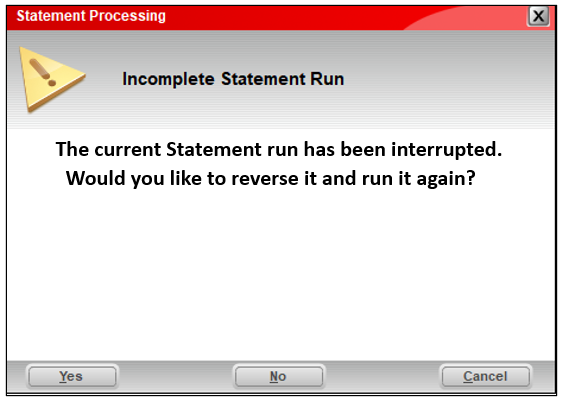
Figure 14: Statement Processing window/Statement run interruption message
Manual statement run
Note: When automatic statement generation is enabled, the Generate Statements button is shown after 25 days. If automatic statement generation is disabled, to support clients who run statements twice per month, the Generate Statements button will be shown after 12 days. Additionally, on the off chance there is an interruption, and you need to reverse the statement run and run the process again, the Generate Statements button will be shown.
To manually run statements:
- In the Month-End Statements window, under the Report Settings pane, click Generate Statements.
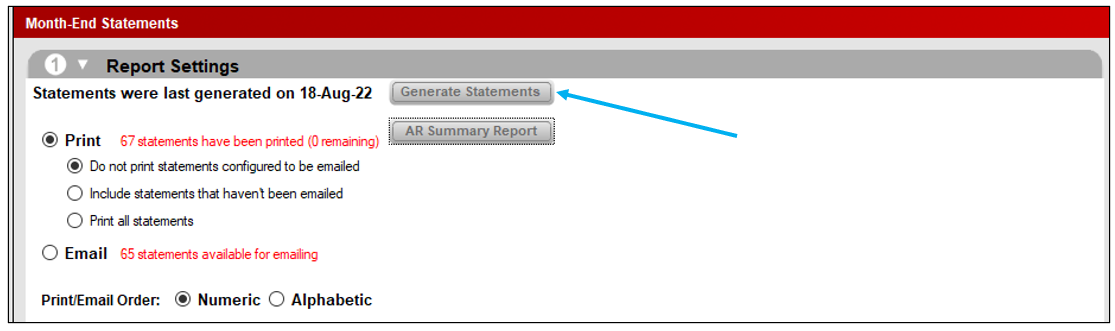
Figure 15: Manual Generate Statements option/button
- In the Generate Statements window, select a date from the Statements include all activity prior to calendar.
Note: The default is the prior day before the current date with the timestamp one second before the current day (23:59:59). Any date prior to the current date will have that timestamp. If you select the current day, the time becomes the “current time;” that is, the exact time of day of the current day, i.e. ‘through right now.”
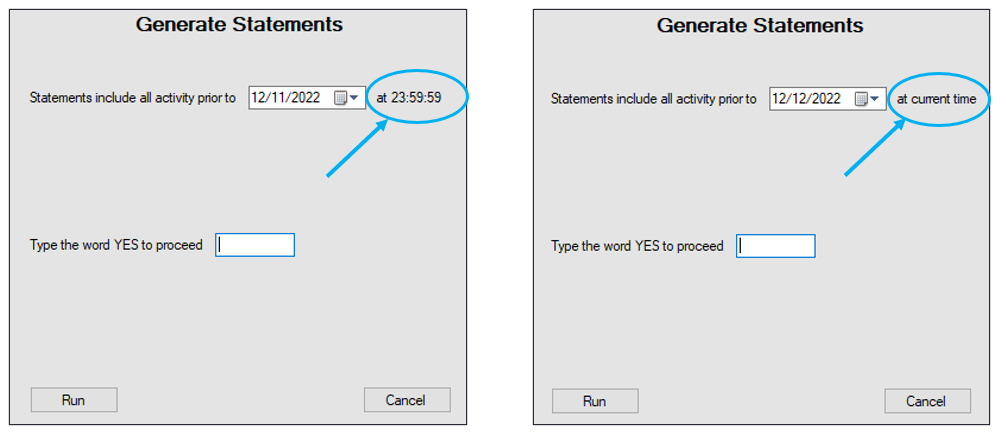
Figure 16: Generate Statements time setting
- In either scenario, type yes in the Type the word YES to proceed box.
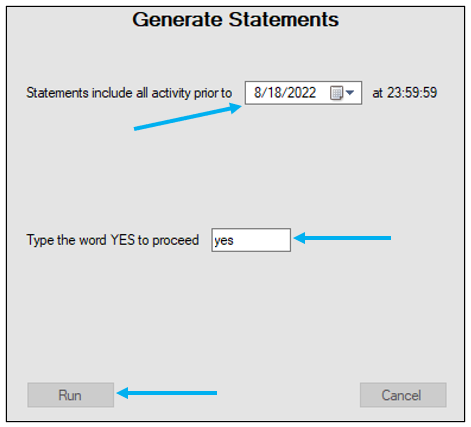
Figure 17: Generate Statements date option
- Click Run. A status bar is displayed on the lower left corner of the screen showing the progress.
- When the run is complete, the Statements Complete window opens. Click OK to close the window.
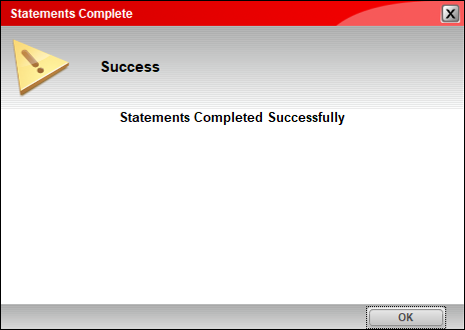
Figure 18: Statements Complete message
Important: On the off chance there is an interruption in the statement run, the Statement Processing window opens with the message shown in Figure 19. To reverse the statement run and run the process again, click Yes.
Figure 19: Statement Processing window/Statement run interruption message
Account Summary Report
The Account Summary Report auto-generates when statements are run. This report corresponds with the current statement. The text shown in Figure 20 informs that reports can be viewed by clicking F10 Recall Reports. Past reports, up to one year, are available.
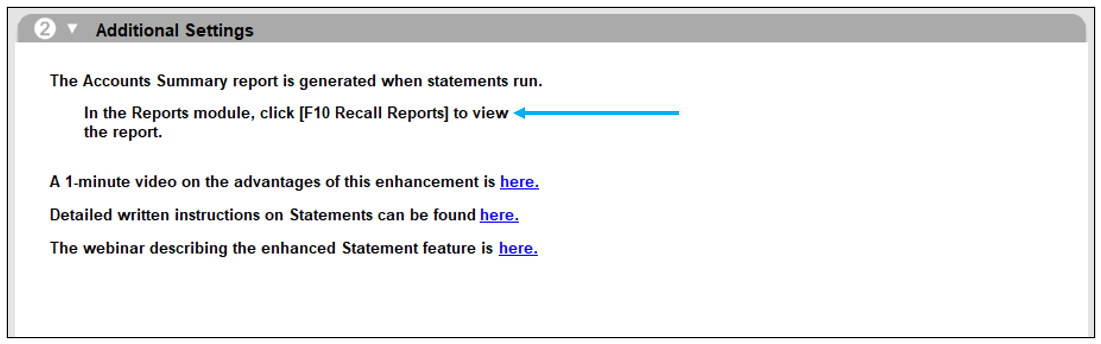
Figure 20: Additional Settings pane/Account Summary report available to view
Pressing the AR Summary Report button at the top of the Report Settings pane will only display the report for the most recent statement run.
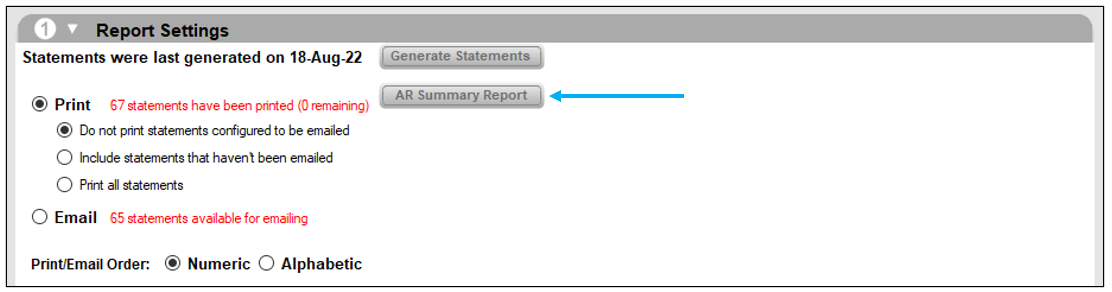
Figure 21: Report Settings pane/AR Summary Report button
If the most recent statement has not been run, the message shown in Figure 22 opens.
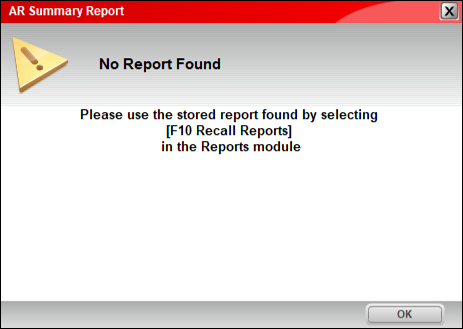
Figure 22: AR Summary Report window/No Report Found message
Note: All information in the Account Summary report is pulled from the Customer account settings in Paladin. No other configuration parameters are necessary.
To access the report after statements have run:
- In Paladin, on the top ribbon, select the Reports module.
- On the bottom ribbon of the module, select F10 Recall Reports.
- In the Recall Reports pane, select your report.
- Click F12 Recall.
A PDF file of the report opens.
How to reverse a Month-end statement
Note: If you have an accounting integration with Paladin, and you reverse Month-end statements, the journal entry in your accounting software might also need to be removed. Reversing in Paladin does not reverse in the accounting software journal entry in your accounting software.
Important: Only the most recent statement is allowed to be reversed.
- In Paladin, from the top menu, select Maintain > Accounts Receivable.
- Click Reverse Statements.
- In the Month End Statements window, select the statement date that you want to reverse.
- Click Reverse, then click OK.
- You will see the message: Are you sure you want to reverse statements run on [date]?
- Click OK.
Note: If there are two or more statements with the same date, do NOT click Reverse. Call Paladin Customer Service.
How to save Month-end statements for bulk mailing
Month-end statements can be saved to a file and sent to a service that prints, stuffs, and mails the statements.
- In Paladin, from the main menu, select File > Setup.
- Select the Receivables tab.
- Check Statements Output to File System.
- If you do not want to send statements to a printer, click to clear the Statements Output to Printer check box.
- Click Save. The file will be saved in the Paladin POS Statements folder.
- Click Save, then click Close.
- Generate the Month-end statements.
If you have questions or suggestions about this information, contact support@paladinpos.com.
