
The Paladin eCommerce application programming interface (API) allows eCommerce platforms to integrate with Paladin to support online sales for our clients. The API provides ways (REST API calls) to access a store’s inventory data in Paladin and create invoices and update stock on hand (SOH) when an online sale is made.
When the integration is complete, Paladin Support enables the integration to access a store’s data in Paladin.
Note: The online store (eCommerce platform) must write and test the integration using the Paladin eCommerce API repository on GitHub.
How the eCommerce API works
The Paladin eCommerce API (Called the PaladinEcomAPI in GitHub) is a RESTful web service API and provides three key functions:
- Get inventory data (Inventory API): This API retrieves inventory data by part number or will return all inventory items that are designated as online store items in Paladin. Online store items must have the Ext Sync checkbox selected. In Paladin, this checkbox is located in the Inventory module > General tab on the top right of the Item Information pane for each item. Refer to Options to enable external sync for eCommerce integration for inventory preparation.

Figure 1: Ext Sync checkbox
The following inventory data is returned by the API when the request is made:
-
- Description 3
- Department
- Class 1
- Subclass 1
- Part Number
- Alt Part Number
- Mfg Part Number
- Description1
- Description2
- Weight
- Core Charge
- Stock On Hand
- Qty On Order
- Taxable
- Retail Price
- Create an invoice for an online sale and update stock on hand (Invoice API): When an online sale is made, this API creates an invoice in Paladin and updates stock on hand. To use this API, you must send the following data:
- Part Number, Description, Sold Price, and Quantity for each item sold
- Invoice total
- Optional: Customer rewards ID (If found in Paladin, the sale will be associated with that customer).
- Provide secure communication (Token API): The Paladin eCommerce integration utilizes OAuth 2.0 to authorize access to the client’s Paladin database. OAuth 2.0 is an industry standard for granting access to remote APIs across the web.
Note: There is no cost for testing the API using test credentials; however, Paladin does have a setup and monthly cost for the integration. Stores should reach out to Paladin Support to ask for pricing and are responsible for the cost of developing the integration using the eCommerce API.
How to set up the integration
The following steps must be followed in the following order:
| Step 1: Support & Client: Provide client with information about the eCommerce integration |
|
Step 5: Support & Client: Set up integration access to the store’s data |
Step 1: Support & Client: Provide client with information about the eCommerce integration
If a client is interested in the eCommerce API, provide them with the following reference:
Step 2: Client & eCommerce platform: Develop integration with the eCommerce API using test credentials
It is the client’s responsibility to develop the integration between their online store and Paladin using the Paladin eCommerce API repository on GitHub.
When they have developed and tested their eCommerce API integration using test data, the client will contact Paladin Support to enable access to their Paladin data.
Step 3: Client: Designate inventory items to be sold online
Before Paladin eCommerce API goes live, this step prepares inventory to be added via Paladin part number (Inventory module > General tab). For instruction on preparing inventory in Paladin, refer to: Options to enable external sync for eCommerce integration
Discuss these options with the client to decide which method is best.
Note: In Paladin’s Inventory module > General tab > Item Information pane, the Ext Sync checkbox is unavailable (grayed out) for clients. The Ext Sync Checkbox is grayed out until either 1) something is selected in Paladin Configuration’s ExternalSync tab, or 2) Mobile API is turned on in Paladin Configuration’s Remote Access tab. Paladin Support can check Ext Sync or perform Step 5 of this article.
Step 4: Support: Paladin eCommerce API credentials
Important: For existing clients with Mobile2, make sure all new mobile services requested by the client are turned on in the Identity Server. For assistance, contact a Paladin Support lead.
For new Paladin eCommerce API credentials:
- Contact Paladin Support leads to create Paladin eCommerce API credentials and passwords (these are the Paladin Identity Server credentials).
- Email the eCommerce API credentials and passwords to the client with instruction to send this information to their web developer.
- Web developer turns on eCommerce integration.
Step 5: Support & Client: Set up integration access to the store’s data
Once eCommerce credentials and passwords are acquired:
- Get a connection to a store terminal running Paladin.
- Sign in as Paladin Support.
- From the main menu, select File > Setup.
- Select Remote Access tab.
- In the Paladin Identity Service pane, check Enable identity Service Client.

Figure 2: Paladin Identity Service/Enable identity Service Client
- In the Mobile2 StoreService pane, check Enable Mobile API.
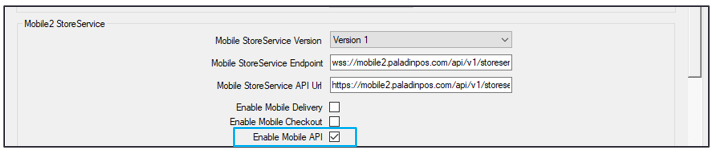
Figure 3: Mobile2 StoreService/Enable Mobile API
- In the Mobile API Options pane, check Enable Mobile API – Inventory and Enable Mobile API –Invoices.

Figure 4: Mobile API Options pane/Enable Mobile API – Inventory and Enable Mobile API –Invoices
- Click Save, then click Close.
Important: Turn on billing.
Note: Only turn on billing once we have turned on all settings in Paladin (Step 5) and have provided the client their username and password for the API.
[/box]
[/hide][/hidethis]
If you have questions or suggestions about this information, contact support@paladinpos.com.