
Note: While you can use the Count function on any device running PaldinGo, we recommend purchasing a Memor device from Paladin. Memor devices integrate a barcode scanner with the PaladinGo app making repetitive scanning much faster, especially since it can be locked into a hand-held case that has a pistol grip and trigger. Contact Paladin Support if interested in acquiring the Memor device.
The following needs to be done on the Memor device to ensure the scanning function works correctly:
- Select Datalogic Settings > Scanner & decoder > Scanner Options.
- Check Scanner/Camera Interoperability.
Important: PaladinGo provides the same RF Unit 15 line functionality of inventory alerts (dynamic prompts).
These inventory alerts are:
- Item Overstock
- Shrinkage
- Low on Stock
- Suggest Clearance – For information and instruction on setting up clearance items, refer to the PaladinNsight™ Clearance function KBA.
When an item is a clearance item, the following prompt appears at the bottom of the Count module:
![]()
Figure 1: Clearance prompt
For information on these alerts and instruction on setting them up, refer to the PaladinGo™ Paladin Configuration Settings KBA.
The following can be performed through the Count page:
- View status of item
- General
- Pricing
- Order Control
- Remote Stock
- Overwrite
- Append
- Receive
- Set Location
- Print/Print Later
Three of the functions are available on the bottom of the page after a part has been selected.
On the top of the module, using either the UPC icon to scan an item, the Magnifying Glass to search for an item, or by entering the part number.

Figure 2: Top of module/find item options
The information on the item appears on the top of the module, which includes:
- Item’s part number
- Item’s name
- Stock on Hand (SOH)
- On Order
- Last Counted Date
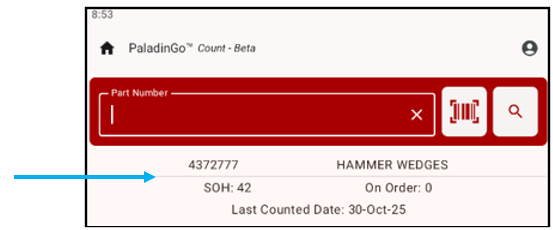
Figure 3: Item info on top of Count module
View status of item
Viewing status is compile in the following drop-downs:
General
The General drop-down provides information on the item’s department and Gross Margin Return on Investment (GMROI).

Figure 4: General drop-down
Pricing
The Pricing drop-down provides information on the item’s pricing.

Figure 5: Pricing drop-down
Order Control
The Order Control drop-down provides the following on an item:
- Amount Sold YTD (year to date)
- The item’s Last Sale Date
- Minimum Stock of the item
- Maximum Stock of the item
- Suggested Order Qty of the item
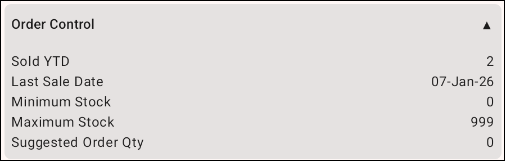
Figure 6: Order Control drop-down
Remote Stock
The Remote Stock drop-down provides information on the item’s available remote stock.

Figure 7: Remote Stock drop-down
On the bottom of the module the following options can be chosen:
Overwrite
To Overwrite the item:
- Tap Overwrite.
- Make changes to the SOH and the Price.
- Tap the green floppy disk icon to save changes.
- Recall the item to the module by tapping on the magnifying glass in the Part Number field.
The changes are reflected in SOH on the top of the Count module and in the Pricing drop-down. Changes also update the Inventory module of PaladinGo as well as the item in Paladin’s Inventory module.
Note: An unexpected variation in the item’s SOH value triggers a shrinkage warning. Theft, loss, damaged or misplaced items result in a decrease of SOH at the next count. If this is the case, a Shrinkage Warning pane opens at the bottom of the Count module.
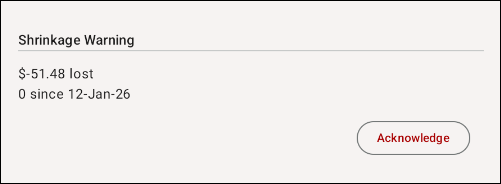
Figure 8: Shrinkage Warning
Append
To Append (change) the SOH and Price of an item:
- Tap Append.
- Make changes to the SOH and the Price.
- Tap the green floppy disk icon to save changes.
- Recall the item to the module by tapping on the magnifying glass in the Part Number field.
The changes are reflected in SOH on the top of the Count module and in the Pricing drop-down. Changes also update the Inventory module of PaladinGo as well as the item in Paladin’s Inventory module.
Receive
To receive items:
- Tap Receive.
- Make changes to the SOH and Price (optional).
- Tap the green floppy disk icon to save changes.
- Recall the item to the module by tapping on the magnifying glass in the Part Number field.
Changes update the Inventory page of PaladinGo as well as the item in Paladin’s PO module in the SOH History window.
To view the update in Paladin:
- Select the PO module.
- In the Part # box, enter the part number.
- Press Enter.
- On the top right hand of the module, click the magnifying glass under Stock On Hand,
- The SOH History window opens showing the receive entry made.
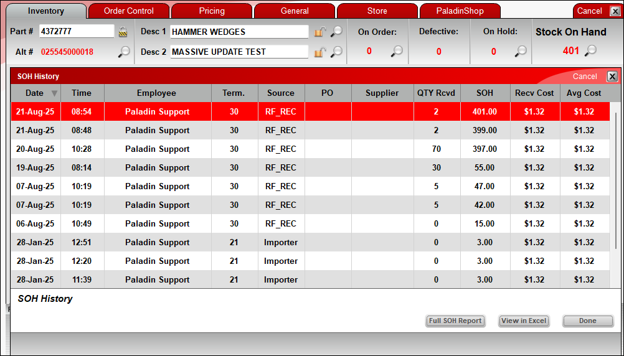
Figure 9: Paladin SOH History window
Set Location
Having a location set results in saving or changing the location of a part.
To set location:
- On the bottom of the module, tap Set location.

Figure 10: Set location
Locations (set in Paladin) appear.
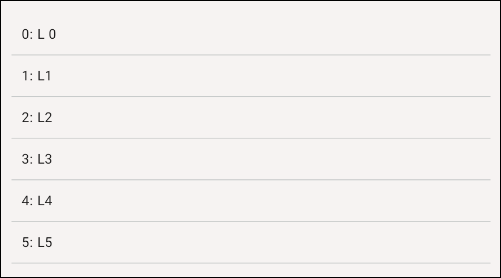
Figure 11: Locations
- Tap a location.
The location now shows with a red X beside it.

Figure 12: Location set
- To remove or change locations, tap Set location.
To set/add locations in Paladin:
- In Paladin, select File > Setup.
- Select the Loc tab.
- In the Locations pane, press New.
- Add an available number in the Loc Label Number box.
- Place your cursor in the Name box. The letter L plus the new Loc Label Number is set by default.
- Click Save, then click Close.
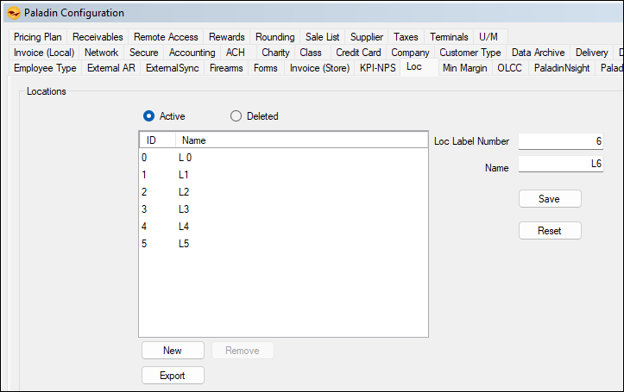
Figure 13: Locations in Paladin
To view locations in Paladin:
- In Paladin, from the top ribbon, select the Inventory module.
- Select the General tab.
The location is shown in the Location box in the Item Information pane.
- To see what items are in that location, press the magnifying glass at the end of the Location box.
The Location History window opens.
- For a report on the items in the location, press Report.
An Excel spreadsheet opens with all the information on the items in the history.
Print/Print Later
To print bin tags there are two options, Print or Print Later.

Figure 14: Print Later
When toggled, the Print Later function sets Print Later in Paladin so that you can print bintags in bulk (sheet form) on a office printer. This function is one direction; meaning that Print Later can only be set from the PaladinGo device, not from Paladin terminals.
To print the bintags in Paladin:
- In Paladin, from the top ribbon, select the Inventory module.
- Select the General tab.
- Click Print Bintag in the Item Information pane.
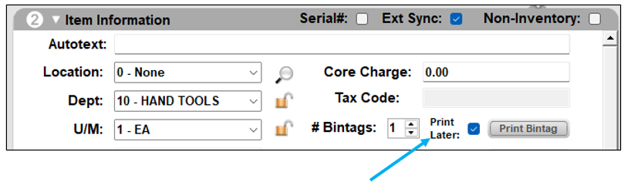
Figure 15: Print Bintag in Paladin
If you have questions or suggestions about this information, contact support@paladinpos.com.
