
Important: Bin tag 52 is now available to meet the Cash Discounting laws in New York. As of 01/01/2024, New York now requires stores that are passing credit card fees onto card holders to post both the price for paying with cash and the price for paying with a credit card on their bin tags.
Notes:
- Bin tags measure about 2 inches-by-1 inch have and have an adhesive back.
- Shelf tags measure about 2 inches-by-1 inch and are designed to be placed in a holder (no adhesive).
This article provides instruction and information on the following:
- How to add and assign location to bintags
- How to select, change, or confirm default preferences for bin tag styles
- How to set up bin tags and shelf tags on a mobile printer
- How to print bin tags or shelf tags from a mobile printer
- How to print a batch of bin tags or shelf tags from a label printer
- How to add an individual bin tag or shelf tag to a batch on a label printer
- How to print an individual bin tag or shelf tag from a dedicated label printer
For information on how to batch and print EDI price changes on full sheet bin tags or shelf tags, click here.
How to add and assign location to bintags
Note: Number of bintags value will persist when removing all locations or when changing from location None to another location.
The number of bintags needed is added by selecting #Bintags list arrows in the Inventory module/General tab/ Item Information pane, which opens the Locations window where the Number Of Bintags can be adjusted.
To add and assign location to bintags:
- In Paladin, select the Inventory module.
- Enter a part number in the Part # box and press Enter.
- Select the General tab.
- In the Item Information pane, click on the # Bintags list.
The Locations window opens.
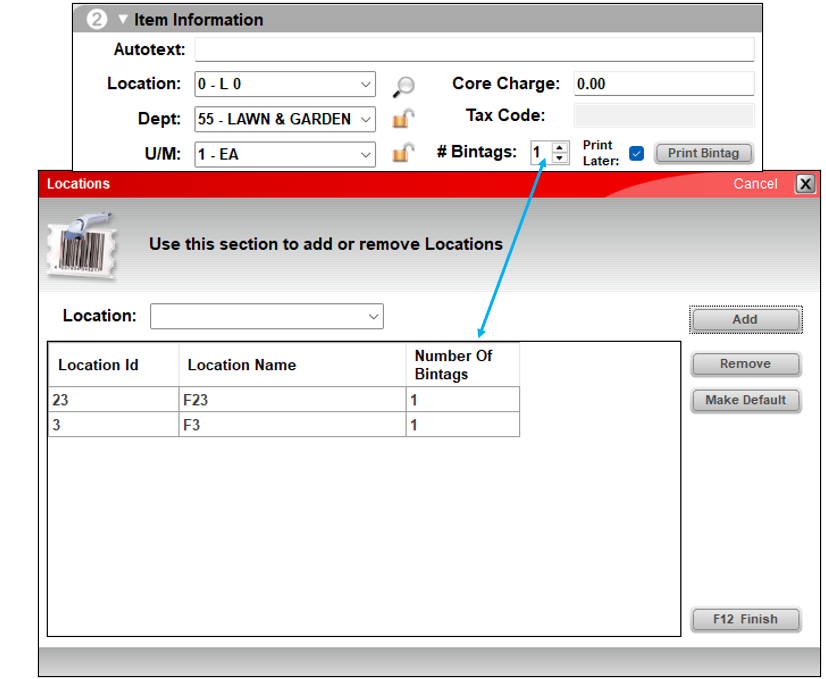
Figure 1: Locations window
- In the Number Of Bintags column, enter the number needed for each location.
- Click F12 Finish.
How to select, change, or confirm default preferences for bin tag styles
- Open the LTSR Catalog and determine the tags that you want.
- In Paladin, from the main menu, select File > Setup.
- Select the Company tab.
- In the Tag Styles section, in the Default Bin Tag Style drop-down list, select the Bin Tag Format # that you want.
- Click Save, then click Close.
How to set up bin tags and shelf tags on a mobile printer
- Open the LTSR Catalog
- Determine which tags that you want.
- In Paladin, from the main menu, select File > Setup.
- Select the Network tab.
- Enter the Administrator Password.
- In the Network pane, select the mobile printer model from the RF Attached Printer list.
- Click Save.
- Select the Company tab.
- In the RF Terminals pane, in the RF Printer Bin Tag Style list, select a Bintag Format #.
- Click Save, then click Close.
How to print bin tags or shelf tags from a mobile printer
- Make sure that the portable printer is connected to the RF unit.
- To sign on, tap 1.
- Choose Overwrite SOH or Append to SOH.
- If the Bin Tag Output Devices Attached Printer message appears, tap Enter.
- Select a Printing method.
- To print all, continue though the prompts, and scan an item.
- If you select print only items with a price change or location change, a bin tag will be prompted.
- If you cannot select one of these options, you can enter a # during the sale price prompt.
How to print a batch of bin tags or shelf tags from a label printer
- In Paladin, on the top ribbon, select the Reports module.
- In the Report Area pane, select Inventory > Labels.
- In the Report List pane, click Bin Tag Format # (choice of 1 -48).
- In the Choose Report window, click F12 Next.
- In the Bin Tag Format # window, in the Report Settings pane, add the parameters you want.
- In the Additional Settings pane, add the parameters you want.
- In the sorting Options pane, click F12 Run Report.
Next, perform the following to reset the bin tag flags on the items you printed. This will prevent you from unintentionally printing duplicate bin tags for the items.
- Repeat steps 2 -5 (above).
- In the Additional Settings pane, add the parameters you want and check Reset bin tag flags?
- In the sorting Options pane, click F12 Run Report.
How to add an individual bin tag or shelf tag to a batch on a label printer
- In Paladin, on the top ribbon, select the Inventory module.
- In the Part # box, enter the part number and press Enter.
- Click the General tab.
- In the Item Information pane, check Print Later.
How to print an individual bin tag or shelf tag from a dedicated label printer
- In Paladin, on the top ribbon, select the Inventory module.
- In the Part # box, enter the part number and press Enter.
- Open the General tab.
- In the Item Information pane, click Print Bin tag.
Note: If a quantity price break is set on the item, a bin tag will print for the entire quantity break unless the Disable Quantity Break Bintags setting is selected in Paladin Configuration.
To access this setting:
- In Paladin, from the main menu, select File > Setup.
- Select the Company tab.
- In the Tag Styles pane, check Disable Quantity Break Bintags.
- Click Save, then click Close.
If you have questions or suggestions about this information, contact support@paladinpos.com.
