
Today’s customers are increasingly interested in receiving invoices and other correspondence through email. Paladin supports this by including email options for quotes, invoices, purchase orders, statements, and more. Email Manager offers a consistent email experience throughout Paladin. When you use the email feature to manually email invoices, quotes, purchase orders, sales history, and other information, the Email Manager window opens and offers the following options:
- Select an email address from the customer’s or supplier email address list in Paladin.
- Enter a new email address and send a receipt to that customer.
- Send multiple emails before closing the window.
Note: To email invoices and other information to your customers, the email feature must be set up in Paladin. A Paladin Support representative can do this for you. Contact us at support@paladinpos.com or 1-800-725-2346, option 2.
This article provides instruction and information on the following:
- How to use Email Manager to manage emails in the Customers module
- Set automatic email of invoices and statements
- How to use Email Manager to email invoices in the Invoice/Quote module
- How to use Email Manager to email purchase orders in the PO module
How to use Email Manager to manage emails in the Customers module
When you select a customer, and then click the Email box, Email Manager lets you add, remove, or edit email addresses. You can also click View in Excel to view the customer’s email address list in an Excel spreadsheet. Each of these options are explained in the following:
- Adding an email address
- Removing an email address
- Editing an email address
- View email for customers in Excel
Note: If a customer has more than one email address associated with an account, ellipses […] appear in the Email box next to the first email address. 
Figure 1: More than one email address indication
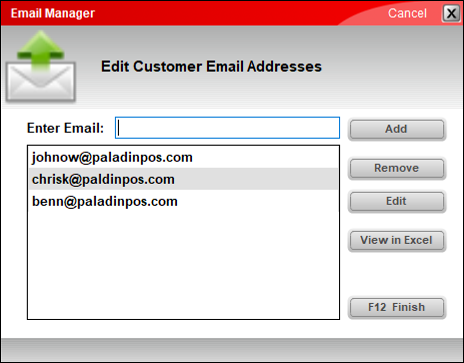
Figure 2: Email Manager window
Adding an email address
- In Paladin, on the top ribbon, select the Customers module.
- Enter or select a customer account from the Customer list.
- Press Enter.
- In the Contact Information pane, place your cursor in the E-mail box.
- The Email Manager window opens.
- Enter an email address in the Enter Email box.
- Click Add.
- If the customer has more than one email address, perform steps 4 – 7.
- When complete, click F12 Finish.
Removing an email address
- In Paladin, on the top ribbon, select the Customers module.
- Enter or select a customer account from the Customer list.
- Press Enter.
- In the Contact Information pane, place your cursor in the E-mail box.
- The Email Manager window opens.
- Highlight the email address to remove.
- Click Remove.
- If the customer has more than one email address to remove, perform steps 4 – 7.
- When complete, click F12 Finish.
Editing an email address
- In Paladin, on the top ribbon, select the Customers module.
- Enter or select a customer account from the Customer list.
- Press Enter.
- In the Contact Information pane, place your cursor in the E-mail box.
- The Email Manager window opens.
- Highlight the email address to edit.
- Click Edit.
- Make the updates and click Finish.
- To edit more email addresses, perform steps 4- 7.
View email for customers in Excel
There may be a need to have a list of a customer’s email addresses. To create a list:
- In Paladin, on the top ribbon, select the Customers module.
- Enter or select a customer account from the Customer list.
- Press Enter.
- In the Contact Information pane, place your cursor in the E-mail box.
- The Email Manager window opens.
- Click View in Excel.
- An Excel icon appears on the bottom taskbar of your computer. Click the Excel icon to open the list.
Set automatic email of invoices and statements
You can choose to always send invoice copies and statement copies to a customer’s email account(s).
- In Paladin, on the top ribbon, select the Customers module.
- Enter or select a customer account from the Customer list.
- Press Enter.
- In the Form Control pane, select one or both of the following checkboxes:
- E-mail invoice copies?
- E-mail statement copies?
- Click F12 Save.
How to use Email Manager to email invoices in the Invoice/Quote module
- After the sale has been made and payment type is selected, press Enter. The Transaction Complete window opens.
- Select 6 Email Receipt.
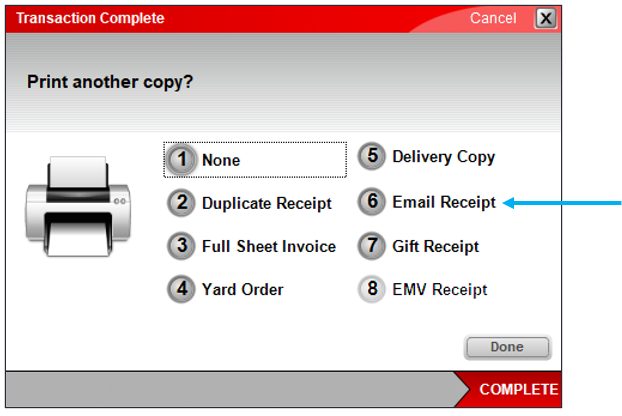
Figure 3: Transaction Complete window/6 Email Receipt
- The Email Invoice window opens. There are four buttons: Send Once, Add and Send, Send Selected, and F12 Close.
Note: The Send Once or Add and Send buttons will be grayed out and unavailable if the Enter Email box is empty.
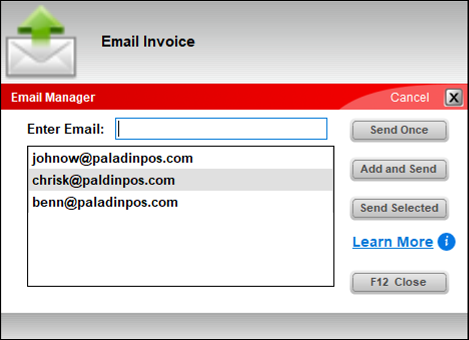
Figure 4: Email Invoice window
- Pressing Send Once will only send the email in the Enter Email box; it will not save it to the customer’s profile or add it to the data grid view below.
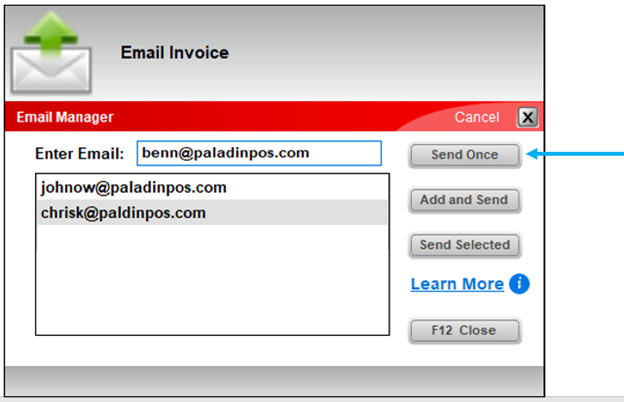
Figure 5: Email Invoice window/Send Once option
- Pressing Add and Send will send the email, add the email in the data grid view, and save it to the customer’s profile.
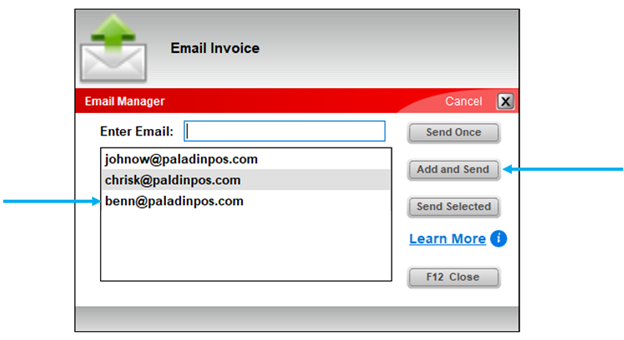
Figure 6: Email Invoice window/Email added
- Pressing Send Selected allows the user to send an invoice email to one or more selected email addresses in the data grid view.
Note: Email addresses can be multi-selected by clicking on an email address and holding the Ctrl key while selecting other email addresses.
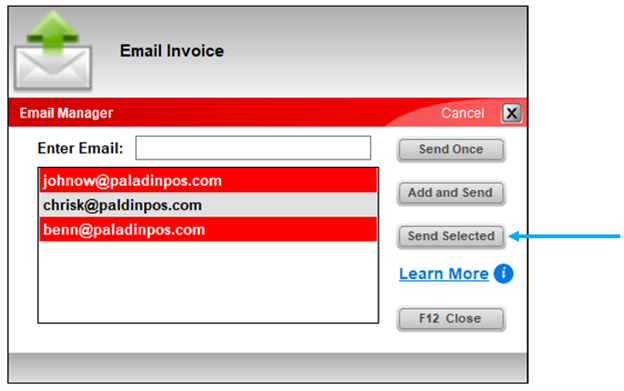
Figure 7: Email Invoice window/Send Selected email chosen using the Ctrl key to select email addresses
Note: Email addresses can be multi-selected as a group by clicking on an email address and then holding the Shift key while selecting the last email address of the desired grouping.
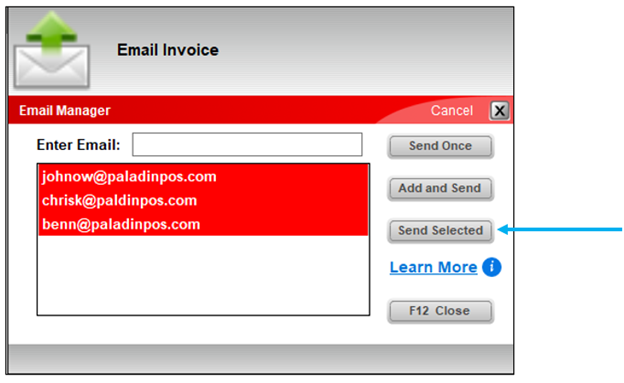
Figure 8: Email Invoice window/Send Selected email chosen using the Shift key to select email addresses
After Send Selected is pressed, at the bottom of the Email Invoice window is a message stating how many emails were sent.
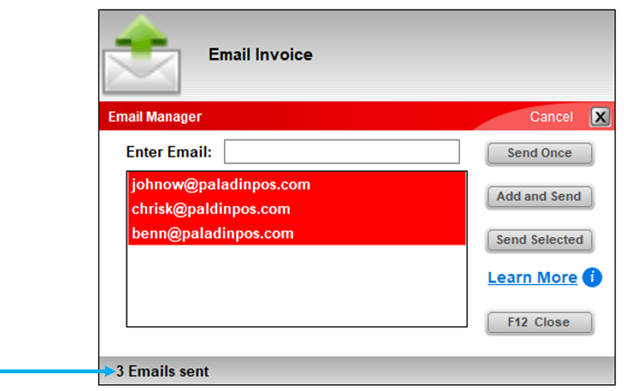
Figure 9: Email Invoice window/Emails sent
There is also the Learn More link, that when pressed, opens the Learn More window, which provides instruction on multi-selection of email.
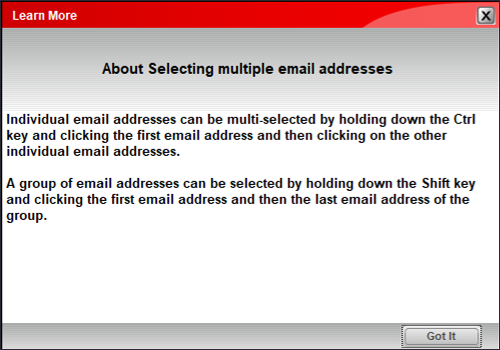
Figure 10: Learn More window/Selecting multiple email addresses
How to use Email Manager to email purchase orders in the PO module
In the PO module, the Email Manager will open in the following two scenarios:
- In the Confirm PO tab, when you create a purchase order and click F1 Buy, an Email option appears in the PO Complete window.
- In the PO Receive mode, when you recall a PO, and click F8 Process, then click F6 Reprint PO, an Email option appears in the Reprint Purchase Order window.
If you click Email, the Email Manager window opens and shows the supplier’s email address if available.
- To email the purchase order, select the supplier’s email address or enter a different address, then press Send. The Email Manager window will stay open to allow you to send multiple emails.
- To close the window, click F12 Close.
Additional setup notes:
- You can specify a specific return (from) email address to use for emailed POs only. Otherwise, the return email will default to the return address used for emailed receipts and statements. To specify a return email for POs only:
- In Paladin, from the main menu, select File > Setup.
- Select the Forms tab.
- In the Email Options pane, in the From Email Address (Purchase Orders) box, enter the return email address for emailed purchase orders.
- Click Save, then click Close.
- A supplier can have only one saved email address in Paladin. If you enter a different email address in the Email Manager, the new address will not be saved, and it will not overwrite the current supplier’s email address. To change the supplier’s email address in Paladin:
-
- In Paladin, from the main menu, select File > Setup.
- Select the Supplier tab.
- In the Suppliers pane, in the suppliers list, select the supplier.
- In the Email Address box, enter the supplier’s email address.
- Click Save, then click Close.
If you have questions or suggestions about this information, contact support@paladinpos.com.
