
PaladinShop™ is your online storefront and customer self-service portal, included with Paladin Point of Sale.
With PaladinShop, you can:
- Showcase your inventory online
- Sell products online for in-store pickup
- Allow customers to view and reprint invoices and statements
- Enable customers to make online account payments
- Provide detailed product information supplied by your vendors
PaladinShop is included with your Paladin system and is designed to help increase revenue while improving customer convenience and satisfaction.
This article provides information and instruction on the following:
Setup Process
PaladinShop sites are created and configured by Paladin.
To request a PaladinShop site, contact Paladin Customer Support or submit a support case from your Paladin terminal. Once your request has been received, the Paladin team will complete the necessary setup and configuration.
After setup is complete, a member of the Training Department will contact you to schedule PaladinShop training. Training is strongly recommended to help you get the most value from your new PaladinShop site.
PaladinShop Settings
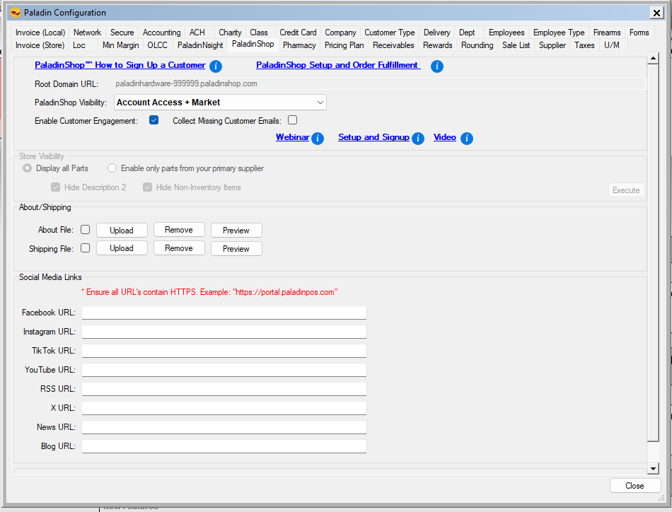
Figure 1: PaladinShop tab
The following is provided in the PaladinShop tab:
- Root Domain URL
- PaladinShop Visibility
- Enable Customer Engagement
- Collect Missing Customer Emails
- About Shipping Information
- Social Media Links
Root Domain URL
The Root Domain URL is the unique web address assigned to your PaladinShop site during setup.
This URL can be printed on invoices and statements when Enable Customer Engagement is checked. The Root Domain URL is assigned during setup and cannot be edited.
PaladinShop Visibility
The PaladinShop Visibility setting determines which features are available to your customers.
The following are available from the PaladinShop Visibility list:
Account Access + Market
Note: This option is for full site setup.
This option provides the complete PaladinShop experience, allowing customers to:
- Browse and purchase inventory online
- Place orders for in-store pickup
- View and reprint invoices and statements
- Make online account payments
Account Access + Browse
Note: This option is for Inventory Showcase + Customer Portal
This option allows customers to:
- Browse inventory available in your store
- View and reprint invoices and statements
- Make online account payments
Customers can view inventory but cannot purchase products online.
Account Access
Note: This option is for Customer Self-Service Portal
This option allows customers to:
- View and reprint invoices and statements
- Make online account payments
Inventory is not displayed on the site.
Enable Customer Engagement
When checked, Paladin prints a QR code and informational message on invoices and statements to help promote your PaladinShop site to customers.
The QR code directs customers to your store’s unique PaladinShop URL where they can create an account, review account information, and access available self-service features.

Figure 2: QR code
Note: Any images shown in this documentation are examples only. Your store’s URL and your customers’ account information will be unique to your business.
Collect Missing Customer Emails
This setting becomes available after Enable Customer Engagement is checked.
When activated, Paladin displays a prompt during checkout in the Invoice/Quote module whenever a customer record does not contain an email address. The cashier can then request and enter the customer’s email address.
Customer email addresses are important because they simplify account creation and login access for PaladinShop users.
About Shipping Information
The About Shipping pane includes the following:
During setup, Paladin creates initial About and Shipping files using information from your Paladin system and content generated with assistance from Paladin AI.
You can customize these files by:
- Creating or editing the content in Microsoft Word.
- Saving the file as an HTML document.
- Uploading the file to Paladin.
Available options include:
- Upload – Upload a file from Paladin Cloud.
- Preview – View how the content will appear on your PaladinShop site.
- Remove – Delete the current file.
About File
The About File contains information about your business and is displayed when customers select About Us from the Information section at the bottom of the PaladinShop homepage.
Shipping File
The Shipping File contains your store’s shipping and return policies and is displayed when customers select Shipping and Returns from the Information section at the bottom of the homepage.
Note: Shipping is not currently supported in PaladinShop. At this time, PaladinShop supports Buy Online, Pick Up In Store (BOPIS) only.
Social Media Links
The Social Media Links pane allows you to add links to your business’ social media accounts.
When configured, the corresponding Social Media icons appear at the bottom of your PaladinShop site, allowing customers to easily connect with your business on those platforms.
Removing PaladinShop
If a client decides to not utilize PaladinShop any longer, they should contact Paladin Support to submit a case for PaladinShop to be disabled.
Hide in PaladinShop option
Paladin offers the option to hide PaladinShop in departments, classes, and subclasses, as well as individual inventory items. The following sections provide instruction on enabling the option:
Departments
Note: Setting Hide in PaladinShop is only visible in the Departments tab if Enable is checked in the PaladinShop pane of the PaladinShop tab in Paladin Configuration.
To set this:
- In Paladin, from the main menu, select File > Setup.
- Select the Dept tab.
- In the Departments pane, select a department.
- In the main field, check Hide in PaladinShop.

Figure 3: Departments/Hide in PaladinShop
Classes
Whether a department has or has not been set with Hide in PaladinShop, classes and sub-classes may be set to Hide in PaladinShop.
To set this:
- In Paladin, from the main menu, select File > Setup.
- Select the Class tab.
- In the field under Active, select a class.
- Under the Default Dept. list, check Hide in PaladinShop.
- Click Save, then click Close.
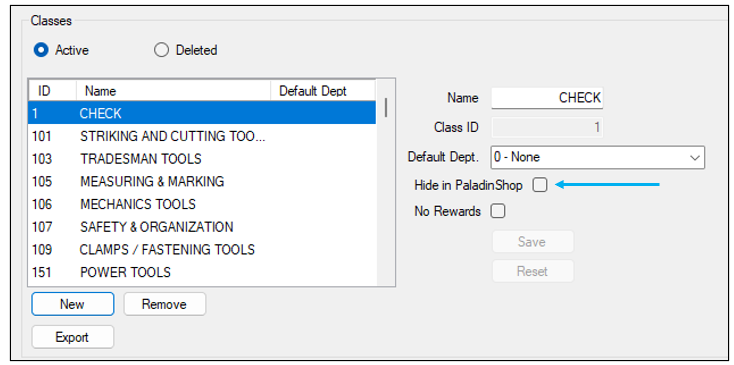
Figure 4: Classes/Hide in PaladinShop
Subclasses
If only subclasses need to be excluded, Hide in PaladinShop can be set.
To set this:
- In Paladin, from the main menu, select File > Setup.
- Select the Class tab.
- In the field under Active, select a sub class.
- In the Sub Classes pane, check Hide in PaladinShop.
- Click Save, then click Close.

Figure 5: Sub Classes/Hide in PaladinShop
Individual items
Individual items can be hidden in the store’s site. This is done by:
- In Paladin, from the top ribbon, select the Inventory tab.
- Select the PaladinShop tab.

Figure 6: Inventory module/PaladinShop tab
The PaladinShop Inventory Visibility pane opens.
Department, Class, Subclass, and Not Kit Trigger must have a green checkmark for PaladinShop Visibility to be selected. If you do not want an item to be visible in a stores site; Visible can be changed to Hidden.
Note: If an item is part of a kit in Paladin, Not Kit Trigger will be a red X, and PaladinShop Visibility needs to be Hidden.
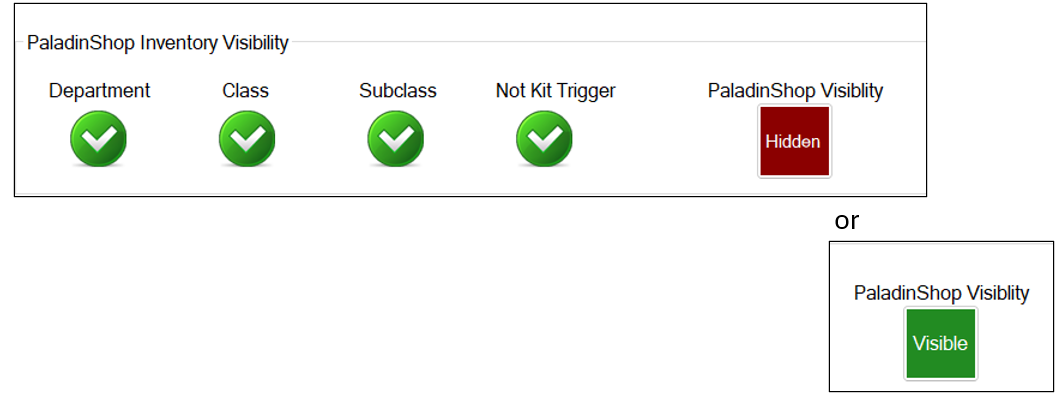
Figure 7: PaladinShop Inventory Visibility
- After assigning PaladinShop Visibility, on the bottom ribbon of the module, click F12 Save.
PaladinShop order fulfillment
When an order is placed from the store’s site, it is reflected in the PaladinShop tab of Paladin’s Features browser.
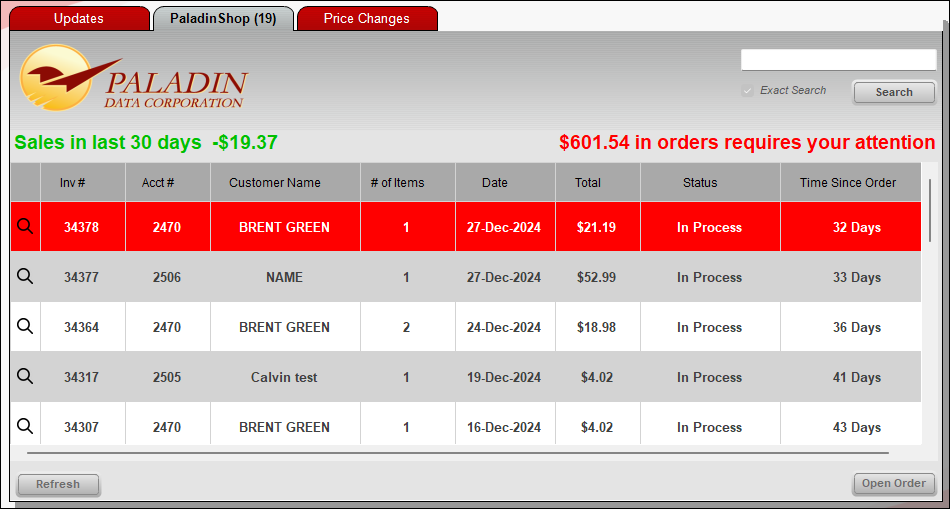
Figure 8: PaladinShop tab
The PaladinShop tab shows the number of items in the queue, status of the sales in the last 30 days, and the dollar amount in orders that require attention/fulfillment.

Figure 9: Store order status
Orders can be opened in two ways:
- Clicking on the magnifying glass at the beginning of orders.
- Click on Open Order on the bottom right of the PaladinShop tab.
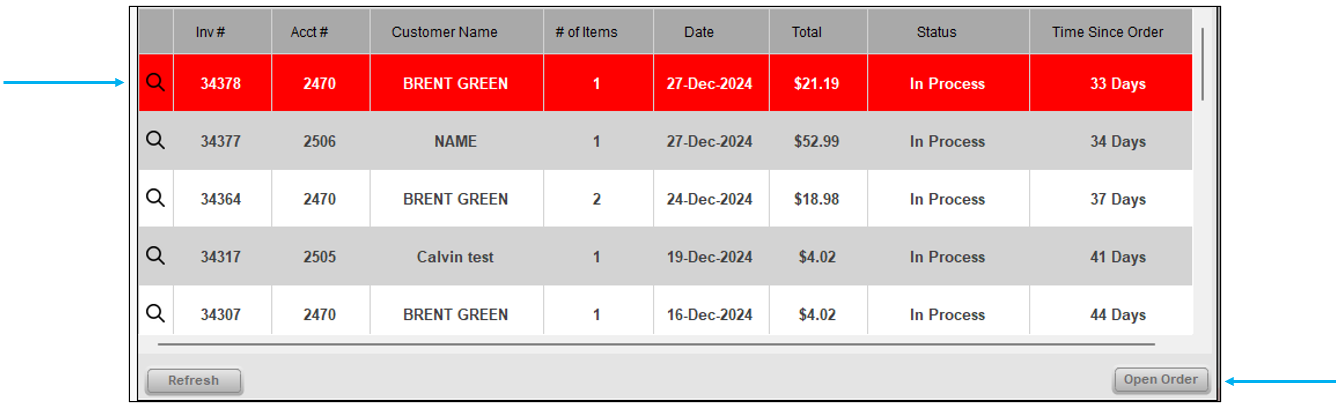
Figure 10: Options to open orders
When either option is selected to open an order, the Order Details tab opens showing:
- Print Pick List option.
- A green checkmark indicating that a part in the order has been pulled (this will be reflected in SOH).
- An orange exclamation mark indicating that a part in the order is yet to be pulled (having the part Canceled is an option).

Figure 11: Status of parts in an order
At the bottom right of the Order Details tab is Send Order Update. If items in the order have not been designated as Pulled or Canceled, and Send Order Update is pressed, the Order Not Complete window opens.
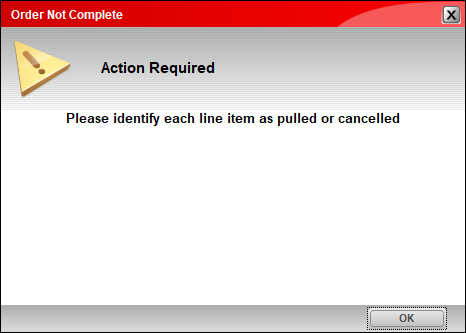
Figure 12: Order Not Complete window
After assigning a state to the items, selecting Send Order Update returns the PaladinShop tab, and the order is now in Paladin for invoice processing.
Note that the PaladinShop tab now reflects the following:
- The number of orders in the queue is reduced (for this example, the number went from 19 to 18).
- The dollar amount in orders that require attention/fulfillment is reduced (in this example the dollar amount went from $601.54 to $ 551.05).

Figure 13: Update to orders in queue and orders requiring attention
Note: If an item is canceled, and the refund exceeds the total amount of the order, the Refund Order window opens stating that the Refund exceeds the order transaction amount. The order will need to be removed and recreated in PaladinShop to fulfill the item(s) that can be pulled.
Note: The item that was Canceled is canceled in the PaladinShop site and is not reflected in Paladin when the order is invoiced.
To complete the order and create an invoice/receipt:
- In Paladin, on the top ribbon, select the Invoice/Quote module.
- On the bottom ribbon of the module, select F6 Recall Transaction.
- On the top of the Recall Transaction window, enable PaladinShop and check Show for all customers.
- Highlight the order you are working on, and in the lower right hand corner of the window, select Open Order.
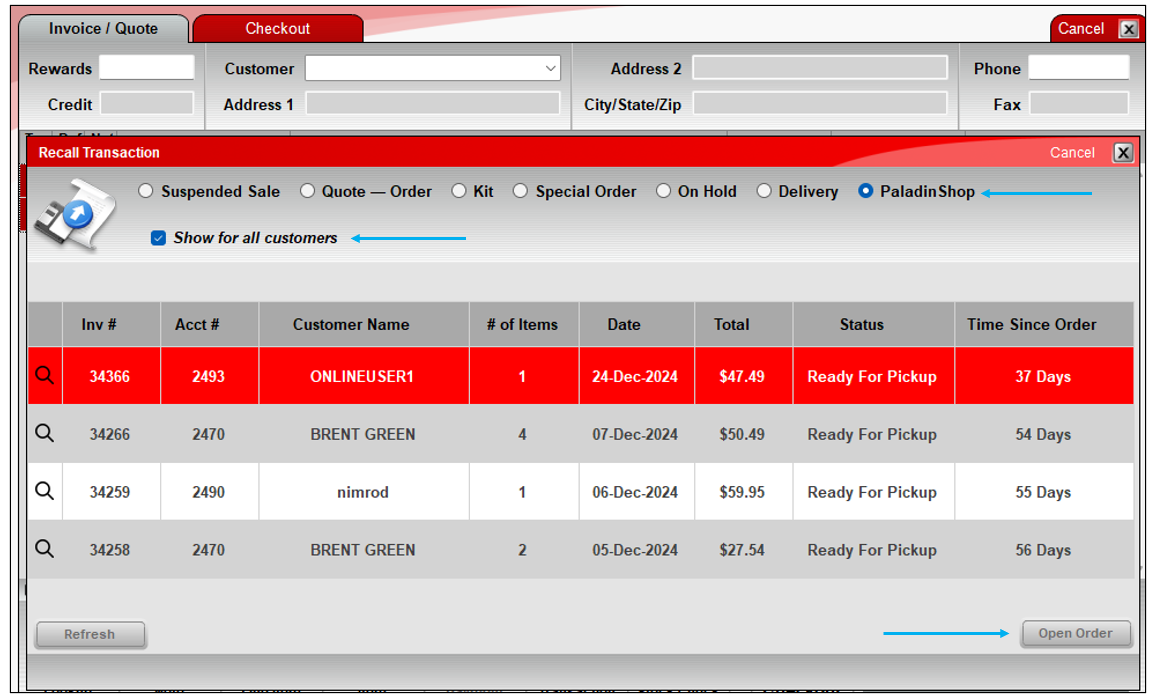
Figure 14: Recall Transaction window
The Ecommerce Order Details window opens.

Figure 15: Ecommerce Order Details window
On the bottom of the window you have the option to Deliver to Customer or Cancel Order. A note is also given to the cashier to Make sure to verify authorized signer’s ID and order number. Verifying the authorized signer is done in the Invoice Information window (Figure 15).
- Select Deliver to Customer.
Important: If the customer does not have an email established, the Order Not Complete window opens.

Figure 16: Order Not Complete window/customer email needed
The customer will need to enter their email address in the Contact Information pane of the Customers module. When done, the steps to complete the order and create an invoice/receipt will need to be repeated.
Note: When processing an order in Paladin that is not related to a purchase through the store’s site, at checkout, the Enter Email Address window opens. Enter the customer’s email address and press OK.
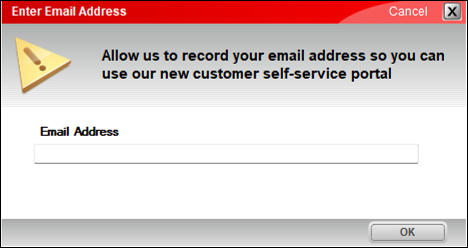
Figure 17: Enter Email Address window
After step 5, the process continues with the Invoice Information window opening.
The Invoice Information window opens.
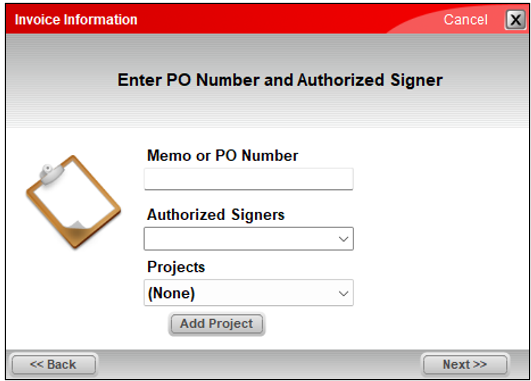
Figure 18: Invoice Information window
- Verify the person picking up the order is listed in the Authorized Signers list. If requested from the person picking up the order, information can be entered in the Memo or PO Number box, and a project can be selected from the Projects list. A project can be added by selecting Add Project.
- Click Next.
The invoice prints to the dedicated printer established and is formatted as follows:
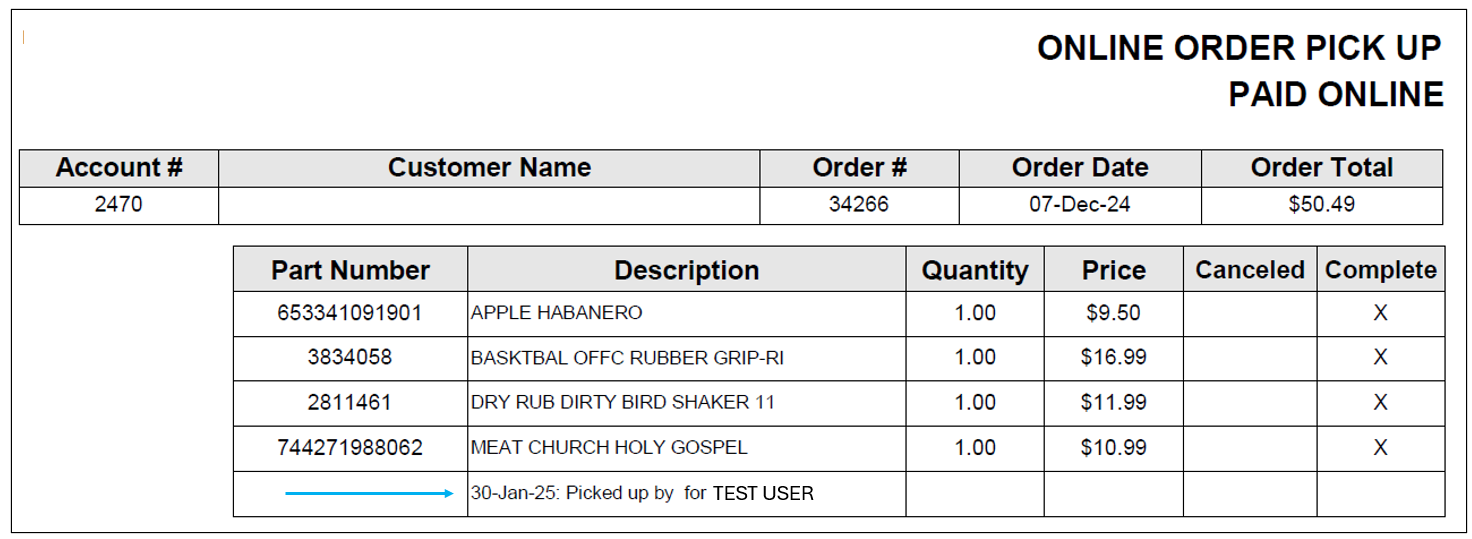
Figure 19: Pick up invoice
Note: The date the order was picked up in store is shown along with the name of the authorized employee/signer.
If you have questions or suggestions about this information, contact support@paladinpos.com.