
Perform the following steps as part of the FastBound integration setup process. This process can be time intensive. STEP F will likely take you the most time.
Important: Do not start these tasks until Paladin Support has instructed you to start.
This article provides instruction and information, which must be done in the following order:
- STEP A: Set up A&D firearm inventory items in Paladin
- STEP B: Create inventory items for any fees, such as background checks and transfer fees in Paladin
- STEP C: In FastBound, add Federal Firearms License (FFL) and other entities that supply you with firearms as FastBound contacts
- STEP D: In Paladin, create firearm suppliers
- STEP E: Acquire firearm inventory in FastBound and set up links between FastBound and Paladin
- STEP F: Submit a Help Request to turn on the integration
Before you begin, Paladin must have performed these steps with you:
- Turn on serialization.
- Create a department for acquisition and disposition (A&D) firearms.
- Create a class for firearms A&D firearms.
- Set up and verified the connection between FastBound and Paladin.
STEP A: Set up A&D firearm inventory items in Paladin
In this step, you will turn on serialization and assign the designated firearms class to each acquisition and disposition (A&D) firearm item (part #) in your inventory. If a firearm inventory item does not exist, you will create it.
- If you don’t know your designated A&D firearm class, in Paladin, from the main menu, select File > Setup; select the Firearms tab, and in the Firearms pane note the Firearms Class ID.
- In Paladin, on the top ribbon, select the Inventory module.
- For each A&D firearm that you sell, perform the following:
- Open the inventory item.
Note: If the item doesn’t exist, press F2 Add Item to create it and set stock on hand (SOH) to zero even if you have this firearm in stock. To ensure that your costs and margins are computed correctly, it is best practice to update your SOH by receiving a purchase order. Make a note to receive items later, in the PO module, if needed. - Select the General tab.
- In the Class pane, select the A&D firearms class in any column.
- On the top of the Item Information pane, check Serial#. This turns on serialization for this item.
- In the Item Information pane, in the Dept list, select the firearms department.
- Click F12 Save to update the item.
- Optional: Enter serial numbers for the item: Click F6 Serial # & Alt Part #.
- In the Alternate Part # & Serial # window, enable Serial # and add the serial numbers. If it is not convenient to enter them here, you can do it in a later step (STEP E).
- Repeat these steps for each A&D firearm inventory item.
- Open the inventory item.
STEP B: Create inventory items for any fees, such as background checks and transfer fees in Paladin
If you charge fees for firearms, such as a background check fee, create an inventory item for the fee in Paladin and set the non-inventory status. The non-inventory status is used for non-tangible products with no stock on hand and zero cost basis.
Perform the following for each fee:
- In Paladin, on the top ribbon, select the Inventory module.
- On the bottom ribbon of the module, click F2 Add Item.
- Enter the required information for the fee. The Part # can be an ID that is easy to remember. Set the Cost, and SOH to zero.
- Click F12 Add to create the item.
- With the new item open, click the General tab.
- On the top of the Item Information pane, check Non-inventory.
- If the fee is not taxable, click the Pricing tab and clear the Taxable checkbox.
- Click F12 Save.
STEP C: In FastBound, add Federal Firearms License (FFL) and other entities that supply you with firearms as FastBound Contacts
In FastBound, create contacts for all Federal Firearms Licenses (FFL) and organizations that supply your store with firearms. You will select from these contacts when you enter the acquisition information for each firearm in your inventory in STEP D.
Note: If you need help with this task, contact FastBound.
STEP D: In Paladin, create firearm suppliers
Important: The firearm suppliers in Paladin are NOT linked to your FastBound Contacts. They will be used in Paladin’s PO module to receive firearms.
To create a firearm supplier in Paladin:
- In Paladin, from the main menu, select File > Setup.
- Select the Suppliers tab.
- For each firearm supplier:
- In the Suppliers pane, click New.
- Enter the supplier Name.
- Enter an unused Supplier Number.
- Optional: Enter additional information as desired.
- Click Save.
- Click Save, then click Close.
- Close and restart Paladin.
STEP E: Acquire firearm inventory in FastBound and set up links between FastBound and Paladin
In this step, you will acquire your firearm inventory in FastBound and establish links between FastBound and Paladin for the firearms in your inventory. The links are unique keys that combine the part # in Paladin and the firearm serial number. When you sell an item in Paladin, this link allows Paladin to collect and send disposition data to FastBound so FastBound can dispose the firearm.
This setup step can be time intensive and is performed entirely in Paladin using three tools:
- Firearms Reconciliation Part 1: Link FastBound Firearms to Paladin
- FastBound Reconciliation Part 2: Add Paladin Firearms to FastBound
- FastBound Reconciliation Part 3: Add Firearms to both Paladin and FastBound
Instruction on these three tools are given in the following subsections:
- How to access the reconciliation tools
- How to use the Firearms Reconciliation Part 1 tool
- How to use the FastBound Reconciliation Part 2: Add Paladin Firearms to FastBound
- How to use the FastBound Reconciliation Part 3: Add Firearms to both Paladin and FastBound
Note: All tools create Paladin/FastBound links.
-
Firearms Reconciliation Part 1: Link FastBound Firearms to Paladin
This tool finds firearms that are acquired in FastBound but not linked to a firearm in Paladin. This tool is primarily for stores that were already using FastBound as a standalone application before converting to this integration. For most stores, this tool will return no results, which is expected. However, this tool must be run before using either of the other tools.
-
FastBound Reconciliation Part 2: Add Paladin Firearms to FastBound
This tool gathers acquisition details for firearms in your inventory and then automatically acquires them in FastBound. This tools assumes you have entered firearm serial numbers in Paladin. If you have not entered serial numbers in Paladin inventory for your firearms, do this before proceeding with Part 2 or consider using the FastBound Reconciliation Part 3 tool, which does not require you to have the serial number in Paladin (it adds it for you).FastBound Reconciliation Part 2 has two options:
-
Option 1: Click Add Firearms to FastBound.
This option methodically steps through each firearm inventory item (part #), collects acquisition details for the serial numbers on that inventory item, then acquires them in FastBound.
Tip: If you need more information for an item, click Skip in the upper left corner of the window to go to the next item. -
Option 2: Enter a Serial Number and click Add Item to FastBound.
This option collects acquisition details for any serial number you enter. The serial number must be recorded in a Paladin firearm item (part #). You may find this option helpful if you are entering information from a paper bound book.
-
-
FastBound Reconciliation Part 3: Add Firearms to both Paladin and FastBound
This tool is useful if you have not added serial numbers to your firearm inventory part #s in Paladin. This tool requires you to enter a serial number and select a part #. It then adds the serial number to the part # in Paladin, collects the acquisition details, then acquires the firearm in FastBound.
How to access the reconciliation tools
- In Paladin, from the main menu, select File > Setup.
- Select the Firearms tab.
- Scroll to the Firearms Reconciliation pane.
How to use the Firearms Reconciliation Part 1 tool
Note: You must perform Firearms Reconciliation Part 1 before proceeding to Part 2 or Part 3.
- In the FastBound Reconciliation Part 1 pane, click Find Unlinked Items.
- If you see the message, No Unknown Items Found, you are done with Part 1 and can continue to FastBound Reconciliation Part 2. Otherwise, continue with this procedure.
- Select the Paladin Part Number corresponding to each serial number returned.
Notes:- If the part # does not exist, you can click Create Part Number to create a new firearm part # in Paladin. It will immediately appear in the Paladin Part Number list.
- If there are many items in this list, and you are not sure of the part #s, consider creating a Serial Number List report for the firearms class, which shows serial numbers and their part #. You will have to exit Paladin Configuration to run the report.
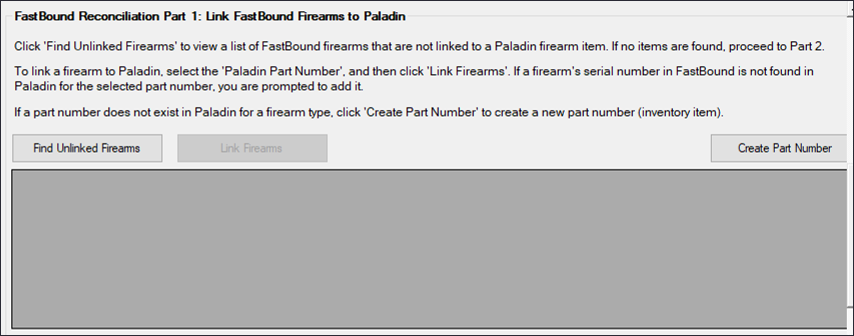
Figure 1: Fast Bound Reconciliation Part 1
- Click Link Firearms to create the links.
Note:
-
- If you select a Paladin Part Number for a serial number, and the serial number is not recorded on the part number, you will be prompted to add it.
- If you accept, the serial number will be added to inventory item (part #) without affecting the stock on hand.
- If you decline to investigate further, the item will continue to appear when you click Find Unlinked Firearms.
- When Find Unlinked Firearms returns no results, proceed to FastBound Reconciliation Part 2.
How to use the FastBound Reconciliation Part 2: Add Paladin Firearms to FastBound
This tool assumes that you have entered serial numbers for your acquired firearms in Paladin inventory. Do this first, or alternatively, you can enter each serial number and part number independently using the FastBound Reconciliation Part 3 Tool. To enter serial numbers for an inventory item, in Paladin’s Inventory module, open the item. Then, on the bottom ribbon of the module, click F6 Serial # & Alt Part #, and in the Alternate Part # & Serial # window, enable Serial #. Enter the serial number in the Enter Serial # box, then click Add. When done, click F12 Finish.
- In the FastBound Reconciliation Part 2 pane, select an option. You can switch between them, if desired.
- Option 1: Click Add Firearms to FastBound to collect acquisition details for all firearms (serial numbers) that are not acquired in FastBound. After you enter the details for each serial number, the firearm will be automatically acquired in FastBound.
Tip: If you need more information for a firearm (serial number), click Skip in the upper left corner of the window to go to the next one. - Option 2: To acquire a firearm into FastBound by serial number, enter the Serial Number, then click Add Item to FastBound.
The serial number must be recorded in a Paladin firearm item. You may find this method helpful if you are entering information from a paper bound book and have already entered serial numbers for your inventory items.
- Option 1: Click Add Firearms to FastBound to collect acquisition details for all firearms (serial numbers) that are not acquired in FastBound. After you enter the details for each serial number, the firearm will be automatically acquired in FastBound.
- All firearms/Serial numbers are acquired when you click Add Firearms to FastBound and the following message appears: All Paladin firearms have been entered into FastBound
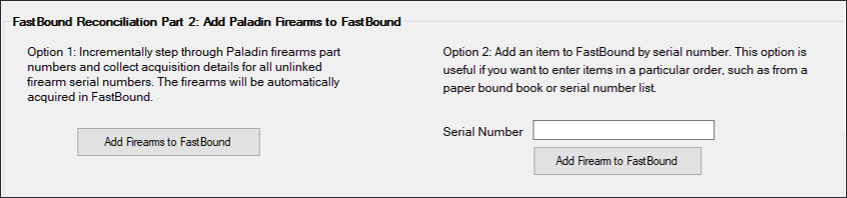
Figure 2: Fast Bound Reconciliation Part 2
How to use the FastBound Reconciliation Part 3: Add Firearms to both Paladin and FastBound
This tool is intended to acquire firearms whose serial numbers are not recorded in Paladin inventory. Like Part 2, this tool collects acquisition details for the serial number you enter and acquires the firearm in FastBound. However, this method does the extra step of saving the serial number to the part # you specify.
- In the FastBound Reconciliation Part 3, enter a Serial Number and select a Part Number.
- Click Add Firearm.
- Enter the acquisition details, then click OK.
- The firearm will be acquired in FastBound, and the serial number will be recorded in Paladin on the part number you specified.
If you find that you need to create a new firearm part #, click Create Part Number and enter the inventory information. The part number will automatically be serialized and added to the firearms class. It will also immediately appear in the Part Number list.
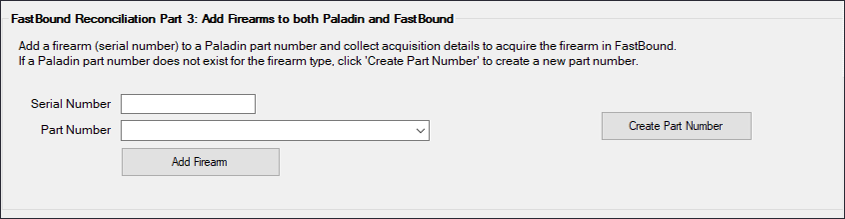
Figure 3: Fast Bound Reconciliation Part 3
STEP F: Submit a Help Request to turn on the integration
After you have acquired all your firearms into FastBound, submit a Help Request to turn on FastBound integration.
To submit a Help Request in Paladin:
- In Paladin, on the top menu, select Help > Support > Submit a Help Request. When asked if this is a store down emergency, click No.
- Fill out the form, and in the Description box, state that you have completed the setup steps and are ready to turn on FastBound integration.
- A Paladin Support representative will contact you.
If you have questions or suggestions about this information, contact support@paladinpos.com.
