This article provides instruction and information on the following:
- How to upload a file to Do It Best
- How to sign up a Do It Best Rewards customer
- Do It Best National Lookup
- How to redeem a Do It Best coupon
How to upload a file to Do It Best
- On the client’s computer, navigate to C:\PaladinPOS.
- Create a folder, and name it Uploaded.
- Go to C:\PaladinPOS\Export. If you do not see a DIBUpload folder, create one.
- Open Paladin.
- From the top menu, select Maintain > Data Viewer.
- Select the Rewards tab.
- Select Do It Best from the Brand list.
- In the Starting list and the Through list, select the date range for the date file that you need to send.
- Make sure that the Test Mode checkbox is not selected.
- Click View Data.
- When the data appears in the Data Viewer, click Upload Data to upload the data to Do It Best.
- Close and restart Paladin.
- From the main menu, select File > Setup.
- Select the Company tab.
- In the Paladin Service pane, in the Run on Terminal Id box, enter the server terminal ID.
- Click Save, then click Close.
- On the following day, email the client to verify that it received the nightly upload in the C:\PaladinPOS\Export\DIBUploaded folder.
Note: When you manually send the Do It Best file, put it in the C:\PaladinPOS\Uploaded folder.
How to sign up a Do It Best Rewards customer
There are two ways to sign up a Do It Best Rewards customer:
Signing up an existing customer In the Customers module:
- In Paladin, on the top ribbon, select the Customers module.
- In the Customer box, enter the customer’s name and press Enter.
- On the top of the module, next to Rewards, click Sign Up.
- In the Sign Up New Rewards member window.
- In the Reward Number box:, assign a Reward Number (required).
- Enter a Phone number (required).
- If the customer is a veteran, check Veteran.
- Click F12 Finish.

Figure 1: Sign Up New Rewards member window
- Select the Credit pane, in the Credit Limit box, enter zero or a fixed amount.
- Click F12 Save.
- Select the Do It Best Rewards tab.
- In the Customer Rewards Card pane, if Veteran was checked in the Sign Up New Rewards member window, Veteran? will be checked.

Figure 2: Veteran status
Signing up a customer during checkout in the Invoice/Quote module:
- On the top of the module, next to Rewards, click Sign Up.
- In the Sign Up New Rewards member window.
- In the Reward Number box:, assign a Reward Number (required).
- Enter a Phone number (required).
- If the customer is a veteran, check Veteran.
- Click F12 Finish.
Do It Best National Lookup
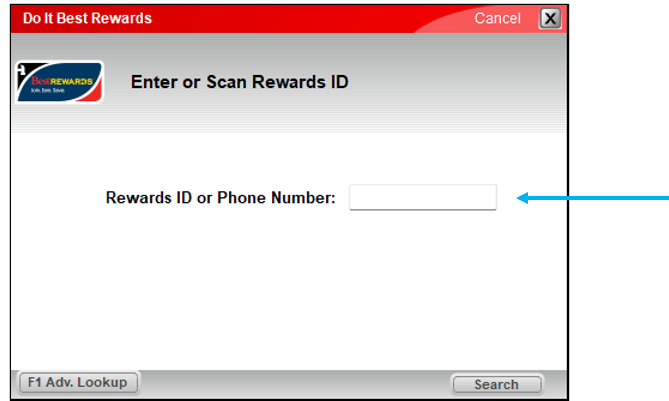
When checking out a customer in Paladin’s Invoice/Quote module, if set, the Do It Best Rewards Enter or Scan Rewards ID window opens. If the Do It Best Rewards customer does not exist in Paladin, in the Rewards ID or Phone Number field, enter either for the customer and click Search.

Figure 3: Do It Best Rewards Enter or Scan Rewards ID window
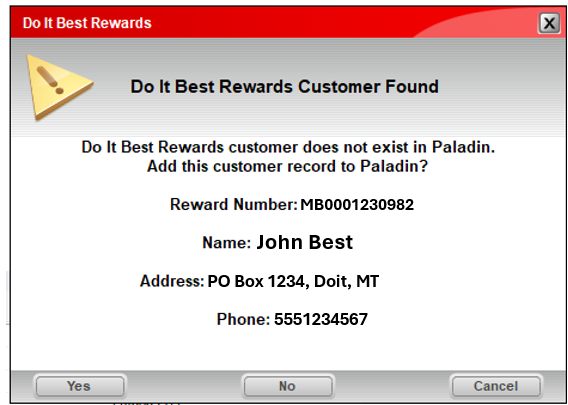
The Do It Best Rewards Do It Best Rewards Customer Found window opens providing the customer’s information.

Figure 4: Do It Best Rewards Do It Best Rewards Customer Found window
If the customer agrees to have their customer record in Paladin, select Yes and proceed through the checkout process. The customer is assigned a number which now shows in the Customer field of the module.

Figure 5: Paladin Customer number
If the customer does not want to have their customer record in Paladin, select No and proceed through the checkout process. The Customer field of the module now shows the customer name and no customer number.

Figure 6: Paladin Customer with no customer record
How to redeem a Do It Best coupon
To redeem a Do It Best coupon:
- In Paladin, on the top ribbon, select the Invoice/Quote module.
- Add the purchase items to the invoice.
- Scan the Do It Best coupon barcode to add it to the invoice.
- Click F8 Checkout, then complete the checkout process.
If you have questions or suggestions about this information, contact support@paladinpos.com.

