This article provides instruction and information on the following:
About the report
Many products now incur additional fees set by government and regulatory agencies for recycling or environmental remediation. Paladin makes it easy to automatically include these fees at checkout by using Inventory Core charges. However, as multiple fees are added, we recognize the need for detailed reporting.
To accomplish this, Paladin’s Government Fee Detail (GVMT) report provides breakdown of additional item fees by the item’s class. For example, if items A and C both incur fees and belong to the same class, their fees will be grouped together in the report. To make the best use of this report, make sure all items with fees are assigned to a class.
The report is provided in Excel and contains:
- A summary and total of all fees by class
- Itemized lists of fee transactions for each class
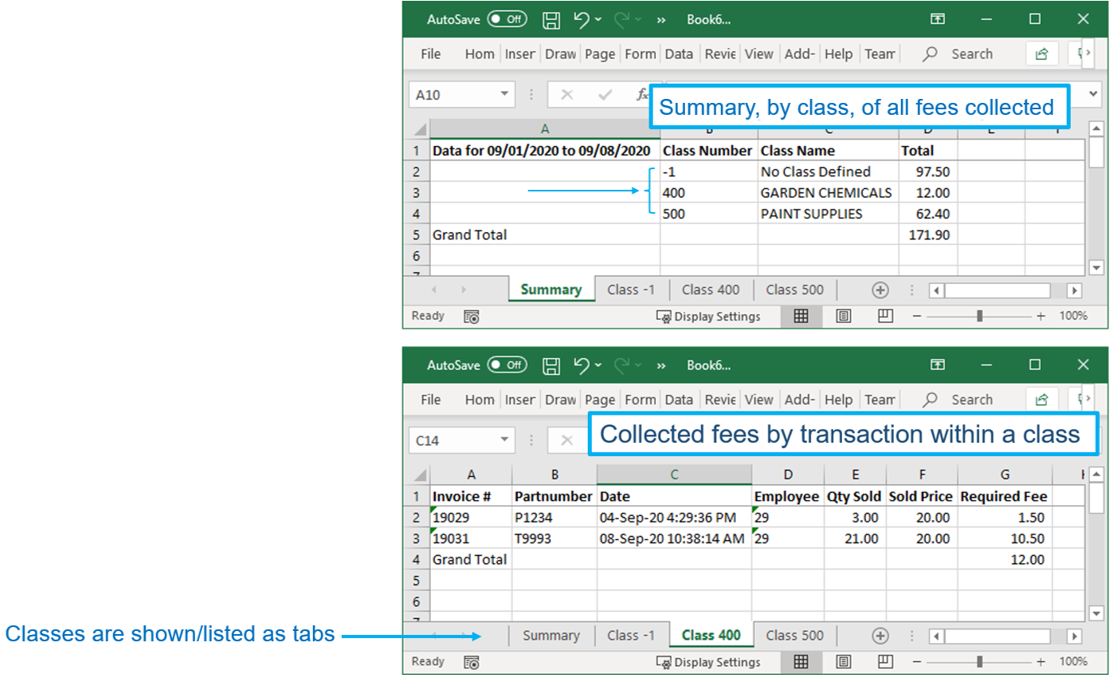
Figure 1: Excel Summary of fees and Collected fees
Notes:
- Fees are associated with the item’s class at the time of sale. This means that item fees collected prior to assigning a class to an item appear in the ‘no class’ category.
- If your inventory item has multiple classes selected, the fee is associated with the first class as viewed from left to right in Paladin’s Inventory module, General tab.
Turn on the fees feature
To set up the feature that assigns fees to items:
- In Paladin, from the main menu, select File > Setup.
- Select the Invoice (Store) tab.
- In the Invoice pane, check Use Alternate Core Charge Identifier.
- Optional: In the Core Charge Identifier box, enter GVMT. This name will be used for fees throughout Paladin, including when the fee is added to an invoice.

Figure 2: Core Charge Identifier
- Click Save, then click Close.
- Close and restart Paladin.
Assign fees and classes
In Paladin’s Inventory module, open each inventory item that will incur a fee. On the General tab, in the Item Information pane, look for the box with your fee name (GVMT) and enter the fee amount. Make sure a class is selected.
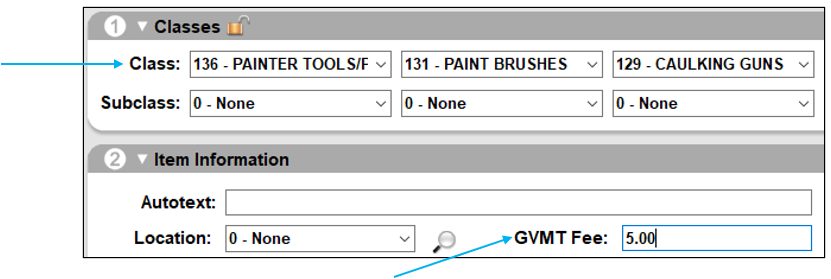
Figure 3: Class and Required Fee
Note: Class assignment for a collected fee is set to the item’s class at the time of sale. Therefore, if you update the class on an item during the report time period, the collected fees for the item may be distributed across different classes in the report.
Create the report
You can see a breakdown of collected fees by class in the GVMT Fee Details report. To create the report:
- In Paladin, on the top ribbon, select the Reports module.
- In the Report Area pane, select Sales Analysis > What I Need to Know.
- In the Report List pane, select GVMT Fee Details.
Note: In the Report Description pane, it is mentioned that report opens in Excel.

Figure 4: GVMT Fee Details Report setup
- In the Choose Report pane, click F12 Next.
- In the Fee Details window, in the Report Settings pane, select a Beginning and Ending date for the report.
- In the Sorting Options pane, click F12 Run Report.
- An Excel icon will appear on the bottom taskbar of your computer. Click the Excel icon to open the report.
If you have questions or suggestions about this information, contact support@paladinpos.com.
