This article provides instruction and information on the following:
- How to create a Comparative Revenue report
- Information about the Sales Tax Detail section of the Comparative Revenue report
- How to set Comparative Revenue report export
- How to set up department groups for the Comparative Revenue report
Note: Refer to the following for detailed instruction on how to read a Comparative Revenue report.
How to create a Comparative Revenue report
Note: The Comparative Revenue Report must be run on the same day that you run the Transaction Report with monthly service charges. Refer to: Create a Transaction Report showing monthly service charges
- In Paladin, on the top ribbon, select the Reports module.
- In the Report Area pane, select Sales Analysis > Revenue.
- In the Report List pane, select the report that you want to generate.
-
- Today’s Comparative Revenue
- Yesterday’s Comparative Revenue
- Period Comparative Revenue
- Report Revenue from a Promotion
- In the Choose Report pane, click F12 Next.
- In the Report Settings window, enter the desired report settings.
Note: You can select Export to Excel and/or Exclude Tax from Gross Profit?
- In the Additional Settings pane, select one of the following from the Detail by list:
-
- None
- Department
- Primary Supplier
- Location
- Class 1
- Class 2
- Class 3
- Customer Type
- In the Sorting Options pane, click F12 Run Report.
A PDF file of report opens.
Important: : If Change is given on a Cash sale, the # OF INV column of the THIS PERIOD pane will show 2. This is expected behavior in Paladin.
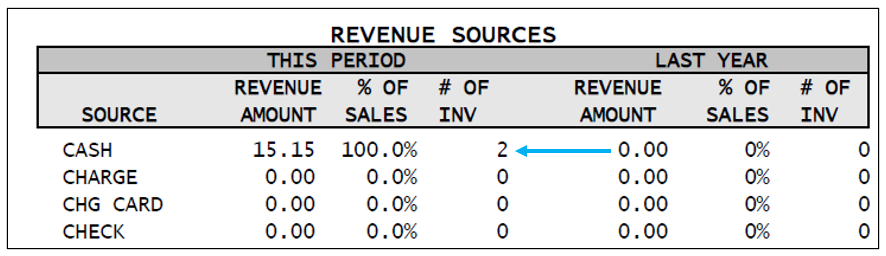
Figure 1: Expected discrepancy # OF INV
Note: For stores that are set up with in-store pickup, in the Revenue Sources table of the report, under Sources, you will see the WEBSTORE line item. The WEBSTORE number represents all items charged to the In-Store Pickup payment type.
Information about the Sales Tax Detail section of the Comparative Revenue Report
Note: The following items will not affect INVOICE NON-TAXED amounts.
|
Tax row: This Period Exempt Sales includes |
||
|
For this line item |
Go here |
Options |
|
If the tax is unchecked on invoice |
Invoice/Quote module |
|
|
If the tax box is unchecked for the item in the Inventory module |
Inventory module |
To select an item, do one of the following: 1. Enter the part number, use Advanced Lookup, or create a new item. 2. In the Pricing tab, in the Pricing Level section, select the item, and then clear the Taxable checkbox. |
|
If the department is non-taxable |
File > Setup > Dept tab |
If you have admin privileges, select or create a department, then select the taxes that apply to the department. |
|
Instant saving/Dynamic Promotions that are non-taxable |
|
For Ace Rewards clients only: Select any instant savings or dynamic promotions that are not taxed. Examples: Coupons, reward programs. |
Note: The following items will affect THIS PERIOD EXEMPT SALES amounts.
|
Tax row: INVOICE NON-TAXED: This Period Exempt Sales includes |
||
|
For this line item |
Go here |
Options |
|
Account is non-taxable |
Customers module |
Select or create a new customer, then press F8 to change the tax- exempt status. |
|
Tax is reset with F8 in checkout screen |
Invoice/Quote module |
Process the transaction, complete the transaction on the Checkout screen, then press F8 to change the tax. |
|
Service Charges |
Customers module |
Select all service charges that are tax exempt. |
How to set Comparative Revenue report export
This option causes the Comparative Revenue report to export a row for every active department in your store. Every report contains the same number of lines, thus, simplifying using this data in other management or reporting systems.
To enable this feature:
- In Paladin, from the main menu, select File > Setup.
- Select the Company tab.
- In the Report Options pane, check Show Zero Comparative Revenue Departments in Excel Export.
- Click Save, then click Close.
Note: This feature is limited to the Excel export output only.
How to set up department groups for the Comparative Revenue report
When you assign department groups. the Comparative Revenue report (Excel version) automatically creates individual worksheets for those specified groups. It is not necessary to assign every department to a group.
- Decide how you want to group your departments. Each group will need an integer group ID. Integers can be simply 1, 2, 3, etc. You do not have to assign every department to a group.
- In Paladin, from the main menu, select File > Setup.
- Select the Dept tab.
- To assign a department group ID, select the department, then enter the group ID (integer) in the Excel Report Group column. Do this for all departments in each group.
- Click Save, then click Close.
- Close and restart Paladin.
If you have questions or suggestions about this information, contact support@paladinpos.com.
