Note: Paladin can run many sale types. For guidance and training, contact Customer Support.
Important: For multi-stores, you must enter the same supplier name for each store. If you do not do this, you will create multiple pricing plans and sale lists.
For example, do not use these variations: Sunset, sunset, sunset1, sunset2, etc. Instead, use Sunset for each store.
Important: Because multi-stores can have both Ace and non-Ace locations, Ace EDI sale creation will no longer add a pricing plan to non-Ace EDI stores. Pricing plans will now only be created automatically for stores with Ace EDI enabled and an Ace supplier number.
This article provides instruction and information on the following:
- How to set up a pricing plan
- Navigate between pricing plans and sales lists
- How to remove a pricing plan
- How to apply a pricing plan to a customer account
- How to view and remove customers from pricing plans
- How to create a pricing plan with subclasses
- How to adjust pricing plans
- Pricing plan filters
- Sale and pricing plan IDs for sale templates
Note: For information on using RF Units with pricing plans, refer to Step 2: How to assign the sale to a pricing plan and activate the sale in the How to use the RF unit to import a Sale List and activate a sale section in the RF Units KBA.
How to set up a pricing plan
To set up a pricing plan:
- In Paladin, from the main menu, select File >Setup.
- Select the Pricing Plan tab.
- In the Pricing Plans section, click New.
- In the Name box, enter a name for the pricing plan.
Note: The name can be a maximum of 30 characters.
Optional: To indicate that no discount will be less than the minimum allowable margin, check Respect Min Margin.
Enter data for any or all of the following pricing plans:
|
To set up this pricing plan |
Follow these steps |
|
Sale numbers |
In the Sale List Range Start and Sale List End boxes, enter the range of sales to which this pricing plan applies. |
|
Department numbers |
In the Dept Number Range Start and Dept Number Range End boxes, enter the department range. |
|
Class numbers |
In the Class Number Range Start and Class Number Range End boxes, enter the class. |
|
Subclass numbers |
In the Subclass Numbers Range Start and Subclass Numbers Range End boxes, enter the subclass. |
|
Supplier numbers |
In the Supplier Number Range Start and the Supplier Number Range End boxes, enter the supplier number range. |
|
Date range |
If there is a date range, check Date Range. Then in the Date Range Start and Date Range End lists, select the date. |
|
Basic percentage discount |
• In the Discount or Markup list, select Discount Percent. • In the Cost or Retail Price list, select the type of cost or price. • In the Amt % box, enter the percentage amount. |
|
Ace B2B |
Note: In Paladin, Pricing Plans had a restriction that limited a price discount to class, department, supplier, or sale ID range. This restriction has been removed; therefore, clients can now create store-wide, multiple items discounts. An “owner” discount of cost + 0 is still disallowed in Paladin. If clients want to test the discounts with their own accounts, they’ll need to create a new Pricing Plan that isn’t at cost, even if it is cost + 1%, and add that to their accounts. This won’t impact their price in the store since the cost + 0 will override it. Note: Additional setup is required by the client to link Paladin customer accounts with acehardware.com business accounts. This is accomplished using the ACENET tool. Refer the client to Ace Hardware for more information. |
- Click Save, then click Close.
Navigating between pricing plans and sales lists
When in the Paladin Configuration > Pricing Plan tab, you can navigate between sales in the Sale List tab and the Pricing Plan tab.
-
In the Pricing Plan tab, click Go to Sale.
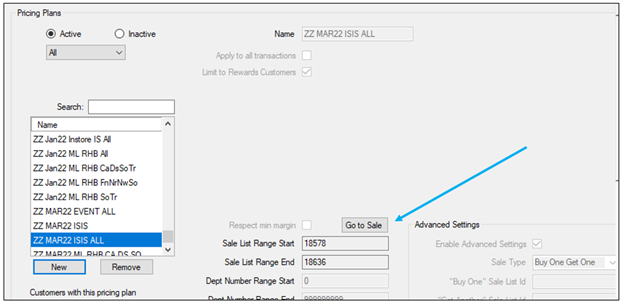
Figure 1: Pricing Plan tab Go to Sale button
- In the Pricing Plans pane of the Sale List tab, click Edit to return to the Pricing Plan tab.
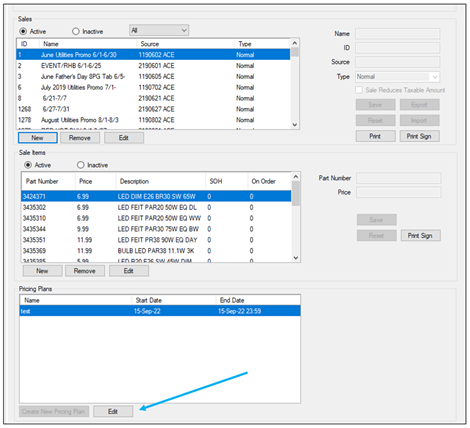
Figure 2: Sale List tab
How to remove a pricing plan
Note: Multiple pricing plans can be selected to remove or restore them. For block selection of multiple pricing plans, place your cursor on the first plan you want in the group, hold down the Shift key, and then click on the last plan you want in the block. To select various plans and then group them, place your cursor on the first plan you want in the group, then hold down the Ctrl key as you select additional plans in the list.
For single stores
- In Paladin, from the main menu, select File >Setup.
- Select the Pricing Plan tab.
- In the Pricing Plans section, highlight a Pricing Plan.
- Click Remove.
- Click Save, then click Close.
For Multi-stores
- In Paladin, from the main menu, select File >Setup.
- Select the Pricing Plan tab.
- In the Enable Pricing Plans section, uncheck the store that you want the pricing plan removed.
- Click Save, then click Close.
How to apply a pricing plan to a customer account
In Paladin, you can offer your customers special discounts by creating and assigning pricing plans to their customer account.
Note: To set up a pricing plan, refer to the How to set up a pricing plan section of this article.
- In Paladin, on the top ribbon, select the Customers module.
- Enter or select a customer account from the Customer list.
- Press Enter.
- On the bottom ribbon of the module, click F7 Adjust Pricing Plans.
- In the Adjust Pricing Plans window, in the Available Pricing Plans list, select the pricing plan, then click Add.
Note: To remove a pricing plan, in the Selected Pricing Plans pane, select the pricing plan and click Remove.
- Click F12 Save. The pricing plans in the Selected Pricing Plans pane will be applied to the customer account at checkout.
How to view and remove customers from pricing plans
Note: Multiple pricing plans can be selected to remove or restore them. For block selection of multiple pricing plans, place your cursor on the first plan you want in the group, hold down the Shift key, and then click on the last plan you want in the block. To select various plans and then group them, place your cursor on the first plan you want in the group, then hold down the Ctrl key as you select additional plans in the list.
To view customer pricing plans:
- In Paladin, from the main menu, select File > Setup.
- Select the Pricing Plan tab.
The Customers with this pricing plan field displays a list of customers using a particular plan.
To remove a customer from a pricing plan:
- Select a pricing plan from the Pricing Plans field.
- Select the customer from the Customers with this pricing plan field, then click Remove.
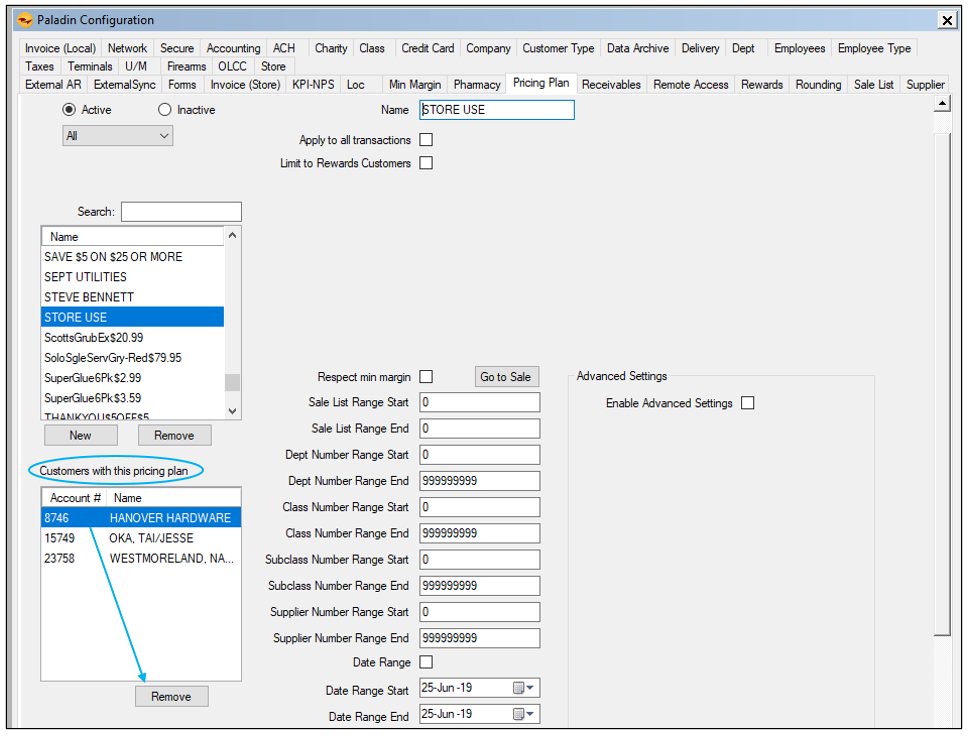
Figure 3: Paladin Configuration Pricing Plan tab/Customers with this pricing plan
How to create a pricing plan with subclasses
You can create a pricing plan by subclass by defining a range of one or more subclasses. This flexibility lets you control pricing on smaller, and more specific, groups of items in your store.
- In Paladin, from the main menu, select File > Setup.
- Select the Pricing Plan tab.
- Below the list of pricing plan names, click New.
- In the Name box, enter a name for the pricing plan.
- In the Class Number Range Start and Class Number Range End boxes, enter class IDs.
- In the Subclass Number Range Start and Subclass Number Range End boxes, enter subclass IDs.
Note: If you enter additional number ranges for department, class, or supplier, these filters are also applied. However, complex combinations are not recommended.
- Enter the Date Range, Discount, or Markup (for how the new price is calculated).
- Enter the Cost or Retail price (for the value used to create the new price),
- Enter the Amt % (for the percentage to use in calculating a new price).
- Click Save, then click Close.
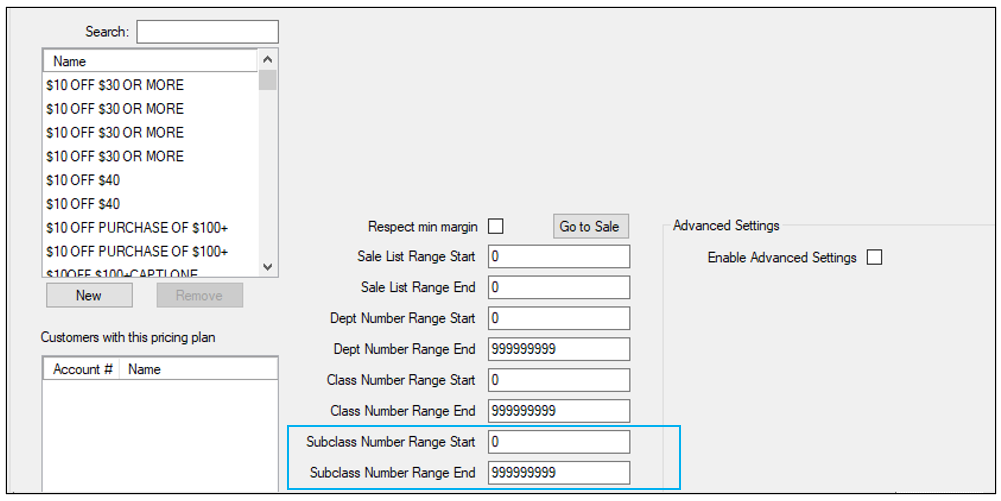
Figure 4: Paladin Configuration Pricing Plan tab/Subclass Number Range Start and End
How to adjust pricing plans
To view or edit a customer’s pricing plans:
- In Paladin, on the top ribbon, select the Customers module.
- Enter or select a customer name from the Customer list.
- On the bottom ribbon of the module, click F7 Adjust Pricing Plans.
- In the Adjust Pricing Plans window, you can view the Available Pricing Plans and Selected Pricing Plans.
- Make changes to the customer pricing plans.
- To add a pricing plan for the customer, in the Available Pricing Plans list, highlight a pricing plan, then click Add.
- To remove a pricing plan for the customer, in the Selected Pricing Plans list, highlight a pricing plan, then click Remove.
- When updates are complete, click F12 Finish.
Pricing plan filters
Pricing plan filters let you manage active sales more efficiently. When you select a filter, only those types of pricing plans are displayed.
The following table shows the types of pricing plans that appear for each filter.
|
Filter |
Pricing plan |
|
All |
All pricing plans. |
|
Normal |
All pricing plans except for:
|
|
Instant Savings |
Pricing plans for Instant Savings only. |
|
Dynamic Promo (Pricing plan only) |
Pricing plans for Dynamic Promotions only. |
To select a pricing plan filter:
- In Paladin, from the main menu, select File > Setup.
- Select the Pricing Plan tab.
- In the Pricing Plans pane, select a filter from the All list.
- Click Save, then click Close.
Sale and pricing plan IDs for sale templates
When you export sale sign information from Paladin, pricing plan IDs and Sale IDs are included for each sale item. You can use Microsoft Access templates to incorporate these values into your sale signs. The sale list ID has already been added to the Sale Sign 8 template.
To download the latest Microsoft Access templates:
- In Paladin, from the top menu, select Maintain > Download and then click Download MS Access Templates (Signs, Labels). The templates will download automatically. When the download is complete, the following message appears: Database Successfully Downloaded.
Note: You can use your terminal during the download process.
To create the sign export file:
- In Paladin, from the main menu, select File > Setup.
- Select the Sale List tab, select a sale, and then click Print Sign.
- Click Save, then click Close.
If you open the export file with Excel, the new values appear in the last two columns. The column headings are:
- PRICINGPLANID
- SALEID
If you have questions or suggestions about this information, contact support@paladinpos.com.
