With Advanced Lookup, you can find, edit, or add the following information:
| Customer | History | Inventory | Purchase Order |
|
|
|
|
This article provides instruction and information on the following:
- Advanced Lookup search feature
- How to set Advanced Lookup default search options
- How to use Advanced Lookup to find items to add to an invoice
- How to use Advanced Lookup to add items from an existing invoice to a new invoice
- How to use Advanced Lookup to find and add a customer to an invoice
- Advanced Lookup invoice history
- How to use Advanced Lookup to find an inventory item
- How to use Advanced Lookup to add items to a purchase order
- How to use Advanced Lookup to search for a customer account
- How to use Advanced Lookup to do a secondary search
- How to enable product pictures/images to be viewed in Advanced Lookup
- How to add a vendor web site to Advanced Lookup
Advanced Lookup search feature
This feature allows users to search inventory Descriptions 1 and 2 as a single field. Stores using long and/or complicated descriptions may find benefit from this search ability. The benefit gained from this feature is the ability to find inventory items with a specific phrase contained in their descriptions even if the phrase is split between Description 1 and Description 2 fields.
Note: Multi-word/multi-field searches require additional time to execute. Since every word is a separate search, stores with large inventories may see slightly slower search returns.
To enable this search ability:
- In Paladin, from the main menu, select File > Setup.
- Select the Company tab.
- In the Advanced Lookup pane, check Search Descriptions 1 and 2 as one field (This will negatively impact all search speeds).
- Click Save, then click Close.
How to set Advanced Lookup default search options
In Paladin, you can choose the default search option when you perform an Advanced Lookup search in Paladin’s Inventory, PO, or Invoice/Quote modules.
The Keyword search, which is the current default and the most extensive, searches all inventory fields for the text you provide.
Another option is to display only the items for specific:
- Class
- Department
- Location
- Supplier
To set any of these four options to be the default search option:
- In Paladin, from the main menu, select File > Setup.
- Select the Company tab.
- In the Advanced Lookup pane, from the Inventory Default Search Type list, select the search option that you want to be the default.
- Click Save, then click Close.
How to use Advanced Lookup to find items to add to an invoice
- In Paladin, on the top ribbon, select the Invoice/Quote module.
- On the bottom ribbon of the module, click F1 Advanced Lookup.
- In the Inventory tab, select one of the following options:
- Class
- Department
- Location
- Supplier
- Keyword
Note: If you have selected Keyword as a search parameter, in the search box enter a search term, then select an item from the list. If you want to search for a specific item, check Exact Phrase. All other options provide information that can be selected from the search box list.
- Click Find.
Optional: On the top ribbon, click F1 Results. In the Find Within Results search box, enter clarifying information, then click F3 Find Next or F4 Find Prev.
- In the Qty column, click the quantity box on the line item, then enter the amount of items that you want to add to the invoice.
Optional: To search beyond your inventory for a special order item, click F2 Vendor Site.
- Click F8 Add Items to Invoice.
How to use Advanced Lookup to add items from an existing invoice to a new invoice
- In Paladin, on the top ribbon, select the Invoice/Quote module.
- On the bottom ribbon of the module, click F1 Advanced Lookup.
- Click the History tab.
- Click to select one of the following options:
- Invoice
- Part
- Part + Customer
Note: You can only use the Part + Customer option for a customer that has been added to the invoice.
- Perform one of the following procedures:
-
- To search by Invoice, enter the invoice number, then click Find.
- To search by Part, enter the part number, then click Find.
- To search by Part + Customer, enter a part number, then click Find.
- Optional: On the top ribbon, click F1 Results. In the Find Within Results search box, enter clarifying information, then click F3 Find Next or F4 Find Prev.
- To add an item to a new invoice, double-click in the Qty box, enter the amount of items that you want to add, then click F8 Add Items to Invoice.
How to use Advanced Lookup to find and add a customer to an invoice
- In Paladin, on the top ribbon, select the Invoice/Quote module.
- On the bottom ribbon of the module, click F1 Advanced Lookup.
- Click the Customer tab.
- Enable one of the following options:
- All
- Name
- Account Number
- Address
- Phone
- Rewards Number
- Ace Nat’l Lookup (This is only available to Ace Hardware stores.)
- In the Keyword Search box, enter a search term, then click Find.
- Click to select the line item of the customer that you want to add, then click F8 Select Customer. You will return to the Invoice/Quote tab where you can add more items to the invoice.
Advanced Lookup invoice history
In the Invoice/Quote module, when a customer account is not selected, and you click F1 Advanced Lookup, then click the History tab, the default search text is Recent Cash Sales. If you click Find, the search displays all cash sales from the last 48 hours that are not associated with a customer account.
To view a complete history of all cash sales that are not associated with a customer account:
- In Paladin, on the top ribbon, select the Customers module.
- On the bottom ribbon of the module, click F1 Advanced Lookup.
- On the top ribbon of the Advanced Lookup window, enable All.
- Enter “cash” in the Keyword Search box.
- Click Find.
- Recall the Cash Sale customer account (Account # 0).
- Click the Credit tab.
- In the Sales History pane, click the magnifying glass next to Customer Friendly.
All cash sales not associated with a customer account will be shown.
Note: These same steps can be used to search for an invoice for a specific customer. To do this, instead of searching for the “Cash Sale” customer account, search for the appropriate customer account name.
How to use Advanced Lookup to find an inventory item
- In Paladin, on the top ribbon, select the Inventory module.
- On the bottom ribbon of the module, click F1 Adv. Lookup.
- In the Adv. Lookup window, enable one of the following options:
- Class
- Department
- Location
- Supplier
- Keyword
Note: If you have selected Keyword as a search parameter, in the search box, enter a search term, then select an item from the list. If you want to search for a specific item, check Exact Phrase. All other options provide information that can be selected from the search box list.
- Click Find.
- Optional: On the top ribbon, click F1Results. In the Find Within Results search box, enter clarifying information, then click F3 Find Next or F4 Find Prev.
- In the Select column, click to select the check box next to the inventory item that you want to edit.
- Optional: To search beyond your inventory for a special item, click F2 Vendor Site.
- Click F8 Edit Part.
The Inventory tab opens with details.
How to use Advanced Lookup to add items to a purchase order
- In Paladin, on the top ribbon, select the PO module.
- On the bottom ribbon of the module, click F1 Advanced Lookup.
- In the Advanced Lookup window, enable one of the following options:
- Class
- Department
- Location
- Supplier
- Keyword
Note: If you have selected Keyword as a search parameter, in the search box, enter a search term, then select an item from the list. If you want to search for a specific item, check Exact Phrase. All other options provide information that can be selected from the search box list.
- Click Find.
- Optional: On the top ribbon, click F1 Results. In the Find Within Results search box, enter clarifying information, then click F3 Find Next or F4 Find Prev.
- To add an item to a new invoice, double-click in the Qty box, enter the amount of items that you want to add, then click F8 Add Items to Invoice.
- Optional: To search beyond your inventory for a special item, on the top ribbon, click F2 Vendor Site.
How to use Advanced Lookup to search for a customer account
- In Paladin, on top ribbon, select the Customers module.
- on the bottom ribbon of the module, click F1 Advanced Lookup.
- In the Advanced Lookup window, enable one of the following options:
- All
- Name
- Account Number
- Address
- Phone
- Rewards Number
- Ace Nat’l Lookup (This is only available to Ace Hardware stores.)
- In the Keyword Search box, enter a search term, then click Find.
- Highlight the Customer Name, then click F8 Select Customer.
How to use Advanced Lookup to do a secondary search
A secondary search lets you look for information within your first set of results. For example, you can search your inventory by supplier, then search for a particular supplier item.
The secondary search feature is supported for Paladin’s Invoice/Quote, Inventory, and PO modules.
- In Paladin, on the top ribbon, select either the Invoice/Quote, Inventory or PO module.
- On the bottom ribbon of the module chosen, click F1 Advanced Lookup (F1 Adv. Lookup in the Inventory module).
- Choose your search options and perform an initial search.
Note: Advanced Lookup search options change depending on the module that you are in and what you are looking for.
- To perform a secondary search limited to your first set of results, click F1 Results.
Note: If a Results button does not appear, the secondary search is not available.
- In the Find within Results box, enter a search term, then click F3 Find Next. If a result is found, that row will be highlighted.
-
- To move to the next result, click F3 Find Next again.
- To reverse the search, click F4 FindPrev. As you look through the results, you can enter item quantities or select multiple rows (depending on the search).
How to enable product pictures/images to be viewed in Advanced Lookup
Images of parts can be downloaded to your computer and viewed through Advanced Lookup in either Paladin’s Invoice/Quote module or Inventory module. When set up, the function will run 10 minutes nightly adding or updating images.
|
Feature Available To |
Requirements |
|
Database version 4.67 |
|
Paladin must be version 6431.1 or higher. |
|
Paladin must be version 5672.1 or higher. A Subscription Key must be provided (refer to: Do It Best API Subscription for instruction on creating the key). |
Note: For Ace and True Value, there are no additional settings required other than the setup instructions that follow. But, for Do It Best, a Subscription Key must be provided.
To set up Do It Best for images
- In Paladin, from the main menu, select File > Setup.
- Select the Supplier tab.
- In the EDI System Choice pane, select Do It Best from the list.
- Enter a DIB API Subscription Key.
- Click Save, then click Close.
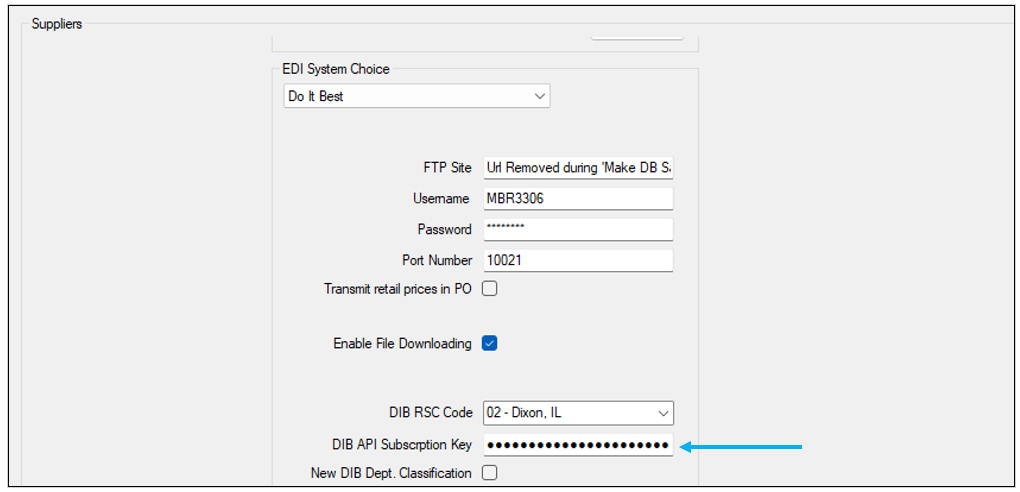
Figure 1: DIB API Subscription Key
To set this feature
- On a terminal dedicated for keeping images, open Paladin, and from the main menu, select File > Setup.
- Select the Company tab.
- In the Inventory pane, enter \\servername\sharename in the Image Network Share box, where:
servername = your server’s name
sharename = whatever you want the share name to be
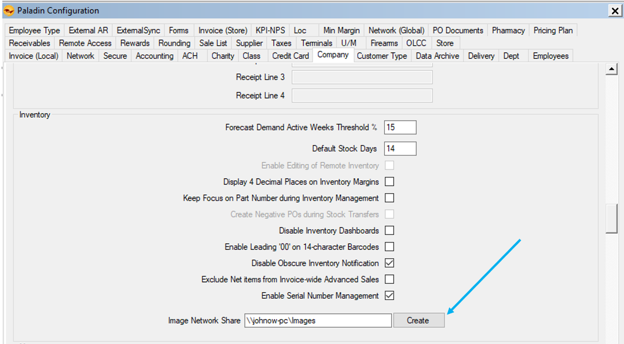
Figure 2: Company tab/Image Network Share option
- Click Create. A folder will be created on the server.
Note: You don’t have to use the Create button if you already have an existing share you want to use. You can just enter that location.
- Click Save, then click Close.
API calls (non-EDI) will be made nightly for 10 minutes to populate the Image file.
Note: Do not turn off the terminal associated with the Image file. The nightly 10 minute window may take several evenings to populate all images. Not all products will have an associated image.
Important: Pictures/images may not show on other terminals. You may need to restart Paladin on those terminals.
To view images
- On the top ribbon of Paladin, select the module (Invoice/Quote or Inventory).
- On the bottom ribbon of the module, select F1 Advanced Lookup (F1 Adv. Lookup in the Inventory module).
- In the Advanced Lookup window, enable how you want to find items. The options are:
-
- Class
- Department
- Location
- Supplier
- Keyword
- After you have enabled your search parameter, click Find >>. The Advanced Lookup window will populate with parts and their corresponding data.
- Find and click the magnifying glass next to a part. An image of that part opens.
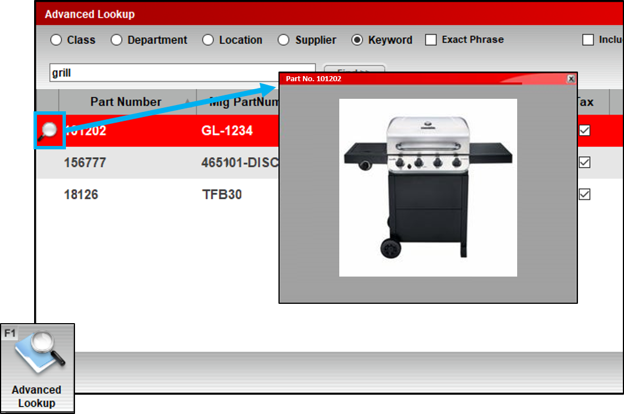
Figure 3: Image of a part
How to add a vendor web site to Advanced Lookup
- In Paladin, from the main menu, select File > Setup.
- Select the Supplier tab.
- In the Suppliers pane, enable the Active option, then click the vendor site that you want to include in the Advanced Lookup feature.
- In the Website URL box, enter the vendor’s URL that you want to appear in Advanced Lookup.
- Click Save, then click Close.
If you have questions or suggestions about this information, contact support@paladinpos.com.
